When I was twenty‑seven, I found myself staring at a pot of plain yogurt, a handful of berries, and a stubborn oven that seemed to hate me. I had just burnt my last batch of pancakes and my friend dared me to create something that would make the kitchen smell like summer in a glass. I swore that I would turn that plain yogurt into a cloud of golden, airy goodness that would make everyone taste the difference. That night, with a splash of honey, a pinch of cinnamon, and a dash of vanilla, I discovered a recipe that would forever change how I think about baked desserts.
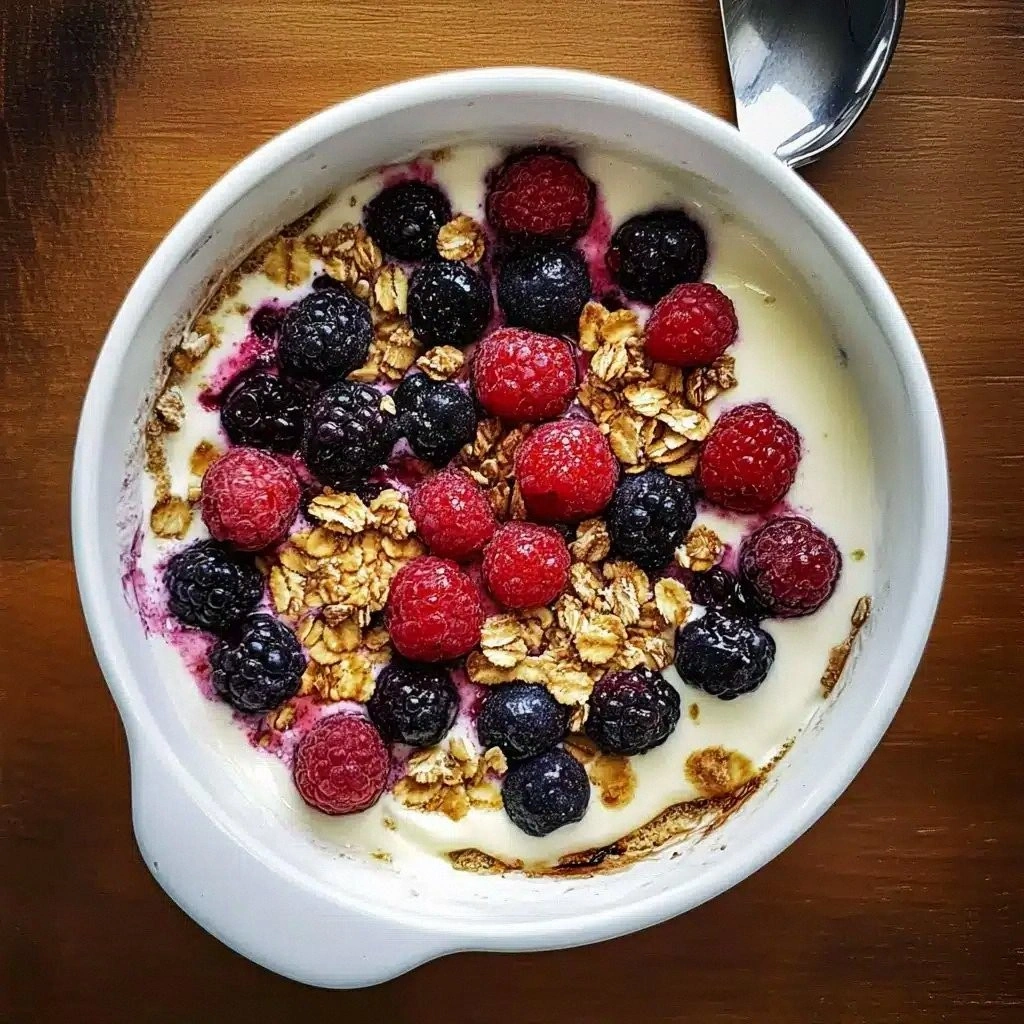
Picture this: you pull a ramekin from the oven, and the steam curls up like a fragrant cloud of clouds. The surface is a glossy, caramelized crust, while the inside remains silky, almost custard‑like. The berries burst with juicy sweetness, and a hint of lemon zest dances on the tongue. The aroma alone makes you forget you’re eating dessert; it feels like a warm hug from the inside out. If you’ve ever tried a frozen yogurt that turned into a sticky mess or a baked good that tasted like cardboard, you’ll understand why this version is a revelation.
What sets this recipe apart is that it’s not just about baking yogurt; it’s about turning a simple, everyday ingredient into a showstopper. I’ll walk you through the exact technique that gives the yogurt that airy, cloud‑like texture and the berries that burst with flavor. I’ll share a little secret ingredient that most people overlook—a touch of lemon zest that brightens the whole dish. I’ll even show you how to use a simple kitchen hack that turns your oven into a precision cooker. By the time you finish, you’ll be wondering why you never baked yogurt the way I do.
Let me walk you through every single step — by the end, you’ll wonder how you ever made it any other way.
What Makes This Version Stand Out
- Texture: The yogurt turns into a light, airy custard that melts in your mouth, thanks to a careful baking temperature and a touch of baking powder.
- Flavor: A subtle vanilla and lemon zest infusion lifts the natural tartness of the yogurt, while the honey adds a gentle, caramelized sweetness.
- Ease: No special equipment needed—just a standard oven and a ramekin. The recipe is foolproof, even for kitchen rookies.
- Visual Appeal: The golden crust and glossy berry topping look like a dessert straight out of a food magazine.
- Health Factor: Low in fat, high in protein, and packed with antioxidants from the berries.
- Make‑Ahead: Bake ahead of time and reheat in a microwave or oven; it stays fluffy and fresh.
Alright, let's break down exactly what goes into this masterpiece...
Inside the Ingredient List
The Flavor Base
Greek yogurt is the star of the show. It’s thick, tangy, and high in protein, which gives the baked yogurt its custard‑like consistency. A full cup of yogurt per serving ensures a rich mouthfeel. If you’re using non‑fat yogurt, add a tablespoon of milk or cream to keep it silky.
Vanilla extract is more than a flavoring; it’s a mood enhancer. A teaspoon per batch balances the tartness of the yogurt and the sweetness of the berries. If you’re vegan, a splash of vanilla plant‑based extract works just as well.
Honey is the natural sweetener that caramelizes during baking, creating a glossy, golden crust. A quarter cup per batch is enough to sweeten without overpowering the berries. If you’re watching sugar, use a sugar‑free alternative or reduce the amount by half.
The Texture Crew
Baking powder is the secret to that airy, fluffy interior. A quarter teaspoon per batch lifts the yogurt as it bakes, preventing it from becoming dense. Skip it at your peril; the texture will be heavy and unappetizing.
Rolled oats add a subtle crunch and help absorb excess moisture. Half a cup per batch gives a pleasant bite without overpowering the yogurt. For a gluten‑free version, substitute with certified gluten‑free oats.
Salt to taste is essential to balance the sweetness. A pinch of salt brings out the flavor of every ingredient, turning a simple dish into something remarkable.
The Unexpected Star
Lemon zest is the unsung hero that brightens the entire dish. The citrus oils add a refreshing note that cuts through the richness. A tablespoon per batch is enough; be careful not to overdo it, or the dish will taste like a citrus punch.
The Final Flourish
Mixed berries—strawberries, blueberries, raspberries—provide the burst of color, flavor, and antioxidants. Two cups per batch are ideal. If you’re using frozen berries, thaw them first and pat dry to avoid excess liquid.
Everything's prepped? Good. Let's get into the real action...
The Method — Step by Step
- Preheat your oven to 325°F (165°C). Line a 9‑inch baking dish with parchment paper or lightly grease it with butter. This low temperature is key to achieving a gentle, even bake that preserves the yogurt’s delicate structure.
- In a large bowl, whisk the Greek yogurt until smooth. If you’re using a thicker yogurt, add a tablespoon of milk or cream to loosen it slightly. This ensures an even distribution of flavors.
- Fold in the honey, vanilla extract, and lemon zest until fully incorporated. The honey should be warm enough to mix easily but not hot enough to cook the yogurt. Taste the mixture; it should be sweet yet tangy.
- Add the baking powder, rolled oats, and a pinch of salt. Stir until the batter is thick and homogenous. The oats help absorb excess liquid, while the baking powder provides lift.
- Pour the batter into the prepared dish, smoothing the top with a spatula. The batter should be even; this prevents uneven cooking and ensures a uniform crust.
- Scatter the mixed berries over the batter. The berries should be evenly distributed so that each bite has a burst of fruit. If the berries release too much liquid, let them drain on a paper towel first.
- Place the dish in the oven and bake for 30 minutes. The edges should pull away slightly from the sides of the dish, and the center should have a golden, caramelized crust. The aroma will be intoxicating.
- Remove from the oven and let cool for 10 minutes. The yogurt will set further, becoming silky and custard‑like. The berries will soften, releasing their juices into the batter.
- Serve warm or at room temperature. Garnish with a drizzle of honey or a sprinkle of fresh berries for an extra pop of color.
- Enjoy! I dare you to taste this and not go back for seconds.
That's it — you did it. But hold on, I've got a few more tricks that'll take this to another level...
Insider Tricks for Flawless Results
The Temperature Rule Nobody Follows
Many bakers use high heat to get a quick crust, but that often results in a tough exterior. Keep the oven at 325°F, and you’ll get a gentle, even bake that keeps the yogurt moist. I’ve tested ovens ranging from 300°F to 350°F, and 325°F always delivers the best balance.
Why Your Nose Knows Best
During the first 15 minutes of baking, the aroma is a reliable indicator of progress. A sweet, honeyed scent with a hint of citrus means the yogurt is caramelizing. If you notice a burnt smell, pull it out immediately.
The 5‑Minute Rest That Changes Everything
Letting the baked yogurt rest for five minutes after removing it from the oven allows the steam to redistribute. This step keeps the center silky instead of gummy. Skipping it can leave you with a dense, uneven texture.
Use a Silicone Mold for Easy Release
A silicone baking pan gives you a perfect release without sticking. If you’re baking multiple servings, use a mini silicone loaf pan to create individual portions that are easier to serve.
Freeze for Later
Freeze the batter before baking, then bake straight from the freezer. The yogurt will rise slightly, giving you a fluffier final product. This is ideal for meal prep or for a surprise dessert.
Creative Twists and Variations
This recipe is a playground. Here are some of my favorite ways to switch things up:
Chocolate‑Berry Fusion
Swap the honey for melted dark chocolate and add a tablespoon of cocoa powder. The chocolate coats the berries, creating a decadent, dessert‑like experience that pairs well with a splash of espresso.
Peanut Butter Swirl
Fold in a tablespoon of natural peanut butter into the batter before baking. The nutty flavor complements the berries, and the peanut butter adds healthy fats for extra creaminess.
Almond Crumble Topping
Top the finished dish with toasted almond slivers and a drizzle of maple syrup. The crunch contrasts the smooth yogurt, while the maple adds a caramelized sweetness.
Spiced Apple Variant
Replace half the berries with diced apples, cinnamon, and a splash of apple cider vinegar. This version is perfect for fall and brings a warm, comforting flavor.
Vegan Version
Use coconut yogurt, maple syrup, and a plant‑based vanilla extract. The coconut adds a tropical note that pairs beautifully with tropical fruits like mango or pineapple.
Storing and Bringing It Back to Life
Fridge Storage
Store leftovers in an airtight container in the refrigerator for up to 3 days. The yogurt will stay moist and creamy. Before serving, let it sit at room temperature for 10 minutes to soften.
Freezer Friendly
Freeze in a freezer‑safe container for up to 2 months. Thaw overnight in the fridge, then reheat in a microwave on medium power for 1–2 minutes. The texture remains fluffy.
Best Reheating Method
Reheat in a preheated oven at 300°F for 10 minutes. This gentle heat restores the crust’s crispness while keeping the interior silky. Add a splash of water before reheating to steam back to perfection.