I was halfway through a chaotic holiday cookie swap when my friend dared me to create something that would make every other dessert on the table look like a sad, under‑decorated tree. I stared at a pile of plain Oreos, a bag of white candy melts, and a handful of glittery sprinkles, and I thought, “What if I turned these humble sandwich cookies into a festive masterpiece that could double as a conversation starter and a midnight snack?” The kitchen was alive with the clatter of tins, the faint hum of the oven, and the distant jingle of holiday music that made my heart beat in sync with the rhythm of the season. The smell of melting chocolate drifted like a warm blanket, and I could already picture the glossy white coating catching the light like fresh snow on a pine branch.
I remember the first bite: the crisp Oreo snap, the creamy vanilla‑sweet filling, then that silky white shell that melted on my tongue, followed by a burst of red and green sparkle that made my eyes widen in pure, unfiltered joy. It was as if I had taken a bite out of a Christmas card, and the flavors performed a synchronized dance that left my taste buds chanting “more, more, more!” I dare you to taste this and not go back for seconds—because once you’ve experienced that perfect balance of crunchy, creamy, and candy‑kissed, ordinary cookies will forever feel like bland understudies.
Most recipes for chocolate‑covered Oreos either drown them in a sea of dark chocolate or skip the festive flair entirely, leaving you with something that looks and tastes… well, just “chocolate.” Here’s the game‑changer: a three‑layer coating that starts with a white candy‑melt base, then a splash of red and green, and finally a shower of Christmas sprinkles that turn each bite into a tiny holiday fireworks show. I’ll be honest — I ate half the batch before anyone else could get a hand, and that was the best mistake I ever made.
In this post I’m spilling every secret, from the exact melt‑temperature that keeps the white coating glossy, to the timing trick that prevents the sprinkles from sliding off. You’ll learn why a quick chill in the freezer after the first coat is the secret weapon that keeps the colors sharp, and why using a silicone baking mat is the only way to avoid sticky disasters. Picture yourself pulling a tray of glittering Oreos out of the freezer, the whole kitchen smelling like a winter wonderland, and the anticipation building as you watch the sprinkles catch the light. Let me walk you through every single step — by the end, you’ll wonder how you ever made it any other way.
What Makes This Version Stand Out
- Texture: The triple‑coat system gives you a crisp outer shell, a soft middle, and the classic Oreo crunch—all in one bite.
- Flavor: The sweet vanilla of the white melt balances the cocoa of the Oreo, while the red and green accents add a subtle fruity note that screams holiday.
- Simplicity: No fancy tempering or specialty equipment—just a microwave, a spatula, and a little patience.
- Visual Impact: The contrast of snowy white with bright red and green sprinkles turns each cookie into a miniature piece of festive art.
- Crowd Reaction: Guests constantly ask for the recipe, and the “wow” factor is so strong that even the toughest food critics become instant fans.
- Ingredient Quality: Using premium candy melts and fresh‑packaged Oreos ensures a clean, non‑greasy finish that lasts.
- Make‑Ahead Potential: Once coated, they store beautifully for up to a week, making them perfect for holiday parties or gift bags.
- Versatility: Swap out the red and green for any color you like, or add flavored extracts for a personalized twist.
Inside the Ingredient List
The Flavor Base
The star of the show is the classic Oreo itself—two chocolate wafers sandwiching a sweet, vanilla‑infused cream. This foundation provides a buttery crunch that pairs perfectly with the creamy white melt. Skipping the Oreo would be like trying to make a Christmas tree without a trunk; you lose the structural integrity that holds everything together. If you’re feeling adventurous, try double‑stuf Oreos for an extra creamy center, but remember the coating will need a tad more time to set.
The Color Crew
White Candy Melts act as the snowy blanket that covers each cookie, while the red and green melts add festive pops of color. The white melt is essentially white chocolate with added stabilizers, giving it a smooth, glossy finish that doesn’t seize when heated properly. The red and green melts are just as forgiving, but they’re more prone to blooming (that white film you see on chocolate) if they get too hot, so keep your temperature low and steady. If you can’t find candy melts, high‑quality white, red, or green chocolate chips work just as well—just add a teaspoon of vegetable oil to keep the flow.
The Final Flourish
Christmas Sprinkles are the tiny confetti that transform a simple cookie into a holiday spectacle. They’re made from sugar, cornstarch, and food‑grade dyes, and they add a satisfying crunch that contrasts with the smooth coating. If you’re allergic to artificial colors, opt for natural sprinkles made from beet juice or spirulina powder. A pro tip: store sprinkles in an airtight container; humidity is their nemesis and will make them clump, ruining the visual appeal.
Everything's prepped? Good. Let's get into the real action…
The Method — Step by Step
Gather all your ingredients and line a large baking sheet with a silicone mat. This mat prevents the melted candy from sticking and makes cleanup a breeze. I like to set the sheet a few inches from the edge so the cookies have room to spread without touching each other.
Break the Oreos in half and lay each half flat‑side up on the mat. This orientation ensures the creamy filling stays exposed for the coating. If you’re using double‑stuf, you might want to gently press the halves together so the filling doesn’t ooze out later.
Place the white candy melts in a microwave‑safe bowl (about 2 cups) and melt them on medium power for 30‑second bursts, stirring between each burst. The mixture should be smooth and glossy, not grainy. Power transition: This is the moment of truth—if the melt looks dull, you’ve over‑heated it, and it will seize.
Using a fork or a small offset spatula, dip each Oreo half into the white melt, letting excess drip off. The coating should be about 1‑2 mm thick—enough to cling but not so thick that it drowns the cookie. Place the coated halves back on the silicone mat; they’ll look like tiny snowballs.
Immediately after the white coat, dip half of each cookie into the red melt, then the other half into the green melt. This creates a festive half‑and‑half pattern that looks like a candy‑cane swirl when you later add sprinkles. Watch Out: The red and green melts set faster than white, so work quickly or they’ll harden on the spatula.
While the colored coating is still tacky, sprinkle a generous handful of Christmas sprinkles over each cookie. The sprinkles will cling to the wet chocolate like confetti to frosting. For an extra sparkle, try using edible gold dust on a few cookies for a luxe holiday touch.
Transfer the entire sheet to the freezer for 10‑15 minutes. This quick chill firms the coating, locks in the colors, and prevents the sprinkles from sliding off when you stack the cookies later. The freezer also makes the coating snap back into a firm, glossy finish when you bite into it.
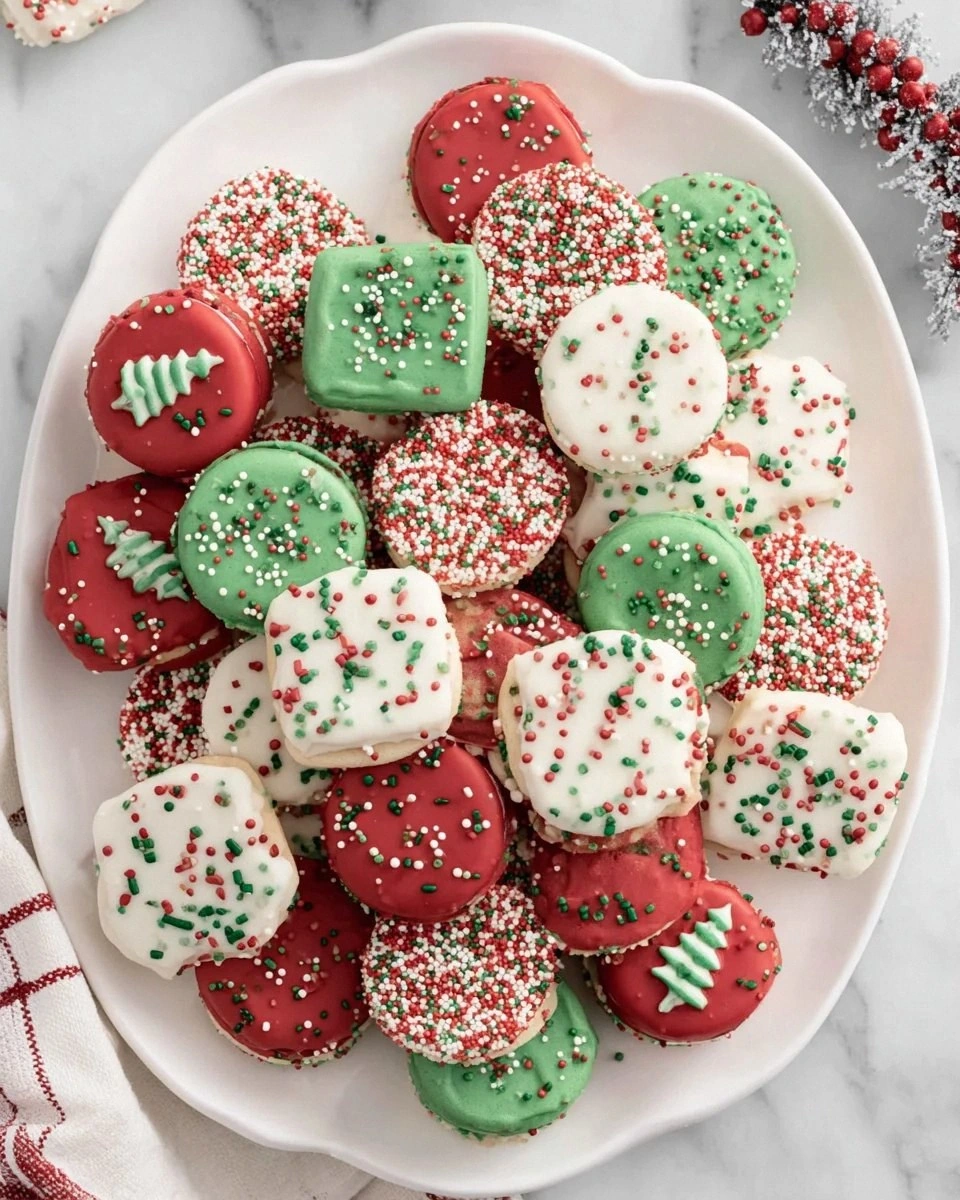
After chilling, gently lift the cookies using a thin spatula and arrange them on a decorative platter. If you’re gifting them, place each cookie in a clear cellophane bag tied with a red ribbon. The final product should look like a snow‑kissed, candy‑colored forest of tiny treats.
That's it — you did it. But hold on, I've got a few more tricks that'll take this to another level…
Insider Tricks for Flawless Results
The Temperature Rule Nobody Follows
Never melt candy melts on high heat. Even a few seconds too long will cause the sugars to caramelize, turning your glossy white coating into a dull, grainy mess. Keep the microwave at 50‑60% power and stir every 20 seconds. I once tried to speed things up and ended up with a batch that looked like frosting gone wrong—lesson learned.
Why Your Nose Knows Best
When the white melt is ready, you’ll smell a faint buttery aroma that signals it’s at the perfect temperature. If you can’t smell anything, it’s still too cool; if it smells burnt, you’ve gone too far. Trusting your nose saves you from a costly redo and gives you that “just‑right” shine.
The 5‑Minute Rest That Changes Everything
After the first white coat, let the cookies sit for five minutes before adding the colored layers. This pause allows the base to set just enough to hold the next coat without bleeding. Skipping this step results in a muddy swirl rather than a clean half‑and‑half design.
The Sprinkles Stick Trick
If sprinkles keep sliding off, dust the coated cookies lightly with powdered sugar before sprinkling. The sugar creates a micro‑grip that holds the colorful bits in place. I tried this once for a batch of gingerbread cookies and the sprinkles stayed put through a week of storage.
Freezer Flash Freeze
A quick 2‑minute blast in the freezer after each dip prevents the colors from blending. It’s like giving each layer a tiny pause to say “I’m ready” before the next one arrives. This trick is pure magic for anyone who wants crisp, distinct stripes.
Creative Twists and Variations
This recipe is a playground. Here are some of my favorite ways to switch things up:
Peppermint Twist
Swap the red candy melt for crushed peppermint bark and add a dash of peppermint extract to the white melt. The result is a cool, minty bite that pairs perfectly with hot cocoa. Great for those who love a refreshing holiday punch.
Chocolate‑Dipped Delight
Instead of white melt, use dark chocolate for the base, then drizzle white and red melts in a festive swirl. This gives you a sophisticated, bittersweet flavor profile that adult guests adore.
Nutty Noel
Add finely chopped toasted almonds to the white melt before dipping. The nuts add a subtle crunch that contrasts beautifully with the smooth coating, and the nutty aroma brings a warm, cozy feel.
Fruit‑Infused Fun
Mix a teaspoon of orange zest into the white melt and use orange‑colored candy melts instead of red. The citrus note brightens the flavor and gives the cookies a sunny holiday vibe.
Vegan Version
Replace the candy melts with vegan chocolate chips (add a splash of coconut oil) and use dairy‑free sprinkles. The texture stays the same, and you can serve these at a plant‑based potluck without missing a beat.
Storing and Bringing It Back to Life
Fridge Storage
Place the cookies in an airtight container lined with parchment paper. They’ll stay fresh for up to 5 days, and the fridge keeps the coating from softening in warm weather. If you notice a slight loss of sparkle, a quick flash in the microwave (10 seconds) restores the gloss.
Freezer Friendly
For longer keep‑time, arrange the cookies on a tray, freeze solid for 30 minutes, then transfer to a zip‑top bag. They’ll survive up to a month without losing texture. When you’re ready to serve, let them thaw at room temperature for 15 minutes, then give them a brief 5‑second blast in a 300°F oven to re‑crisp.
Best Reheating Method
If the coating feels a bit soft, place the cookies on a parchment‑lined baking sheet and warm them in a preheated 300°F oven for just 3‑4 minutes. Adding a tiny splash of water (a teaspoon) to the bottom of the oven creates a gentle steam that revives the crispness without melting the chocolate.