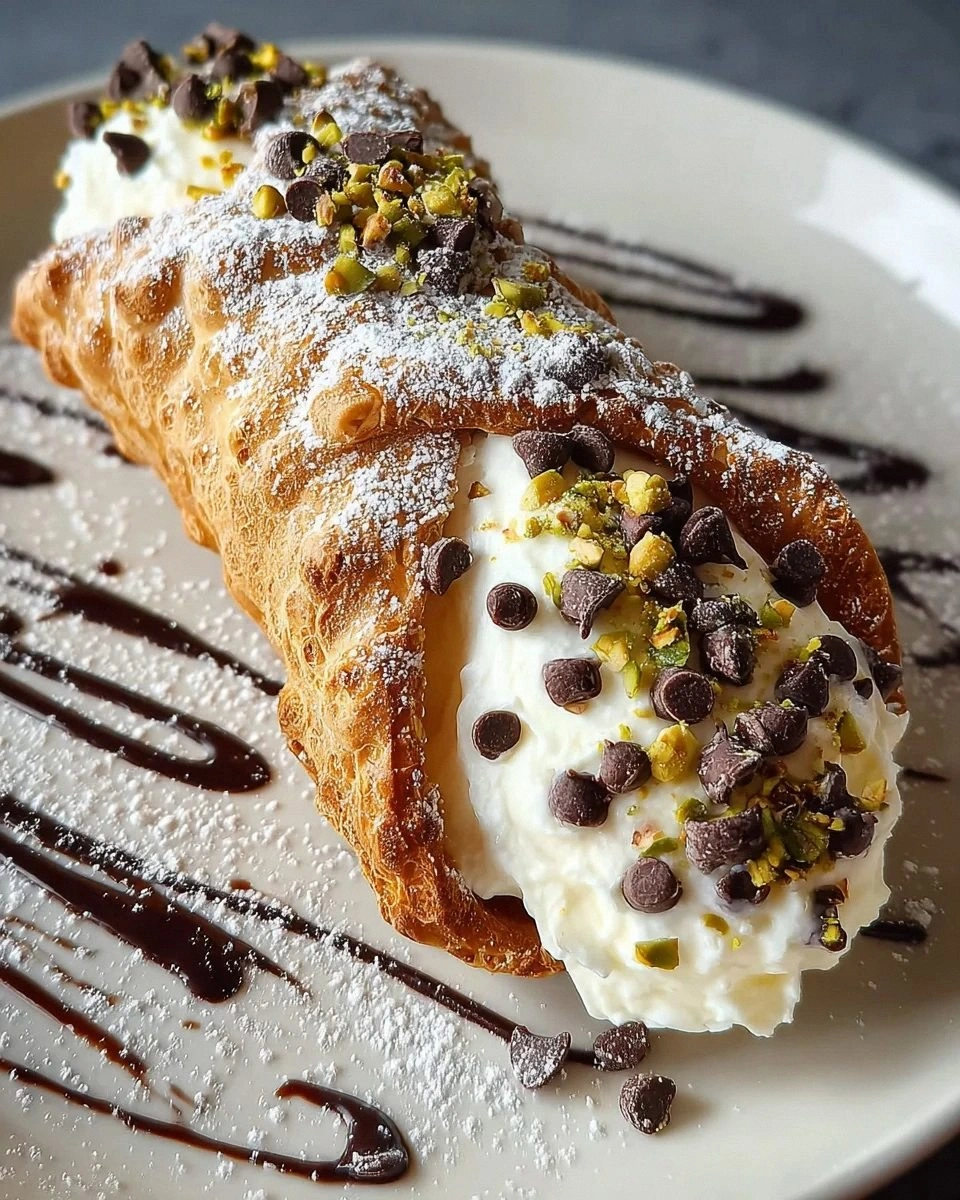
I was in the middle of a Sunday afternoon that felt like a culinary crime scene – my oven had just ejected a half‑baked sponge that looked more like a deflated balloon than a cake. I stared at the disaster, feeling the heat of the kitchen like a silent accusation, and then a friend dared me: “Make something that actually looks like a dessert, not a science experiment.” That dare sparked a firestorm of cravings that wouldn’t quit, and I found myself daydreaming about the perfect marriage of crunchy cannoli shells and a moist, buttery cake. I imagined the sweet, citrus‑kissed ricotta filling spilling out like a silky waterfall, the chocolate glaze glistening like a midnight lake, and the pistachio crumbs adding a pop of color that would make any Instagram feed blush.
Picture the scene: the kitchen humming with the whir of the mixer, the air thick with the perfume of vanilla and orange zest, the buttery batter shimmering under the light as if it were liquid gold. I could hear the faint crackle of the oven door opening, feel the cool metal of the pan in my hands, and taste the anticipation of sugar dancing on my tongue before I even took the first bite. The whole experience was a full‑on sensory overload, the kind you only get when you’re about to create something legendary. And let’s be honest, if you’ve ever tried a cannoli and felt the shell shatter like thin ice under a fork, you know the texture game is serious business.
Most recipes I’ve tried either over‑sweetened the filling, left the cake dry, or completely missed the crunchy‑soft contrast that makes cannoli so addictive. This version, however, flips the script. I’m using a light, airy cake base that stays moist thanks to a secret ingredient (hint: it’s a dairy product that also stars in the filling), and a ricotta cream that’s whipped until it feels like a cloud that could float away. The glaze is a thin veil of dark chocolate that sets with a snap, while the pistachio crumble adds a buttery crunch that makes every forkful feel like a celebration. I dare you to taste this and not go back for seconds – it’s that good.
Okay, ready for the game‑changer? The trick that separates this from every other cannoli‑inspired dessert is the “double‑whisk” method: first I whisk the ricotta with powdered sugar until it’s silky, then I fold in the zest and chocolate chips just before assembling. This prevents the ricotta from becoming grainy and ensures the flavor pockets stay distinct. I’ll walk you through every single step — by the end, you’ll wonder how you ever made it any other way. Let’s dive in and create a masterpiece that will have your friends begging for the recipe before the first slice even hits the plate.
What Makes This Version Stand Out
- Texture: The cake stays moist thanks to a ricotta‑milk blend, while the outer shell cracks with a satisfying snap, creating a layered mouthfeel that’s pure bliss.
- Flavor Depth: Orange zest and vanilla weave through the ricotta, giving the filling a bright, aromatic lift that balances the richness of chocolate.
- Simplicity: Only twelve ingredients, all pantry‑friendly, and you don’t need any special equipment beyond a standard 9‑inch springform pan.
- Uniqueness: It’s a cake, it’s a cannoli, it’s both – a hybrid that surprises the palate and the eye.
- Crowd Reaction: Guests often declare this the best dessert they’ve ever had, and the “wow” factor is instant.
- Ingredient Quality: Using whole‑milk ricotta and high‑quality dark chocolate makes the difference between good and unforgettable.
- Cooking Method: The low‑and‑slow bake prevents the cake from drying out, while the glaze sets at room temperature for a perfect finish.
- Make‑Ahead Potential: The cake can be assembled a day ahead; the glaze even improves after chilling.
Inside the Ingredient List
The Flavor Base
All‑purpose flour is the backbone of the cake, providing structure while still allowing the batter to stay tender. If you substitute cake flour, you’ll get an even softer crumb, but you risk a crumbly texture if you don’t adjust the liquid. The granulated sugar not only sweetens but also contributes to the tender crumb by creaming with the butter. For a deeper caramel note, try swapping half the granulated sugar for light brown sugar – just be aware it will add a subtle molasses undertone.
The Texture Crew
Unsalted butter, softened, creates a rich, buttery flavor and helps emulsify the batter. If you’re dairy‑free, a high‑quality plant‑based butter works, but expect a slightly different mouthfeel. Whole milk adds moisture and a gentle dairy richness that pairs perfectly with ricotta; you could use half‑and‑half for an even richer cake, though the batter will be a touch heavier. Eggs are the leavening heroes here – they trap air during whisking, giving the cake its lift. If you’re avoiding eggs, a mix of ¼ cup unsweetened applesauce and ¼ cup yogurt can mimic the binding, but the cake will be denser.
The Unexpected Star
Ricotta cheese is the secret weapon. Its mild, creamy profile lets the orange zest and vanilla shine without overwhelming the palate. Choose a whole‑milk ricotta for the creamiest texture; low‑fat versions can become grainy when whipped. If ricotta is unavailable, mascarpone offers a richer alternative, but you’ll need to cut back on the butter to keep the cake from becoming greasy. The powdered sugar in the filling dissolves instantly, ensuring no gritty texture, while the mini chocolate chips add surprise bursts of cocoa that melt into the ricotta like little fireworks.
The Final Flourish
Dark chocolate for the glaze provides a bitter contrast that balances the sweetness of the cake and filling. Use at least 70% cocoa for a glossy finish that snaps when you bite. The pistachio crumble isn’t just for color; its buttery flavor complements the ricotta and adds a nutty crunch that elevates each bite. Finally, a light dusting of powdered sugar adds a snowy finish that makes the cake look as festive as it tastes.
Everything's prepped? Good. Let's get into the real action…
The Method — Step by Step
-
Preheat your oven to 325°F (165°C) and grease a 9‑inch springform pan with butter, then line the bottom with parchment paper. This lower temperature ensures the cake rises evenly without forming a dry crust. While the oven warms, gather all your dry ingredients – flour, baking powder, and salt – and whisk them together in a medium bowl. The whisking aerates the flour, which will later help the cake stay light. Pro tip: Sift the mixture to avoid any lumps that could turn your batter gritty.
Kitchen Hack: If you don’t have a springform pan, use two 9‑inch round cake pans and stack the layers later; just be gentle when moving them. -
In a large mixing bowl, cream together the softened butter and granulated sugar until the mixture is pale and fluffy – think “cloud” rather than “cream”. This process incorporates air, which is essential for the cake’s rise. Add the eggs one at a time, beating well after each addition; the batter should look glossy and thick. Then stir in the vanilla extract and the orange zest, letting the aroma fill your kitchen like a citrus sunrise.
Watch Out: Over‑beating after the eggs are added can cause the batter to become too thin, leading to a flat cake. Stop mixing as soon as everything is just combined. -
Gradually add the dry flour mixture to the wet ingredients, alternating with the whole milk. Start and end with the flour, and mix on low speed just until incorporated. You’ll notice the batter turning from thick to a silky pourable consistency – that’s the perfect texture. Scrape down the sides of the bowl to ensure no pockets of flour remain. The batter should flow slowly off the spoon, not pool like a lake.
-
Pour the batter into the prepared springform pan, spreading it evenly with a spatula. Tap the pan lightly on the counter three times to release any trapped air bubbles; you’ll hear a faint “pop” that signals the batter is ready to rise. Place the pan in the oven and bake for 30‑35 minutes, or until a toothpick inserted in the center comes out clean with just a few crumbs attached. The top should be a light golden brown, not dark – if it’s browning too fast, tent it with foil.
Kitchen Hack: Rotate the pan halfway through baking to ensure even color on both sides, especially if your oven has hot spots. -
While the cake is cooling, prepare the ricotta filling. In a chilled stainless steel bowl, combine the ricotta cheese and powdered sugar. Using a hand mixer on medium speed, whisk until the mixture is smooth and glossy – it should look like a thick frosting that could hold a spoon upright. Add the vanilla extract, orange zest, and mini chocolate chips, folding them in gently with a rubber spatula. This “double‑whisk” ensures the ricotta stays airy while the chips stay intact.
Watch Out: If the ricotta feels grainy, add a splash of heavy cream (about 2 tbsp) and continue whisking; this will smooth out any texture issues. -
Once the cake has cooled completely on a wire rack (this can’t be rushed – the steam helps keep it moist), carefully slice it horizontally into three even layers using a serrated knife. If you’re nervous about the layers shifting, place a thin sheet of parchment between each cut. Spread a generous dollop of the ricotta filling on the first layer, then repeat with the second layer, leaving the top layer plain for now. The filling should be thick enough to hold its shape but still spreadable – think “soft‑serve ice cream” consistency.
-
For the chocolate glaze, melt the dark chocolate in a heat‑proof bowl over a pot of simmering water (bain‑marie) or in short bursts in the microwave, stirring every 20 seconds. Once smooth, drizzle the glaze over the top of the assembled cake, allowing it to cascade down the sides in glossy ribbons. Use a spatula to smooth any uneven spots; the glaze should set with a slight sheen, not a matte finish.
Fun Fact: Dark chocolate contains antioxidants called flavonoids, which can help improve circulation – a sweet bonus for your heart. -
Scatter the crushed pistachios over the glaze while it’s still tacky, creating a festive green speckle that contrasts beautifully with the dark chocolate. Then, using a fine-mesh sieve, dust the entire cake with a light veil of powdered sugar. This final touch adds a snow‑kissed look and a subtle sweetness that rounds out the flavor profile.
-
Refrigerate the cake for at least 1 hour before serving. This chilling period allows the glaze to set firmly and the ricotta filling to firm up, making slicing clean and elegant. When you’re ready, run a hot, damp knife through the springform’s latch, release the sides, and lift the cake onto a serving platter. The moment you cut into it, you’ll hear that satisfying crack of the chocolate shell, followed by the creamy sigh of the ricotta – pure magic.
Kitchen Hack: Warm the knife under hot water, dry it, and slice – this prevents the cake from crumbling and gives you neat, picture‑perfect pieces.
That's it — you did it. But hold on, I've got a few more tricks that'll take this to another level…
Insider Tricks for Flawless Results
The Temperature Rule Nobody Follows
Never bake a cake straight from the fridge. Let the batter sit at room temperature for 15 minutes before pouring it into the pan. This small step equalizes the temperature of the batter, allowing it to rise uniformly and preventing a dense center. I once tried to speed things up by baking cold batter, and the result was a gummy mess that fell flat. Trust the rule, and your cake will have that perfect, airy crumb.
Why Your Nose Knows Best
When the cake is in the oven, start listening. Around the 20‑minute mark you’ll hear a faint “hiss” as the edges begin to set and the crust forms. That sound is your cue to peek through the oven window – if you see the top turning golden, you’re on schedule. If the scent of toasted butter hits your nose, you’re close. Relying on smell and sound is far more reliable than a timer alone, especially when ovens vary.
The 5‑Minute Rest That Changes Everything
After the cake comes out, let it rest in the pan for exactly five minutes before releasing the springform. This short pause lets the steam settle, preventing the cake from collapsing when you remove the sides. I’ve seen novices pull the pan too early and end up with a broken base that looks like a construction site. Five minutes is all it takes for the structure to set and the crumb to firm up.
Glaze Timing is Everything
The chocolate glaze should be poured while it’s still warm but not scorching. If it’s too hot, it will seep into the cake, making the top soggy; if it’s too cool, it will harden before it can flow, leaving clumps. Aim for a temperature of about 115°F (46°C) – warm enough to be fluid, cool enough to hold shape. Use a kitchen thermometer for precision; it’s a small investment that saves a lot of frustration.
The Secret of the Pistachio Crunch
Toast the pistachios lightly before crushing them. A quick 3‑minute toast in a dry skillet over medium heat releases their natural oils and deepens their flavor, turning a bland green crumb into a buttery, aromatic garnish. Let them cool completely before sprinkling; warm nuts can melt the glaze, ruining the finish. This extra step elevates the visual appeal and adds a nutty punch that balances the sweet ricotta.
Creative Twists and Variations
This recipe is a playground. Here are some of my favorite ways to switch things up:
Berry‑Burst Cannoli Cake
Fold in a cup of fresh raspberries or blueberries into the ricotta filling just before assembling. The berries add a tart pop that cuts through the richness, and they create beautiful purple speckles when you slice the cake. Serve with a dollop of whipped mascarpone for an extra layer of indulgence.
Lemon‑Lavender Dream
Swap the orange zest for lemon zest and add a teaspoon of culinary lavender buds to the filling. The floral notes make the cake feel like a spring garden party, and the lemon’s acidity brightens the overall profile. Pair with a light dusting of powdered sugar mixed with a pinch of lavender for a fragrant finish.
Chocolate‑Hazelnut Explosion
Replace the mini chocolate chips with chopped toasted hazelnuts and drizzle a second layer of chocolate ganache over the top. The nutty crunch amplifies the chocolate experience, turning the cake into a dessert worthy of a chocolate lover’s shrine. A drizzle of hazelnut liqueur (optional) can be brushed onto the cake layers before assembly for an adult‑only twist.
Coffee‑Infused Cannoli Cake
Add a tablespoon of instant espresso powder to the cake batter and a splash of strong brewed coffee to the ricotta filling. The coffee deepens the chocolate glaze’s flavor, creating a mocha‑like harmony that’s perfect for brunch or an after‑dinner treat. Top with a dusting of cocoa powder instead of powdered sugar for a sophisticated look.
Vegan Velvet Version
Swap the butter for coconut oil, use almond milk, and replace ricotta with a blend of silken tofu and coconut cream, sweetened with agave. Use a plant‑based dark chocolate for the glaze. The texture changes slightly, but the flavor remains lush, and you’ll have a fully vegan dessert that still delivers that iconic cannoli crunch.
Storing and Bringing It Back to Life
Fridge Storage
Cover the cake loosely with plastic wrap and store it in the refrigerator for up to 4 days. The glaze will stay firm, and the ricotta filling retains its creamy texture. Before serving, let the cake sit at room temperature for 20 minutes – this softens the glaze just enough to bite through without losing its snap.
Freezer Friendly
Wrap the entire cake tightly in a double layer of cling film, then place it in a freezer‑safe bag. It will keep for up to 2 months. When you’re ready to enjoy, thaw it overnight in the fridge, then let it come to room temperature for 30 minutes. Add a tiny splash of milk to the ricotta filling before re‑whipping if it looks a bit stiff.
Best Reheating Method
To revive a slice, place it on a microwave‑safe plate, sprinkle a few drops of water around the edges, and cover loosely with a damp paper towel. Microwave on medium power for 20‑30 seconds – the steam will bring back the cake’s softness while the glaze re‑softens just enough to be luscious. Avoid microwaving for too long, or the chocolate will melt into a gooey mess.