Why you'll love this recipe
- Crowd-pleaser with elegant presentation
- Make-ahead for stress‑free entertaining
- Kid‑approved sweet‑tart flavor balance
- Restaurant-quality at home without fancy gear
- Gluten‑free option with simple swap
I still remember the summer heat pressing against the kitchen window while the oven hummed, and my niece giggled as she tried to catch the raspberry juice that escaped the tarts. The first bite was a perfect mess of buttery crumb, creamy vanilla, and bright berry that made us all sigh in unison. That moment turned a simple dessert into a family tradition, and every year I recreate it to capture that same sunshine on a plate. When the pandemic kept us home, I experimented with the gelatin technique to avoid a soggy filling, and the result was a firm yet airy cream that held its shape for days. My friends who tried it over video calls declared it "the best thing we’ve tasted through a screen," and I’ve never looked back.
The story
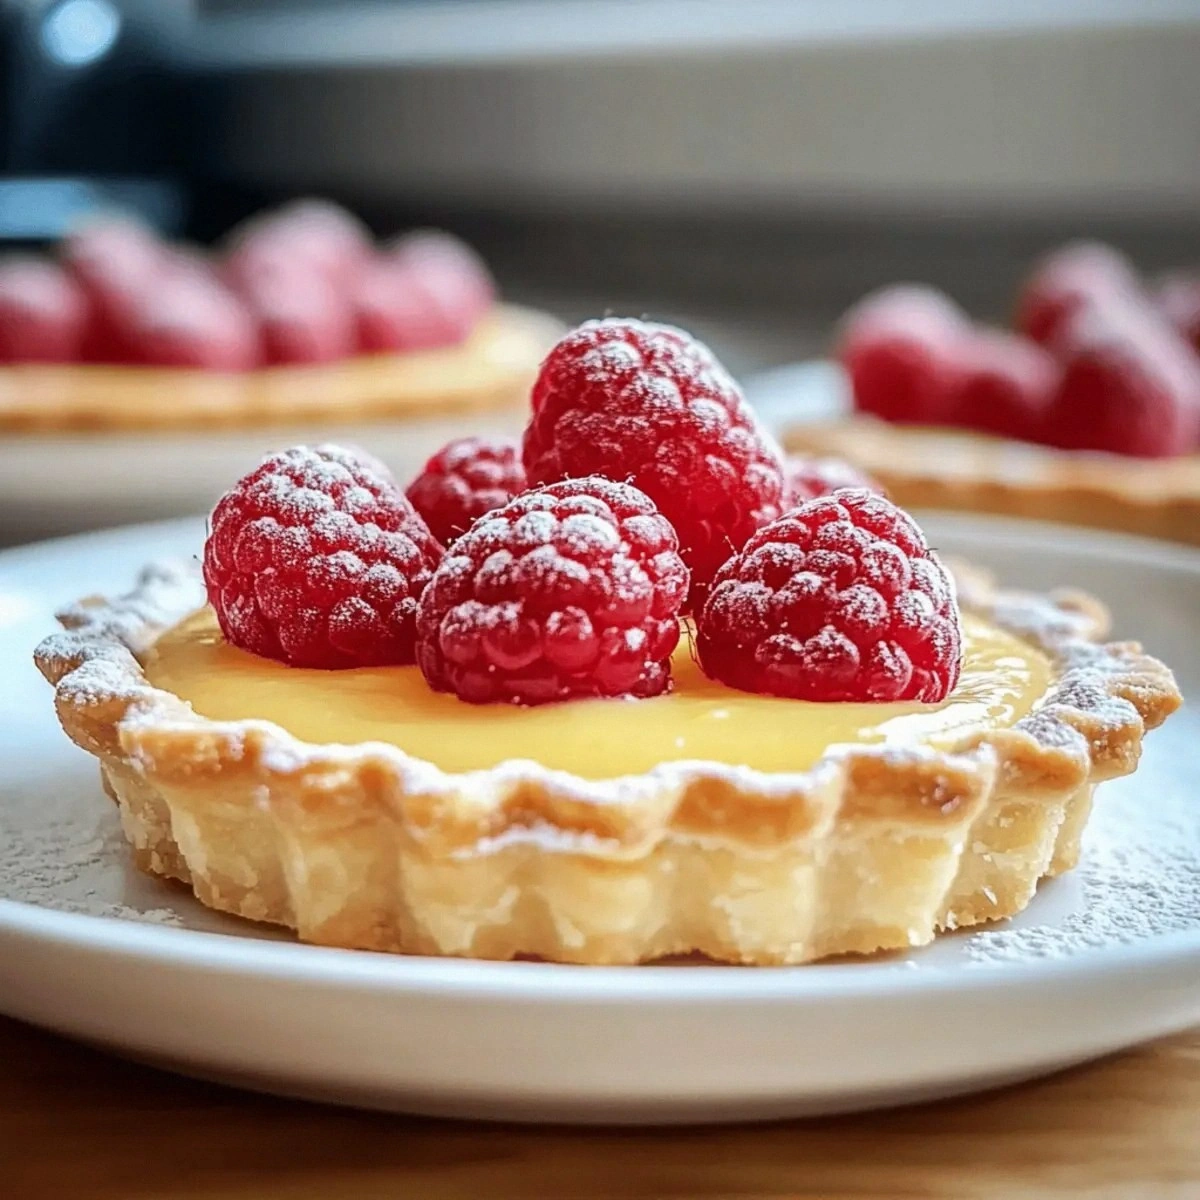
The moment the tart crust hits the oven, a buttery perfume fills the kitchen, and the golden edges begin to whisper. A faint steam rises, carrying hints of vanilla that tease your nose. One bite later, the silky filling melts against the crisp base, and the fresh raspberries burst like tiny fireworks. It's a mini celebration on a plate.
I first learned this tart from my grandmother during a lazy July afternoon, when the garden was awash with ripe berries. She showed me how to fold cold butter into flour until it looked like fine sand, and we laughed as the dough stubbornly clung to the rolling pin. That simple ritual turned into my go-to summer dessert, and I've been tweaking it ever since.
What sets this version apart is the gelatin‑stabilized vanilla cream, which holds its shape without becoming grainy, and the optional use of coconut cream for a dairy‑free twist. Most recipes skim over the chilling step, but we give the crust a full half‑hour chill and the filling a two‑hour set, guaranteeing a flawless texture every time.
The flavor journey starts with a buttery, slightly salty crust, followed by a velvety vanilla custard that’s sweet but never cloying. The topping of plump raspberries adds a bright acidic pop, while a whisper of mint lifts the whole palate. Each bite balances crisp, creamy, and tart in perfect harmony.
These tarts shine as a show‑stopping dessert for a weekend brunch, a light finish after a hearty dinner, or even a make‑ahead treat for a picnic. Slice them into elegant portions for a dinner party, or keep the whole pan for a family gathering. Pair them with a glass of chilled rosé or a dollop of whipped cream for extra indulgence.
Don’t let the multiple steps intimidate you; the dough comes together with just a pulse in a food processor, and the cream filling is whipped in minutes. The longest wait is the chilling time, which you can use to prep other dishes. With a little patience, the technique is straightforward and the results look bakery‑level.
After testing four different crust formulas and watching my kids devour three servings each, I can confidently say this tart has earned a permanent spot on our summer menu. Even my picky aunt, who claims she never likes anything “too sweet,” asked for seconds. Now it’s your turn to create that same delighted gasp.
Why This Recipe Works
- Cold butter creates steam pockets for a flaky crust.
- Gelatin dissolved in warm milk stabilizes the whipped cream without graininess.
- Chilling the crust and filling prevents shrinkage and ensures clean slices.
Ingredient notes & substitutions
All-Purpose Flour
Creates the sturdy yet tender crust that holds the creamy filling.
Unsalted Butter
Provides richness and flakiness; the cold butter creates the crumbly texture.
Heavy Cream
Delivers the silky, melt‑in‑your‑mouth filling and stabilizes the gelatin.
Pure Vanilla Extract
Adds depth and aromatic sweetness that ties the tart together.
Unflavored Gelatin
Sets the cream without making it rubbery, ensuring clean slices.
Equipment you'll need
Ingredients
- 1 cup All-Purpose Flour (Can substitute with gluten-free flour.)
- 1/2 cup Unsalted Butter (Margarine can be used as a substitute.)
- 1/4 cup Powdered Sugar (Granulated sugar can work in a pinch.)
- 1/4 teaspoon Salt
- 1 large Egg Yolk (An additional tablespoon of water can replace if needed.)
- 2 -3 tablespoons Cold Water
- 1 cup Heavy Cream (Use coconut cream as a non-dairy alternative.)
- 1/4 cup Granulated Sugar
- 1 teaspoon Pure Vanilla Extract (Vanilla beans or paste may be used for richer taste.)
- 1 teaspoon Unflavored Gelatin (Substitute with agar-agar for a vegetarian option.)
- 1/4 cup Milk (Any dairy or non-dairy milk can be used.)
- 1 cup Fresh Raspberries (Other berries like blueberries or strawberries can substitute.)
- Optional Mint Leaves (For garnish.)
Before You Start
- Preheat oven to 350°F
- Cut butter into cubes and chill
- Measure flour and sugar precisely
Instructions
- 1Step 1
Preheat your oven to 350°F (175°C) and lightly grease your tart pan.
- 2Step 2
Combine all-purpose flour, powdered sugar, and salt in a mixing bowl. Blend in softened unsalted butter until resembling coarse crumbs.
- 3Step 3
Mix in the egg yolk and cold water until the dough holds together. Wrap in plastic wrap and refrigerate for 30 minutes.
- 4Step 4
Roll out the dough until about 1/8 inch thick, transfer to the tart pan, prick the bottom, and bake for 15-20 minutes until golden brown. Cool completely.
- 5Step 5
Dissolve unflavored gelatin in warm milk in a small bowl. In another bowl, whip heavy cream with granulated sugar and vanilla extract until soft peaks form before folding in gelatin mixture.
- 6Step 6
Spread vanilla cream filling into the cooled tart base, cover, and refrigerate for at least 2 hours.
- 7Step 7
Before serving, top tarts with fresh raspberries and mint leaves. Keep chilled until serving.
Pro tips
Keep butter icy
Cut butter into small cubes and chill for at least 15 minutes before mixing.
Don’t over‑mix dough
Stop blending as soon as crumbs hold together; over‑mixting develops gluten and makes the crust tough.
Chill crust before baking
A 30‑minute chill prevents shrinkage and yields a flaky, buttery base.
Watch for golden edges
Remove the tart when the crust is a light golden brown; it continues to cook slightly from residual heat.
Gelatin must dissolve fully
Stir gelatin into warm milk until completely smooth before folding into the whipped cream.
Whip cream to soft peaks
Soft peaks give the filling body without becoming stiff, allowing the gelatin to set properly.
Layer raspberries just before serving
Add berries after chilling to keep them fresh and prevent the crust from getting soggy.
Variations to try
Dairy‑Free Coconut Version
Swap heavy cream for canned coconut cream and use agar‑agar instead of gelatin for a vegan-friendly tart.
Mixed Berry Twist
Combine raspberries with blueberries, blackberries, or sliced strawberries for a colorful, multi‑berry topping.
Mini Individual Tarts
Press the dough into a muffin tin for single‑serve tarts, perfect for parties or lunchboxes.
Serving Suggestions
Troubleshooting
Crust is soggy
Blind‑bake the crust longer and ensure it cools completely before adding filling.
Filling cracks
Do not over‑whip the cream; fold the gelatin mixture gently and chill for the full set time.
Raspberry juice leaks
Add raspberries just before serving and pat them dry gently with paper towels.
Crust shrinks
Keep the dough chilled, roll thinly, and avoid over‑handling after shaping.
Storage & make-ahead
Refrigerator
Cover tightly with plastic wrap; keep up to 3 days.
Freezer
Freeze unfilled crusts for up to 2 months; fill and freeze after setting for 1 month. Thaw overnight in fridge.
Best way to reheat
Warm briefly in a 300°F oven for 5‑7 minutes to restore crispness; avoid microwave.
Make-ahead
Prep crust and fill separately up to 24 hours ahead; assemble just before serving.
Ingredients
- 1 cup All-Purpose Flour (Can substitute with gluten-free flour.)
- 1/2 cup Unsalted Butter (Margarine can be used as a substitute.)
- 1/4 cup Powdered Sugar (Granulated sugar can work in a pinch.)
- 1/4 teaspoon Salt
- 1 large Egg Yolk (An additional tablespoon of water can replace if needed.)
- 2 -3 tablespoons Cold Water
- 1 cup Heavy Cream (Use coconut cream as a non-dairy alternative.)
- 1/4 cup Granulated Sugar
- 1 teaspoon Pure Vanilla Extract (Vanilla beans or paste may be used for richer taste.)
- 1 teaspoon Unflavored Gelatin (Substitute with agar-agar for a vegetarian option.)
- 1/4 cup Milk (Any dairy or non-dairy milk can be used.)
- 1 cup Fresh Raspberries (Other berries like blueberries or strawberries can substitute.)
- Optional Mint Leaves (For garnish.)
Instructions
- 1Preheat your oven to 350°F (175°C) and lightly grease your tart pan.
- 2Combine all-purpose flour, powdered sugar, and salt in a mixing bowl. Blend in softened unsalted butter until resembling coarse crumbs.
- 3Mix in the egg yolk and cold water until the dough holds together. Wrap in plastic wrap and refrigerate for 30 minutes.
- 4Roll out the dough until about 1/8 inch thick, transfer to the tart pan, prick the bottom, and bake for 15-20 minutes until golden brown. Cool completely.
- 5Dissolve unflavored gelatin in warm milk in a small bowl. In another bowl, whip heavy cream with granulated sugar and vanilla extract until soft peaks form before folding in gelatin mixture.
- 6Spread vanilla cream filling into the cooled tart base, cover, and refrigerate for at least 2 hours.
- 7Before serving, top tarts with fresh raspberries and mint leaves. Keep chilled until serving.