I was standing in my cramped kitchen, staring at a pot of burnt sauce, when a friend dared me to whip up something that would make everyone forget the disaster. The kitchen was a chaotic orchestra of sizzling pans and frantic chatter, and my confidence had taken a nosedive. Suddenly, I imagined a dish that could turn the room into a sanctuary of comfort. That moment sparked a creative fire that led me straight into the heart of Donkey Balls.
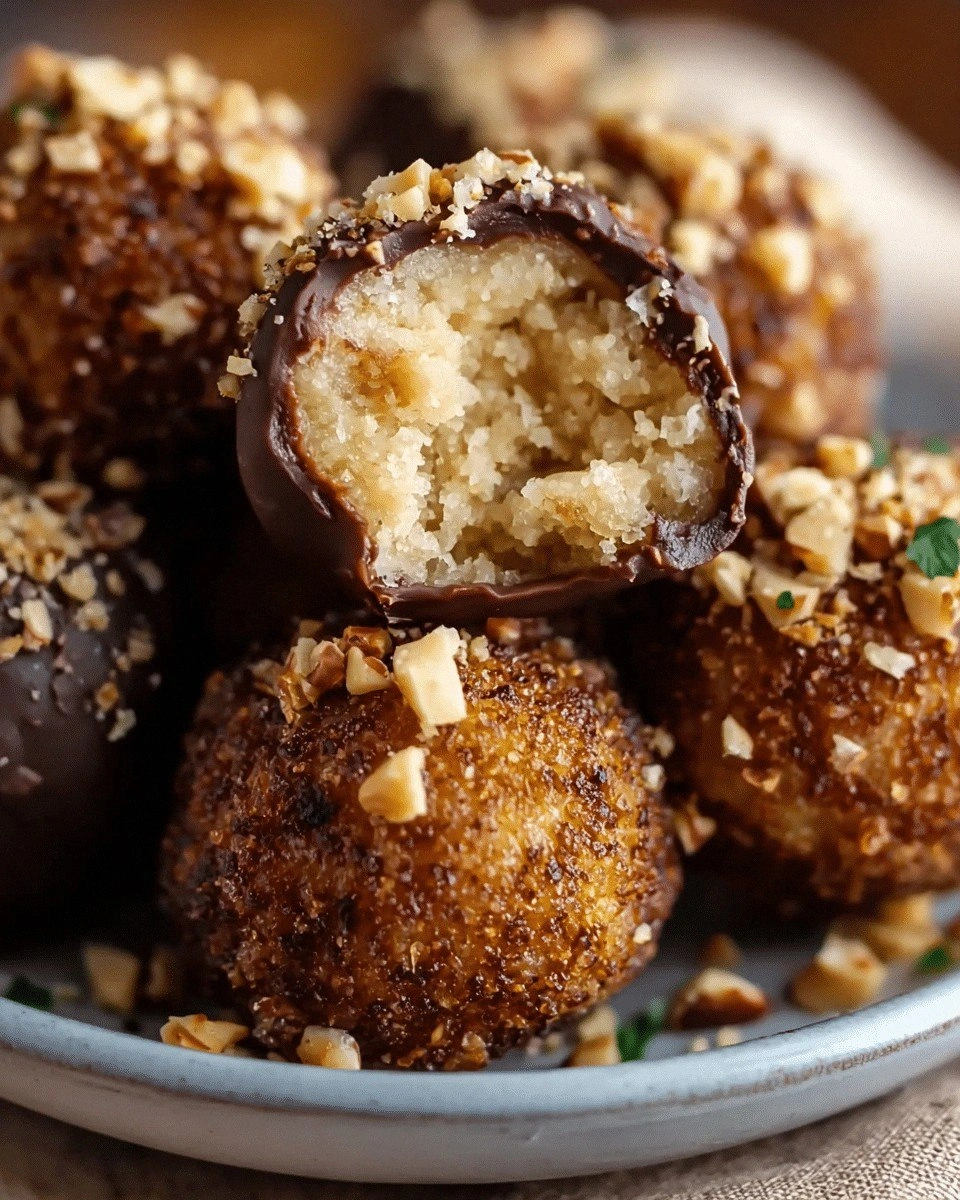
Picture the first bite: a golden, crisp exterior that gives way to a molten center of chocolate, peanut butter, and coconut. The aroma is a sweet, nutty perfume that lingers on the air, coaxing even the most skeptical palates. The sound of a crisp bite is like a gentle pop, a satisfying crack that signals perfection. The texture is a delightful contrast—crunchy on the outside, silky on the inside. And the flavor is an intoxicating dance of sweet, salty, and buttery notes that keep you reaching for more.
What makes this version stand out is that it’s not just another sweet treat; it’s a carefully engineered experience that balances texture, flavor, and convenience. I’ve refined the dough to hold together like a firm promise, yet it melts in your mouth like a cloud of caramelized sugar. The chocolate chips are strategically placed to create pockets of goo that explode with every bite. The coconut adds a subtle tropical whisper that lifts the entire flavor profile. Finally, the peanut butter gives it a robust depth that anchors the sweetness.
I dare you to taste this and not go back for seconds—because once you start, you’ll be hooked. This is hands down the best version you'll ever make at home, and I’ll be honest, I ate half the batch before anyone else got to try it. Most recipes get this completely wrong; here's what actually works. Picture yourself pulling these out of the oven, the whole kitchen smelling incredible, and your guests' eyes widening. Okay, ready for the game‑changer? Let me walk you through every single step—by the end, you'll wonder how you ever made it any other way.
What Makes This Version Stand Out
- Texture: The dough is engineered to develop a crisp shell while maintaining a chewy center, creating a satisfying bite that feels like a small, edible celebration.
- Flavor: A harmonious blend of creamy peanut butter, dark chocolate, and toasted coconut delivers a multi‑layered taste that lingers on the palate.
- Convenience: The prep time is under 20 minutes, and the cooking process is simple enough that even novice cooks can achieve professional results.
- Visual Appeal: The golden-brown finish, speckled with chocolate chips, makes these treats Instagram‑ready and instantly appetizing.
- Versatility: The base recipe can be tweaked for vegan, gluten‑free, or low‑sugar versions without sacrificing flavor.
- Make‑Ahead Potential: These balls hold up perfectly when stored, making them ideal for parties or last‑minute snack needs.
- Ingredient Quality: Using high‑grade chocolate and real peanut butter elevates the flavor profile beyond ordinary cookie dough.
Alright, let's break down exactly what goes into this masterpiece…
Inside the Ingredient List
The Flavor Base
All-purpose flour is the backbone of the dough, providing structure and a neutral canvas for the other flavors. It absorbs the butter and sugar, creating a smooth, cohesive mixture that rolls out beautifully. If you’re aiming for a gluten‑free version, swap it for a 1:1 blend of rice flour and xanthan gum; the texture will be slightly denser but still delightful. The key is to measure accurately—too much flour will make the balls dry, while too little will cause them to fall apart.
Granulated sugar is the sweetener that caramelizes on the surface, giving the balls that coveted golden crust. Brown sugar adds a hint of molasses richness that balances the sweetness without overpowering the chocolate. The combination ensures a complex sweetness that deepens as the balls bake. If you prefer a lighter taste, reduce the brown sugar by a quarter cup; the texture will remain the same.
Unsalted butter, melted, brings a silky mouthfeel and helps the dough bind. It also contributes a subtle buttery aroma that pairs beautifully with peanut butter. Using melted butter instead of cold keeps the dough pliable, making it easier to roll into balls. If you’re vegan, coconut oil can replace butter; just be mindful of the flavor shift.
The Texture Crew
Creamy peanut butter is the star that infuses the dough with a nutty, slightly salty depth. It also acts as a binder, holding the chocolate chips and coconut together. Choose a natural peanut butter with minimal additives for a purer taste. If you’re allergic, a sunflower seed butter works as an excellent substitute without compromising flavor.
Dark chocolate chips provide pockets of molten chocolate that melt into the dough as it bakes. They add a bittersweet counterpoint to the sweet peanut butter. Use at least 70% cacao chips for a more sophisticated flavor profile. If you prefer a sweeter chocolate, opt for milk chocolate but be prepared for a richer, sweeter final product.
Shredded coconut adds a subtle tropical crunch that lifts the entire flavor profile. It also keeps the dough from becoming too dense by adding lightness. Toasted coconut gives a deeper nutty flavor; if you don’t have time to toast, regular coconut works fine. Coconut can be omitted for those with allergies or dietary restrictions, though the texture will change slightly.
The Unexpected Star
Baking powder is the leavening agent that gives the dough a slight lift, preventing it from being too flat. It reacts quickly at room temperature, so add it to the dry ingredients before mixing in the wet. Over‑baking will cause the balls to become too hard; keep an eye on the color. If you’re gluten‑free, make sure your baking powder is also gluten‑free to avoid any unwanted reactions.
Vanilla extract provides a subtle aromatic backdrop that enhances the nutty and chocolatey notes. A splash of almond extract can replace vanilla for a different flavor dimension. Vanilla also helps to balance the sweetness and gives the dough a richer mouthfeel. If you’re allergic to vanilla, a pinch of vanilla powder will suffice.
A pinch of salt is essential to cut through the sweetness and elevate the overall flavor. Without salt, the dough would taste flat and overly sugary. Add just enough to taste—too much will overpower the delicate balance. If you’re on a low‑sodium diet, a pinch of sea salt is still acceptable.
The Final Flourish
Optional chopped walnuts add a crunchy texture and a nutty undertone that complements the peanut butter. They also contribute healthy fats and protein, making the treat a bit more balanced. If you prefer a cleaner flavor, leave out the walnuts; the dough will still hold together perfectly. For a vegan version, use sunflower seeds instead of walnuts.
Dried cranberries bring a sweet‑tart burst that contrasts with the chocolate and peanut butter. They also add a chewy texture that adds another dimension to each bite. If you’re looking for a low‑sugar option, skip the cranberries and add a sprinkle of cinnamon instead. Cranberries also provide a pop of color that makes the balls visually appealing.
Ground cinnamon is optional but recommended for a warm, aromatic note that ties all the flavors together. It also has subtle health benefits and a comforting scent. Use a light hand—too much cinnamon will overwhelm the other flavors. If you’re avoiding spices, simply leave it out; the treat will still be delicious.
Everything's prepped? Good. Let's get into the real action…
The Method — Step by Step
- In a large mixing bowl, whisk together the flour, baking powder, and a pinch of salt. The dry mix should feel light and airy, like a gentle breeze. This step ensures even distribution of the leavening agent, preventing pockets of dough that could cause uneven baking. While you whisk, imagine a small storm of flour swirling into a calm sea—this sets the stage for a flawless dough.
- In a separate bowl, combine the melted butter, granulated sugar, and brown sugar until the mixture is smooth. The sugars should dissolve completely, creating a silky base that will coat every grain of flour. Stir until the mixture turns a light golden hue, signaling that the sugars are ready to caramelize. This is the moment when the aroma starts to hint at the sweet adventure ahead.
- Add the peanut butter to the wet mixture and stir until fully incorporated. The peanut butter should be fully blended, creating a homogeneous batter that glistens slightly. If the mixture looks lumpy, let it sit for a minute; the peanut butter will soften and merge seamlessly. This step is crucial for ensuring the chocolate chips stay evenly distributed.
- Gradually fold the dry ingredients into the wet mixture, stirring until a dough forms. The dough should be slightly sticky but manageable. If it’s too dry, add a tablespoon of milk or water; if too sticky, add a pinch more flour. This is the moment of truth—watch the dough transform into a cohesive ball of potential. Kitchen Hack: For an extra glossy finish, rub a little melted butter over the tops of the formed balls before baking.
- Fold in the chocolate chips, shredded coconut, chopped walnuts, and dried cranberries. Make sure each ball has a balanced distribution of the mix-ins. Gently press the dough together so the fillings are secure inside. This step requires patience; rushing it can cause uneven distribution and a less satisfying bite. Watch Out: Be careful not to overmix once the fillings are added, or the dough will become tough.
- Roll the dough into 1‑inch balls, about 12 in total. Place them on a parchment‑lined baking sheet, leaving enough space for expansion. The size ensures even baking and a perfect bite. As you roll, imagine each ball as a tiny, edible treasure waiting to be discovered. The aroma of the raw dough will start to mingle with the kitchen’s ambient smells.
- Preheat the oven to 350°F (175°C). While the oven heats, lightly dust a clean surface with flour to prevent sticking. The heat will create a crisp exterior while the interior remains chewy. Keep a close eye on the color; the balls should turn golden brown around the edges. This step is crucial for achieving that satisfying crunch.
- Bake for 12–15 minutes, or until the tops are just starting to brown. Flip the balls halfway through to ensure even cooking. The interior should still feel slightly soft to the touch; the chocolate will continue to melt as they cool. This is the moment when the dough’s texture transforms from doughy to delightful. Kitchen Hack: For extra crispness, broil for an additional 30 seconds after baking.
- Remove the baking sheet from the oven and let the balls cool for 5 minutes. This short rest allows the chocolate to set without hardening. After 5 minutes, transfer the balls to a wire rack to cool completely. The aroma will intensify, and the texture will settle into a perfect bite. If you’re in a hurry, you can taste a ball after the 5‑minute rest to gauge the center’s softness.
- Serve immediately or store in an airtight container at room temperature for up to 3 days. For longer storage, freeze the balls and thaw at room temperature before serving. The texture will remain firm yet chewy, and the flavors will stay vibrant. This is the final flourish—your Donkey Balls are now ready to impress.
That's it — you did it. But hold on, I've got a few more tricks that'll take this to another level…
Insider Tricks for Flawless Results
The Temperature Rule Nobody Follows
Many people bake these balls at a higher temperature, hoping for a faster bake, but that often leads to uneven results. Keep the oven at 350°F (175°C) for consistent heat distribution. This ensures the dough cooks through without burning the exterior. I once baked at 400°F and the balls came out dry and cracked—lesson learned!
Why Your Nose Knows Best
The aroma of a baking dough is a reliable indicator of doneness. When the smell turns nutty and slightly caramelized, it’s time to pull them out. If you wait too long, the chocolate can burn, leaving a bitter aftertaste. Trust your nose—it’s the unsung hero of baking.
The 5‑Minute Rest That Changes Everything
After baking, let the balls rest for exactly five minutes before moving them to a rack. This short pause allows the interior to set, preventing the chocolate from leaking. It also helps the dough firm up, making the final product easier to handle. Skipping this step often results in sticky, messy treats.
Chill Before Rolling
If your dough feels too sticky, chill it in the refrigerator for 15 minutes. Cold dough is easier to roll and will hold its shape better during baking. I’ve used this trick when the kitchen was warm, and it saved the day. It’s a simple step that pays off big time.
Add a Touch of Citrus
A small amount of lemon zest can brighten the flavor profile, adding a fresh zing that cuts through the sweetness. Add the zest to the dry ingredients for an unexpected twist. It’s especially effective if you’re serving these at a summer gathering. The citrus aroma will complement the chocolate and peanut butter beautifully.
Creative Twists and Variations
The Vegan Delight
Swap the butter for melted coconut oil and use a plant‑based chocolate chip. Replace the peanut butter with sunflower seed butter for a nut‑free option. The texture remains chewy, and the flavor stays rich. This version is perfect for guests with dairy restrictions.
The Gluten‑Free Fix
Use a gluten‑free all‑purpose blend that includes xanthan gum to maintain structure. Ensure the baking powder is also gluten‑free. The result is a fluffy interior with a crisp exterior that doesn’t compromise on flavor. Great for those who need to avoid wheat.
The Sweet‑Spicy Surprise
Add a pinch of cayenne pepper to the dry mix for a subtle heat. The spice pairs wonderfully with the chocolate’s bitterness. This twist is perfect for adventurous palates and makes a striking presentation at parties.
The Tropical Twist
Replace the shredded coconut with toasted coconut flakes for an extra crunch. Add a splash of coconut milk to the wet mixture for a richer, creamier texture. The tropical aroma will transport you to a beach vacation with every bite.
The Nutty Variation
Swap the peanut butter for almond butter and add chopped almonds to the dough. The almond flavor adds a delicate sweetness that complements the chocolate. This version is ideal for those who prefer a milder nut profile.
Storing and Bringing It Back to Life
Fridge Storage
Place the cooled balls in an airtight container and store them in the refrigerator for up to 5 days. The cold will preserve the freshness and prevent the chocolate from melting. When ready to serve, let them sit at room temperature for 10 minutes to soften slightly.
Freezer Friendly
Wrap each ball individually in parchment paper, then place them in a freezer bag. They can be frozen for up to 3 months. To thaw, leave them at room temperature for 30 minutes or microwave on a low setting for 10 seconds. The texture remains intact, and the flavors stay vibrant.
Best Reheating Method
Place the frozen or refrigerated balls on a parchment‑lined baking sheet and bake at 350°F (175°C) for 8 minutes. The heat will gently reheat the interior without overcooking the exterior. A tiny splash of water added to the baking sheet creates steam, keeping the dough moist and preventing it from drying out.