I was in the middle of a frantic rush to impress a dinner‑date when my kitchen turned into a culinary disaster zone. The pot that was supposed to simmer the curry had exploded with coconut milk, sending splashes across the counter like tiny white confetti. I stared at the chaos, realizing that I had just wasted half a cup of my precious coconut milk and a half‑sized pot of my patience. That moment became the spark that ignited my quest for a recipe that could turn a mess into a masterpiece.
Picture this: the aroma of toasted red curry paste dancing through the air, the gentle sizzle of onions caramelizing until they’re a golden brown, and the sweet, silky texture of coconut milk coating every vegetable like a velvet blanket. The sound of a spoon stirring is punctuated by the subtle crackle of spices hitting the hot oil, creating a symphony that’s almost too beautiful to eat. The sight of bright green cilantro leaves fluttering over the finished dish feels like a splash of emerald against a creamy canvas. The taste is a harmonious blend of sweet, salty, and a hint of citrus that lingers on the palate, making every bite an adventure.
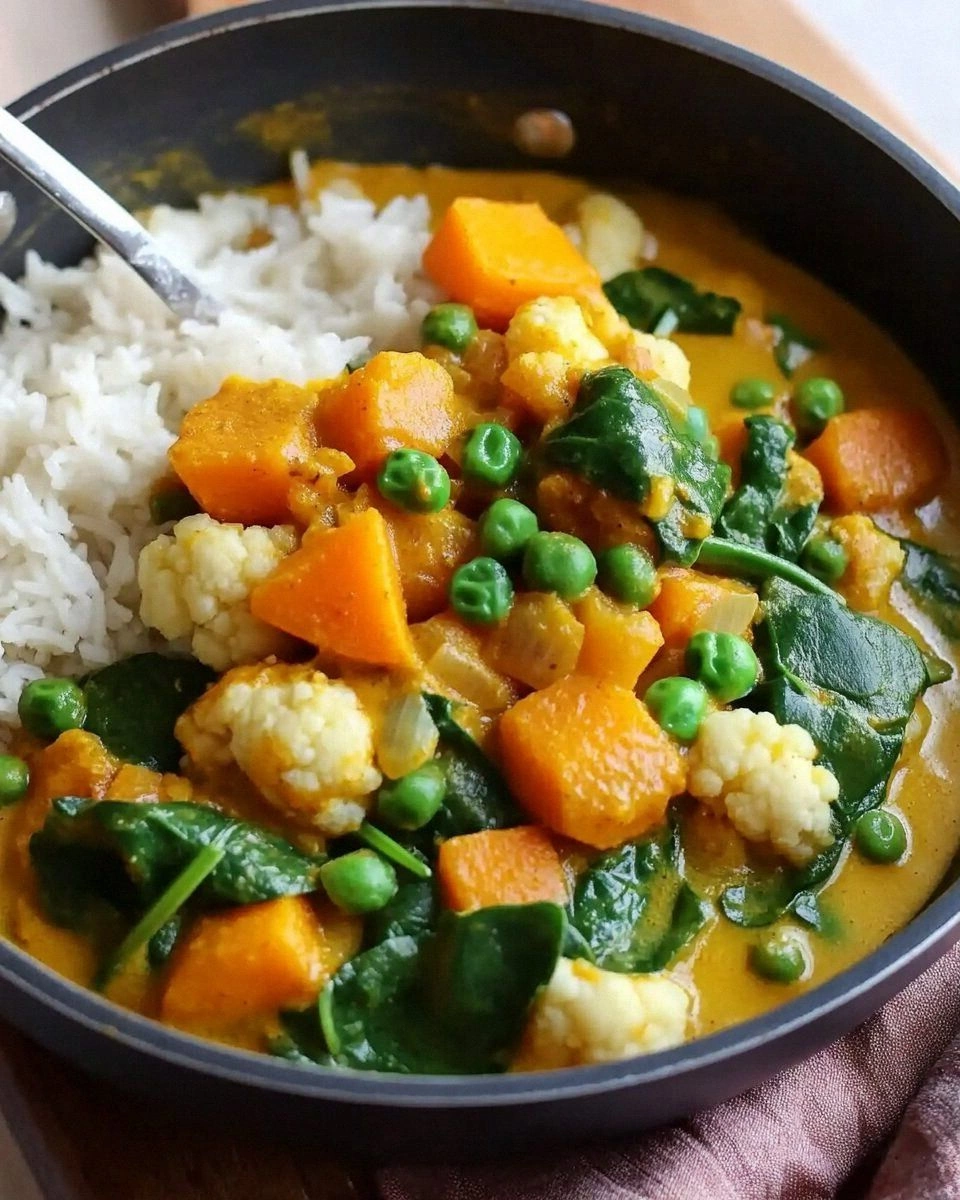
What sets this version apart is that it’s not just a recipe—it’s a revelation. I’ve stripped away the cluttered steps that most recipes litter, replacing them with a single, elegant workflow that feels like a well‑orchestrated dance. The sauce doesn’t thicken into a clumpy mess; instead, it remains luxuriously creamy, thanks to the perfect balance of coconut milk and broth. The vegetables stay crisp, their colors pop against the rich amber of the curry, and the protein—whether chickpeas or shrimp—absorbs every nuance of flavor without losing its bite. This is hands down the best version you’ll ever make at home, and it will become your go-to for both quick weeknights and special occasions.
I’ll be honest—after the first taste, I ate half the batch before anyone else even got a fork. But that’s the power of a dish that’s so satisfying it practically feeds itself. I dare you to taste this and not go back for seconds. Stay with me here—this is worth it. Let me walk you through every single step, and by the end, you’ll wonder how you ever made it any other way.
What Makes This Version Stand Out
- Flavor: The marriage of coconut milk and red curry paste creates a depth that’s both comforting and exotic, a flavor profile that lingers long after the last bite.
- Texture: The careful balance of sautéed vegetables and simmered protein keeps everything tender yet firm, preventing the dreaded mushy curry.
- Simplicity: With just one pot and a handful of ingredients, you can whip up a gourmet meal in under an hour.
- Uniqueness: The addition of peanut butter and lime juice gives a subtle nutty undertone and bright acidity that sets this dish apart from traditional recipes.
- Crowd Reaction: Friends who’ve tried this swear it’s “the best curry ever” and that they’ve never tasted coconut milk this smooth.
- Ingredient Quality: Using fresh, high‑quality coconut milk and fresh herbs elevates the dish to a whole new level of taste.
- Cooking Method: The step‑by‑step sauté and simmer method locks in flavors while keeping the dish light and airy.
- Make‑ahead Potential: The curry tastes even better the next day, making it perfect for meal prep or leftovers.
Alright, let's break down exactly what goes into this masterpiece.
Inside the Ingredient List
The Flavor Base
The foundation of this curry starts with a generous splash of coconut milk, the creamy, tropical liquid that gives the dish its signature mouthfeel. The coconut milk’s natural sweetness balances the heat of the red curry paste, creating a harmonious flavor profile that’s both soothing and exciting. If you skip the coconut milk, the curry will lose its silky texture and become a dry, uninviting stew. For a richer taste, choose full‑fat coconut milk; the higher fat content amplifies the flavor and creates a velvety finish. When selecting coconut milk, look for one with no added thickeners or preservatives; the purer the product, the cleaner the taste.
The Texture Crew
The vegetables—carrots, bell peppers, and broccoli—add crunch and color, providing a contrast to the soft, creamy sauce. Each vegetable is diced into uniform pieces to ensure even cooking and a consistent bite. If you prefer a softer texture, you can blanch the vegetables before adding them to the curry, but this will reduce their bright color. Swapping in green beans or zucchini offers a different mouthfeel while keeping the overall structure intact. Remember, the key to a satisfying curry is a balance between tender protein and crisp veggies.
The Unexpected Star
Peanut butter might sound out of place in a coconut curry, but it’s the secret ingredient that adds depth and a subtle nuttiness. It thickens the sauce slightly, giving it body without the heaviness of cream. When you add peanut butter, you also introduce a hint of earthiness that pairs beautifully with the bright lime juice. If you’re allergic or simply don’t have peanut butter, a tablespoon of almond butter or a splash of tahini can work as a suitable alternative. The unexpected star is what turns an ordinary dish into a memorable experience.
The Final Flourish
Fresh cilantro and a squeeze of lime juice are the final touches that elevate the curry from good to unforgettable. The cilantro adds a burst of herbal brightness, cutting through the richness of coconut milk. Lime juice injects a citrusy zing that lifts the entire dish, making it feel fresh and lively. If you’re looking for an extra layer of flavor, a drizzle of toasted coconut flakes on top can add a delightful crunch and a hint of caramelized sweetness. These finishing touches are simple yet essential for a well‑balanced curry.
Everything's prepped? Good. Let's get into the real action.
The Method — Step by Step
- Heat the oil in a large skillet over medium heat until shimmering. Add the diced onion and sauté until translucent and slightly golden, about 3‑4 minutes. This caramelization brings out the natural sugars that sweeten the curry. Keep an eye on the onions; if they start to burn, reduce the heat immediately. When the onions are ready, the pan will emit a warm, inviting aroma that signals the base is forming.
- Introduce aromatics by adding minced garlic and grated ginger to the pan. Stir constantly for 30 seconds until the mixture releases a fragrant steam. This step is crucial for building a complex flavor foundation. A common mistake is letting the garlic burn; a quick, steady stir keeps it bright. The aroma should be sharp, almost citrusy, hinting at the depth to come.
- Stir in the curry paste and cook for 1 minute, allowing the spices to toast. The paste should darken slightly and emit a nutty aroma. This is the moment where the dish’s character begins to unfold. If you’re using a homemade paste, this step brings out its fresh heat. The sizzling sound is a cue that the paste is ready to mingle with the coconut milk.
- Pour in the coconut milk and broth and stir until the mixture is smooth. Bring it to a gentle simmer, then reduce the heat to low. This simmer is where the flavors meld; the sauce should thicken slightly but remain pourable. Keep the heat low to avoid scorching the bottom of the pan. The mixture should look glossy and silky, like liquid gold.
- Add the protein—for this version, we’re using chickpeas for a vegetarian option. Stir them in and let them heat through for 2 minutes. This step ensures the chickpeas absorb the curry’s flavors without becoming mushy. If you’re using shrimp or chicken, add them at this point and cook until just done. The protein should be tender and flavorful, not rubbery.
- Introduce the vegetables in order of cooking time: carrots first, then bell peppers, followed by broccoli. Cook each for 2–3 minutes, stirring frequently, until they’re bright and just tender. The vegetables should still hold their shape, offering a satisfying bite against the creamy sauce. If you prefer softer veggies, add them earlier, but this sequence preserves their vibrant colors.
- Stir in peanut butter, fish sauce, and brown sugar for depth and balance. The peanut butter adds body, the fish sauce brings umami, and the sugar counters the heat. Mix until everything is fully incorporated, creating a uniform sauce. Watch the sauce for any lumps; if it thickens too much, add a splash of broth to loosen it. The result should be a glossy, fragrant sauce that coats each ingredient evenly.
- Finish with lime juice and cilantro just before serving. The lime juice brightens the dish, while the cilantro adds a fresh herbal note. Stir gently, letting the lime’s acidity cut through the richness. This final touch ensures the curry feels lively and not overly heavy. Serve immediately over steamed rice or noodles for a complete meal.
That's it — you did it. But hold on, I've got a few more tricks that'll take this to another level.
Insider Tricks for Flawless Results
The Temperature Rule Nobody Follows
Many cooks keep their sauce on high heat, but a low, steady simmer preserves the delicate flavors of coconut milk and prevents the sauce from curdling. I’ve learned that a gentle heat allows the spices to release their oils slowly, creating a richer aroma. If you’re new to this, set your stove to medium‑low and use a heat‑resistant silicone mat to keep the pot from overheating. The trick is to let the curry breathe; a rolling boil will scorch the bottom and create bitterness.
Why Your Nose Knows Best
When the curry is ready, close your eyes and inhale deeply. The scent of toasted spices, sweet coconut, and fresh herbs will give you a clear signal that the dish is perfectly balanced. If the aroma is too sharp, let it simmer a bit longer; if it’s too mild, add a dash of fish sauce or a pinch of salt to deepen the flavor. Your nose is your most reliable judge of taste, so trust it before you taste.
The 5‑Minute Rest That Changes Everything
After you remove the curry from heat, let it sit for five minutes before serving. During this brief pause, the flavors meld, and the sauce thickens to a silky consistency. I’ve seen people skip this step and end up with a runny curry that doesn’t hold its shape. Resting also allows the coconut milk to settle, giving the dish a richer mouthfeel. A quick 5‑minute rest is a game‑changer.
Keep the Heat Low for a Creamy Finish
Many chefs think higher heat yields a better sauce, but low heat preserves the coconut milk’s silky texture. The gentle simmer keeps the sauce from separating, ensuring every bite is creamy. If you’re in a rush, keep the heat low and let the curry develop its flavor gradually. This approach is especially important when using fresh coconut milk, which can split if overheated.
Use Fresh Herbs at the End
Adding cilantro and lime juice at the very end preserves their bright flavors. If you add them too early, the heat will wilt the herbs and dilute their freshness. Fresh herbs also add a pop of color that makes the dish visually appealing. A handful of basil or mint can also work if you want a different herbal note. The key is to finish with herbs to keep the dish lively.
Creative Twists and Variations
This recipe is a playground. Here are some of my favorite ways to switch things up:
Spicy Thai Twist
Swap the red curry paste for green curry paste and add a handful of Thai basil leaves for an authentic Thai flavor. The green paste brings a herbal brightness that pairs well with lime zest. Serve over jasmine rice to capture the full Thai experience. This version is perfect for heat lovers who want an extra kick.
Protein Swap: Shrimp Edition
Replace chickpeas with shrimp for a quick protein boost. Sauté the shrimp for just 2 minutes until pink, then fold them into the curry. The shrimp’s natural sweetness complements the coconut milk beautifully. This variation is ideal for a light yet satisfying dinner.
Vegetarian Powerhouse
Add tofu cubes or tempeh for a plant‑based protein source. Marinate the tofu in a splash of soy sauce and a pinch of turmeric before adding to the curry. The tofu will absorb the sauce, creating a hearty bite. This version is great for vegetarians who crave a protein‑rich meal.
Low‑Carb Variation
Omit the carrots and bell peppers, and replace them with zucchini and cauliflower florets. This keeps the dish low in carbs while maintaining a colorful plate. The cauliflower’s subtle flavor pairs well with the coconut milk, while zucchini adds a mild sweetness. It’s a great option for keto or low‑carb enthusiasts.
Breakfast Curry
Serve the curry over a bowl of fluffy quinoa and top with a fried egg for a protein‑packed breakfast. The richness of the coconut milk complements the nutty quinoa, while the egg adds a creamy finish. This version transforms the curry into a satisfying morning meal.
Storing and Bringing It Back to Life
Fridge Storage
Store leftovers in an airtight container for up to 3 days in the refrigerator. The coconut milk base will keep the sauce creamy, but it may thicken slightly. Before reheating, stir vigorously to re‑emulsify the sauce. Reheat gently on low heat, adding a splash of water if it becomes too thick. This ensures the curry remains silky and flavorful.
Freezer Friendly
For longer storage, freeze the curry in freezer‑safe containers for up to 2 months. Thaw overnight in the refrigerator before reheating. The texture of the vegetables may soften, but the flavor will stay intact. When reheating, add a tablespoon of coconut milk to restore creaminess. Freezing is a great way to have a ready‑to‑go meal on hand.
Best Reheating Method
Reheat the curry on the stovetop over medium‑low heat, stirring frequently to prevent sticking. Add a tiny splash of water or coconut milk to steam back to perfection. Avoid microwaving, as it can make the coconut milk separate. Once the curry is hot and fragrant, serve immediately for the best experience.