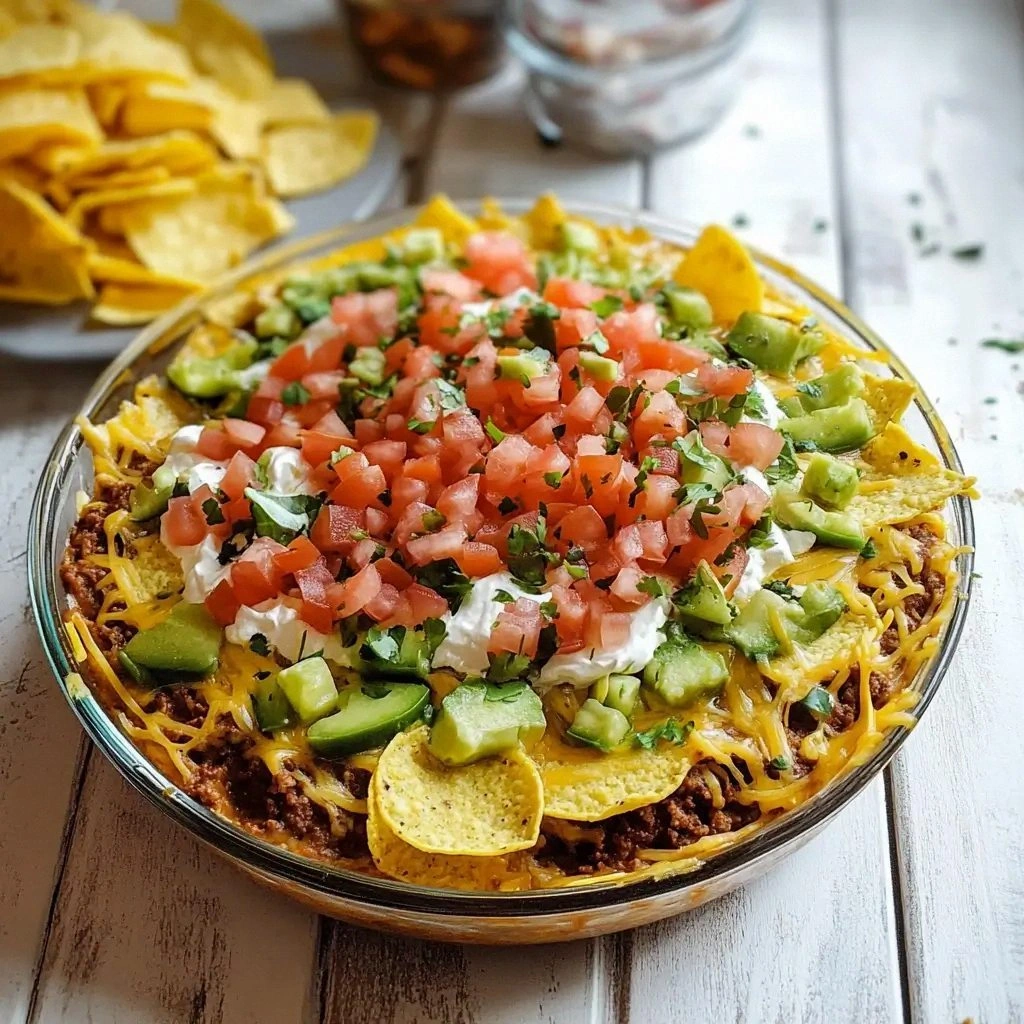
Picture this: I'm standing in a cramped kitchen, a handful of tortilla chips scattered like confetti, and a last‑minute party looming. I had promised my friends a taco‑themed spread, but the pantry was a barren desert of beans and cheese. My eyes darted over the shelves, and in that frantic moment I remembered a recipe I'd stumbled upon a year ago—a 7‑layer taco dip that promised layers of flavor, texture, and pure indulgence. I dared myself to try it, and the next morning my kitchen smelled like a Mexican fiesta. That disaster turned into a triumph, and the dip became an instant crowd‑pleaser.
The first layer was a blanket of creamy refried beans that glistened under the oven light, the second a hearty slab of seasoned ground beef that sizzled when it hit the pan, the third a bright splash of salsa that sang with lime and garlic. The fourth layer of shredded cheese melted into a golden crust, the fifth a smooth, buttery guacamole that added a subtle richness, and the sixth a dollop of cool sour cream that cut the heat. The final layer, a scatter of diced tomatoes and black olives, added a burst of acidity and a satisfying crunch. When I lifted the dip from the oven, steam curled like a lazy cloud, and the aroma of cumin, cilantro, and melted cheese filled the air. Every bite was a symphony: the beans’ velvety texture, the beef’s savory depth, the salsa’s bright punch, the cheese’s gooey melt, the guac’s silky smoothness, the sour cream’s tang, and the tomatoes’ crisp bite.
What makes this version stand out is that it takes the classic taco dip and turns it into a layered masterpiece, each component carefully chosen to complement the others. It’s not just about piling ingredients; it’s about balance, contrast, and that moment when the first bite reveals an unexpected harmony. I’ve refined the seasoning mix to keep the beef juicy without overpowering the subtle flavors of the beans and guac. The dip layers are thick enough to hold their shape but thin enough that every spoonful is a perfect blend. It’s a dish that can be assembled in minutes yet feels like a gourmet creation that would impress even the most discerning palates.
One technique you won’t see in most recipes is the use of a silicone baking mat to keep the dip from sticking and to give the top a crisp, caramelized edge. I also discovered that a quick swirl of guac before baking adds a decorative touch and ensures even distribution of flavor. If you’re ready for a dip that will have your guests begging for the recipe, let me walk you through every single step—by the end, you’ll wonder how you ever made it any other way.
What Makes This Version Stand Out
- Taste: A symphony of cumin, lime, and creamy textures that dance together.
- Texture: Layers that hold firm yet melt into one another when baked.
- Simplicity: Only a handful of pantry staples, no exotic ingredients.
- Uniqueness: The guac and sour cream layers give it a signature twist.
- Crowd Reaction: Guests leave with empty bowls and repeat requests.
- Ingredient Quality: Fresh, high‑grade produce and cheese for maximum flavor.
- Cooking Method: A single baking step that unifies all layers.
- Make‑Ahead Potential: Assemble up to 24 hours before serving; just bake when ready.
Inside the Ingredient List
The Flavor Base
Refried beans, seasoned ground beef, salsa, and taco seasoning form the heart of the dip. Each ingredient is chosen for its ability to carry flavor and complement the others. Refried beans provide a creamy backdrop that absorbs the spices from the beef and salsa. The ground beef, cooked with a blend of cumin, oregano, and a hint of garlic powder, delivers a savory punch that anchors the dip. Salsa, bright and zesty, introduces acidity and heat that cut through the richness. If you skip any of these, the dip loses its depth; the beans become bland, the beef loses its bite, and the salsa’s brightness fades. Swap the beef for grilled chicken or pork for a different protein profile, but keep the seasoning to preserve the signature flavor. When buying beans, look for those that are low in sodium and free of added sugars for the best taste.
The Texture Crew
Shredded cheddar cheese and sour cream are the textural pillars of this dish. Cheese melts into a golden crust that crisps at the edges, offering a satisfying contrast to the smooth layers below. Sour cream, on the other hand, adds a cool, tangy counterpoint that balances the heat from the salsa and beef. The combination of melted cheese and creamy sour cream creates a velvety mouthfeel that lingers on the palate. If you prefer a sharper cheese, try pepper jack or a Mexican blend; just be aware that a stronger flavor will dominate the dip. The sour cream’s fat content is essential for that silky finish—if you use a low‑fat version, the dip will feel thinner. For an extra crunch, sprinkle a handful of tortilla chips on top just before serving.
The Unexpected Star
Guacamole is the secret weapon that elevates this dip from good to unforgettable. Made from ripe avocados, lime juice, and a whisper of sea salt, guacamole adds a buttery richness that pairs beautifully with the other layers. Its green hue also provides a visual contrast that makes the dip look as good as it tastes. If you’re not a fan of avocado, a dollop of Greek yogurt mixed with lime can mimic the creaminess, but it won’t offer the same depth of flavor. The guac should be fresh—prepare it right before baking to avoid browning and preserve its bright color.
The Final Flourish
Diced tomatoes and sliced black olives add the final burst of flavor and texture. The tomatoes bring a juicy acidity that brightens the dip, while the olives introduce a briny, savory note that enhances the overall taste. Together, they create a layered finish that’s both colorful and delicious. If you want a vegetarian version, replace the olives with roasted red peppers or corn kernels for a sweet crunch. This final layer is optional, but it gives the dip that classic taco finish that many people love. Remember to rinse the olives to reduce excess salt if you’re watching sodium levels.
Everything's prepped? Good. Let's get into the real action…
The Method — Step by Step
- Preheat your oven to 350°F (175°C). The gentle heat ensures the layers meld without scorching the top. While the oven warms, gather all your ingredients on the counter so you can work without interruption. A smooth, organized workspace saves time and reduces kitchen chaos. When the oven reaches the right temperature, you’ll hear that comforting hum that signals everything’s ready.
- In a medium skillet over medium heat, brown 1 pound of ground beef until no longer pink, about 6–7 minutes. Sprinkle 1 tablespoon of taco seasoning, a pinch of salt, and a dash of black pepper. Stir constantly to distribute the spices evenly; the aroma of cumin and oregano will begin to fill the air. Once the beef is fully cooked, let it drain on paper towels to remove excess fat. The leaner the beef, the better the dip will hold its shape.
- Spread a generous 2 cups of refried beans as the first layer in a 9‑inch square baking dish. Use a spatula to smooth the surface; a flat base ensures even heat distribution. This creamy foundation will soak up the flavors of the layers above and provide a luscious mouthfeel. If you prefer a thicker dip, add a splash of milk to the beans before spreading.
- Layer the cooked beef over the beans, spreading it evenly. The beef should cover the entire surface, creating a solid second layer. This step is critical because it locks in moisture and adds a hearty protein punch. As the beef cools, it will firm up slightly, giving the dip structure. The aroma of seasoned meat will mingle with the beans, creating an irresistible scent.
- Pour 1 cup of salsa over the beef. The bright, tangy salsa will cut through the richness and add a burst of freshness. Use a spoon to swirl the salsa gently, ensuring it reaches every corner of the dish. The salsa should be bright enough to contrast with the darker layers below. If you like it spicy, add a pinch of cayenne or a few jalapeño slices.
- Sprinkle 2 cups of shredded cheddar cheese over the salsa. The cheese will melt into a golden crust that crisps at the edges, providing a delightful contrast to the creamy layers beneath. As the cheese melts, it will form a smooth, glossy top that invites you to dig in. The cheese also acts as a barrier, preventing the salsa from soaking into the beans. When the cheese is bubbling, you’ll know it’s time to add the next layer.
- Evenly spread 1 cup of guacamole over the melted cheese. The guac’s buttery richness will add a silky layer that balances the heat from the salsa. Use a spatula to create a smooth surface; a neat layer will melt into the cheese during baking. The guac also helps keep the dip moist, preventing it from drying out. If you’re making the dip ahead of time, cover it tightly with plastic wrap to preserve freshness.
- Dollop 1 cup of sour cream on top of the guac in a zig‑zag pattern. The sour cream will add a cool, tangy counterpoint that balances the dip’s richness. Its fat content will keep the layers from becoming too dry. As the dip bakes, the sour cream will gently melt, blending with the guac for a creamy finish. Watch for the edges; they should start to pull away from the dish, signaling that the dip is nearly ready.
- Scatter 1 cup of diced tomatoes and sliced black olives across the sour cream. The tomatoes bring a juicy acidity that brightens the dip, while the olives add a briny, savory note. This final layer provides a colorful contrast that makes the dip look as good as it tastes. If you prefer a vegetarian version, replace the olives with roasted red peppers or corn kernels. The tomatoes should be ripe but firm, so they hold their shape during baking.
- Slide the baking dish into the preheated oven and bake for 20 minutes. The dip should look golden brown on top, with the cheese bubbling and the edges pulling away slightly. The aroma will be intoxicating—think warm tortillas, melted cheese, and the faint scent of cumin. Remove the dish when the dip is set but still slightly soft in the middle; it will firm up as it cools. Let the dip rest for 5 minutes before serving to allow the flavors to meld.
That's it — you did it. But hold on, I've got a few more tricks that'll take this to another level…
Insider Tricks for Flawless Results
The Temperature Rule Nobody Follows
Many people bake dips at 375°F, assuming a higher temperature will give a crispier top. In reality, 350°F is the sweet spot that allows the layers to meld without burning the cheese. This temperature ensures the dip stays moist and the edges don’t over‑brown. If you’re using a convection oven, reduce the heat by 25°F to avoid over‑cooking. The key is to watch the dip closely and pull it out when the cheese is golden but not blackened.
Why Your Nose Knows Best
As the dip bakes, the aroma changes from earthy to slightly caramelized. Trust your nose: when you smell the cheese turning golden and the beans beginning to brown, it’s time to pull the dish out. Your olfactory cues are the most reliable indicator of doneness, more accurate than the clock.
The 5‑Minute Rest That Changes Everything
After removing the dip from the oven, let it sit for exactly five minutes. During this brief rest, the layers set, making it easier to cut clean slices. The dip also allows the flavors to marry, creating a more cohesive taste profile. If you skip this step, you’ll end up with a runny mess that’s hard to serve.
Use a Silicone Mat for Even Baking
Placing a silicone baking mat in the dish prevents sticking and promotes even heat distribution. This simple trick saves you from peeling off a crust of beans or cheese and keeps cleanup a breeze. It also gives the dip a professional look with a clean, even surface.
Keep the Layers Dry for Better Texture
Before adding each layer, pat down any excess moisture. A wet layer can cause the dip to become soggy and the edges to become mushy. Use paper towels to blot the beans and beef before spreading them. This small step preserves the distinct textures that make the dip so enjoyable.
Add a Splash of Water Before Reheating
If you’re reheating the dip, drizzle a tablespoon of water over the top before microwaving. The moisture will steam the dip back to a creamy consistency without drying it out. This trick works well for leftovers, ensuring the dip tastes fresh every time.
Creative Twists and Variations
Smoky Chipotle Twist
Swap the regular taco seasoning for chipotle‑spiced seasoning and add a handful of chipotle peppers in adobo sauce to the salsa. The smoky heat will give the dip a bold, adventurous flavor that pairs well with a crisp beer. This variation is perfect for those who love a little heat but want to stay within the taco theme.
Mexican Street Corn Variation
Replace the diced tomatoes with roasted corn kernels and add a drizzle of lime‑y mayo. The corn adds a sweet crunch, while the mayo gives a creamy tang that complements the guac. This version turns the dip into a street‑corn celebration, ideal for summer gatherings.
Vegan Powerhouse
Omit the ground beef and replace it with spiced lentils or crumbled tempeh. Use a plant‑based cheese and dairy‑free sour cream to keep the dish entirely vegan. This version offers the same layered experience while catering to plant‑based diets.
Low‑Carb Taco Dip
Use cauliflower rice in place of refried beans and skip the tortilla chips. The cauliflower adds fiber and a mild, slightly nutty flavor that holds up well in the dip. Pair it with a side of sliced bell peppers for a low‑carb, high‑protein snack.
Kid‑Friendly Mild Dip
Reduce the amount of salsa and omit the black olives. Instead, add finely diced carrots and zucchini for a gentle sweetness. This version keeps the dip approachable for younger palates while still delivering the layered texture they love.
Extra Crunchy Layer
Top the dip with a scattering of crushed tortilla chips or a sprinkle of chopped roasted peanuts before serving. The crunch adds a delightful contrast to the creamy layers and makes the dip more interactive for guests.
Storing and Bringing It Back to Life
Fridge Storage
Cover the dip tightly with plastic wrap and refrigerate for up to 48 hours. The layers will set, making it easy to slice. Before serving, let the dip sit at room temperature for 10 minutes to soften the cheese and guac. This method keeps the flavors fresh and the textures intact.
Freezer Friendly
Wrap the dip in aluminum foil and place it in a freezer‑safe container. It will stay good for up to 2 weeks. When you’re ready to eat, thaw it overnight in the refrigerator. The dip will retain its structure, though the cheese may separate slightly; a quick stir will fix it.
Best Reheating Method
Reheat the dip in the oven at 325°F (165°C) for 15 minutes or until hot. Alternatively, microwave on medium power for 2–3 minutes, stirring halfway through. Add a splash of water or milk before microwaving to keep the dip creamy. Reheated dip tastes as good as freshly baked, especially when the layers have had time to re‑meld.