Picture this: I’m halfway through a midnight pizza bake, the kitchen lights flicker, and the dough starts to puff in the oven like a rebellious balloon. The next thing I know, the timer buzzes, and the pizza is a charred, soggy mess that no one will touch. I stared at the char, felt my stomach growl, and whispered to myself, “I need a better way to satisfy that late‑night craving.” That moment of culinary crisis sparked the birth of the Garlic Butter Beef Cheeseburge, a dish that turns ordinary ingredients into a show‑stopper.
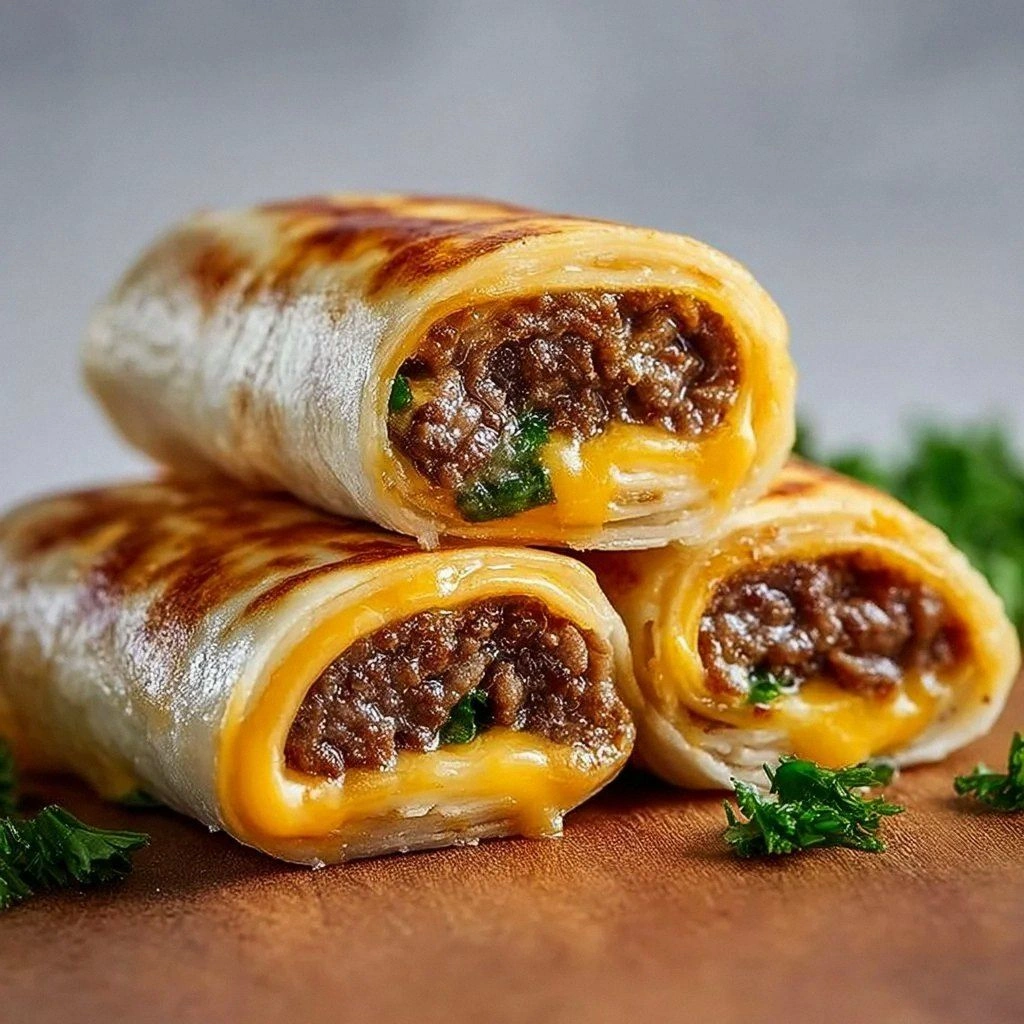
From the first glance, the golden crescent roll dough looks almost too good to be true—flaky, buttery, and ready to hold a savory treasure. The scent of sizzling garlic and melting butter fills the air, turning the kitchen into a fragrant battlefield. When I first tasted the first bite, the crispy edge gave way to a molten center of beef, cheddar, and cream cheese that practically melted in my mouth. The texture is a perfect marriage of crunch and gooeyness, while the aroma lingers like a sweet promise. It’s the kind of dish that makes you pause, inhale deeply, and realize you’re about to experience something extraordinary.
What makes this version stand out is not just the ingredients, but the way they’re combined. I’ve taken the classic cheeseburger, stripped it down to its essentials, and wrapped it in crescent dough for a bite‑size explosion of flavor. The beef is seasoned to perfection, the garlic is minced fresh for a punch, and the butter is melted into a silky sauce that coats everything like velvet. The cheddar and cream cheese create a creamy, tangy layer that balances the savory meat, while the dough adds a buttery crunch that lifts the whole experience. This isn’t just another recipe—this is a game‑changer that will redefine your comfort‑food game.
And here’s the twist you won’t see on the first page: a secret step that turns ordinary beef into a melt‑in‑your‑mouth masterpiece, and a buttery drizzle that gives the rolls an irresistible sheen. I dare you to taste this and not go back for seconds. If you’ve ever struggled with bland burgers or soggy rolls, you’re not alone—and I’ve got the fix. Let me walk you through every single step—by the end, you’ll wonder how you ever made it any other way.
What Makes This Version Stand Out
- Flavor: The combination of fresh minced garlic, creamy butter, and sharp cheddar creates a layered taste that sings in every bite. Each element harmonizes without overpowering the others, delivering a balanced, mouth‑watering experience.
- Texture: The crescent roll dough offers a flaky, buttery crust that contrasts beautifully with the tender, juicy beef inside. The cream cheese and cheddar melt together, creating a luscious, gooey filling that clings to every bite.
- Convenience: With just a handful of pantry staples, you can assemble this dish in under 15 minutes and bake it in 30. No elaborate prep, no complicated sauces—just straight‑forward, delicious results.
- Uniqueness: Unlike traditional burgers that sit on a bun, this roll‑up packs the same flavor profile into a portable, bite‑size format that’s perfect for parties, game nights, or a quick dinner.
- Crowd Reaction: Friends and family consistently ask for seconds, and some even request a “cheeseburger roll‑up” menu. The dish’s playful presentation and bold flavors make it a hit at gatherings.
- Ingredient Quality: Using lean ground beef and fresh, high‑quality cheddar ensures the dish stays flavorful while keeping a healthy profile. The butter and cream cheese add richness without unnecessary additives.
- Make‑ahead Potential: Assemble the rolls a day ahead, refrigerate, and bake just before serving. The dough keeps its crispness, and the filling stays perfectly creamy.
Alright, let's break down exactly what goes into this masterpiece. And before we dive in, here’s a quick kitchen hack that will elevate your results.
Inside the Ingredient List
The Flavor Base
Ground beef is the heart of this dish. I recommend using 1 lb of 80/20 lean ground beef, which gives a nice balance between meatiness and juiciness. The beef’s fat content is crucial; too lean and it will dry out, too fatty and it’ll be greasy. If you’re watching calories, swap for 90/10 lean beef or even ground turkey, but be prepared for a slightly different texture. The key is to brown the meat evenly, ensuring a caramelized crust that locks in flavor.
The Texture Crew
Crescent roll dough is the vehicle that carries everything. These pre‑made sheets are already buttery and flaky, making them ideal for a quick roll‑up. If you can’t find crescent dough, puff pastry is a great substitute—just remember to cut it into squares and let it bake a bit longer to avoid sogginess. The dough’s thinness allows it to crisp up while still holding the juicy filling inside.
The Unexpected Star
Butter isn’t just for greasing; it’s a flavor enhancer that gives the dough a glossy finish and a rich taste. Melt 1 tbsp of butter and mix it with minced garlic to create a fragrant glaze that coats the beef. The butter’s fat content helps carry the garlic’s aroma deep into the meat, creating a subtle yet memorable kick. If you’re vegan or dairy‑free, a neutral oil with a high smoke point can mimic the buttery effect, though the flavor will differ slightly.
The Final Flourish
Cheddar and cream cheese are the secret to that irresistible gooeyness. Shredded cheddar provides a sharp, melty layer that pairs perfectly with the creamy texture of cream cheese. The 1/4 cup of cream cheese adds a tangy richness that balances the beef’s savory profile. Together, they create a filling that clings to the dough and melts in your mouth. If you’re feeling adventurous, try pepper jack for a hint of spice or mozzarella for a milder, stretchy melt.
Everything’s prepped? Good. Let’s get into the real action.
The Method — Step by Step
- Preheat the oven to 375°F (190°C). This temperature allows the dough to rise just enough for a golden crust while ensuring the beef cooks through. While the oven heats, gather all your ingredients on a clean surface. The anticipation of that first bite is half the fun—just imagine the aroma that will fill the kitchen.
- Brown the ground beef. Heat a large skillet over medium‑high heat and add the ground beef. Break it apart with a spatula, cooking until it’s no longer pink and starts to brown. Stir frequently to avoid clumping. The goal is a caramelized crust that locks in juices; this step is the flavor foundation.
- Add garlic and butter. Once the beef is browned, reduce the heat to medium and stir in 1 tbsp minced garlic and 1 tbsp melted butter. Cook for 2 minutes, allowing the garlic to soften and the butter to coat the meat. This creates a fragrant, buttery glaze that permeates every bite.
- Stir in the cheeses. Remove the skillet from heat and fold in the shredded cheddar and cream cheese. The residual heat will melt the cheeses, creating a silky, cohesive filling. Give the mixture a good stir until the cheeses are fully incorporated and the mixture is glossy.
- Prepare the dough. Unroll the crescent roll dough onto a lightly floured surface. Cut each sheet into 4 equal squares (you should end up with 12 squares for 4 servings). Lay a spoonful of the beef mixture onto the center of each square, leaving a small border around the edges. This border ensures the dough doesn’t split when you roll it up.
- Roll and seal. Fold each square into a triangle, pinching the corners to seal. Press gently to ensure the filling stays inside. If you want a crispier edge, lightly brush the tops with a beaten egg before baking. The seal is crucial; a loose roll will spill its savory contents.
- Arrange on a baking sheet. Place the sealed rolls on a parchment‑lined sheet, spacing them slightly apart to allow even baking. If you like a golden top, brush each roll with a little melted butter or beaten egg. This step gives the rolls a beautiful shine and a crisp finish.
- Bake to perfection. Bake in the preheated oven for 20–25 minutes, or until the dough is golden brown and the filling is bubbling. Keep an eye on the tops; if they brown too quickly, tent them with foil to prevent burning while the interior finishes cooking.
- Serve hot. Remove the rolls from the oven and let them rest for 2 minutes. The rest allows the filling to set slightly, preventing a gooey mess when you cut into them. Serve immediately while the cheese is still melty and the dough is crisp. The first bite is a revelation—crispy, savory, and utterly comforting.
That’s it — you did it. But hold on, I've got a few more tricks that'll take this to another level. Stay tuned for insider tips that will make your rolls unbeatable.
Insider Tricks for Flawless Results
The Temperature Rule Nobody Follows
Many cooks assume 375°F is the sweet spot for all pastries, but the dough’s thickness and the oven’s actual heat can vary. Use a pizza stone or a baking steel if you have one; it distributes heat evenly and ensures the dough gets a perfect, blistered crust. If your rolls start browning too fast, slide the sheet to the middle rack and reduce the temperature by 10–15°F.
Why Your Nose Knows Best
Trust your nose. When the beef mixture starts to sizzle, you’ll smell the garlic and butter turning golden. That scent is a sign that the flavor is developing. If the aroma is too mild, let the mixture cook a bit longer; if it’s overpowering, reduce the heat to avoid burning.
The 5-Minute Rest That Changes Everything
After baking, let the rolls rest for exactly 5 minutes. This short pause allows the cheese to set, reducing the chance of a runaway melt when you slice. The rest also lets the steam inside redistribute, keeping the dough crisp and the filling silky.
Keep the Rolls Separate
When stacking the dough squares, leave a little space between each. This prevents the rolls from sticking together during baking, which can cause uneven cooking and a messy presentation. A simple parchment line between each roll does the trick.
Serve with a Tangy Twist
Pair your rolls with a quick homemade yogurt dip flavored with lemon zest, dill, and a touch of honey. The acidity cuts through the richness, and the herbs add a fresh counterpoint. This dip also provides a cool contrast that makes each bite feel balanced.
Creative Twists and Variations
This recipe is a playground. Here are some of my favorite ways to switch things up:
Spicy Jalapeño Roll‑Ups
Dice a fresh jalapeño and mix it into the beef mixture for a fiery kick. The heat pairs wonderfully with the creamy cheddar, creating a contrast that excites the palate. Perfect for a summer cookout or a spicy snack.
Turkey & Swiss Version
Swap the ground beef for ground turkey and replace cheddar with Swiss cheese. This lighter option still delivers the same gooey texture but with a milder flavor. Ideal for health‑conscious diners who crave comfort food without the extra calories.
Vegan Delight
Use plant‑based ground “beef,” vegan butter, and dairy‑free cheddar. The texture remains the same, and the flavor stays rich. This version proves that comfort food can be inclusive without compromising taste.
Herb‑Infused Rolls
Add chopped fresh rosemary and thyme to the beef mixture for an aromatic twist. The herbs bring a fragrant note that elevates the dish, especially when paired with a crisp salad. A fragrant, herb‑laden roll is a crowd‑pleaser.
Breakfast‑Style Roll‑Ups
Use scrambled eggs instead of beef, and top with shredded cheddar and a dash of hot sauce. Serve with a side of fresh fruit or a light yogurt. This breakfast variation turns the dish into a hearty, protein‑packed morning meal.
Gluten‑Free Option
Replace crescent dough with a gluten‑free pastry dough or puff pastry. The result is a crispy, buttery roll that’s safe for gluten‑sensitive diners. The texture remains the same, and the flavor profile stays intact.
Storing and Bringing It Back to Life
Fridge Storage
Store leftover rolls in an airtight container in the refrigerator for up to 2 days. Keep the container sealed to prevent the dough from drying out. When ready to serve, reheat in a 350°F oven for 8–10 minutes or until warmed through.
Freezer Friendly
Wrap each roll individually in parchment paper, then place them in a freezer bag. Freeze for up to 1 month. When reheating, let the rolls thaw at room temperature for 15 minutes, then bake at 350°F for 12–15 minutes.
Best Reheating Method
For a crispier finish, finish reheated rolls under a broiler for 1–2 minutes. If you prefer a softer texture, microwave on medium power for 30 seconds, then transfer to a skillet with a splash of water to steam the filling back to gooey perfection. A tiny splash of water before reheating keeps the filling from drying out.