I was standing in my kitchen, a half‑burned batch of store‑bought chicken thighs smoldering in the pan, when a friend dared me to create something that would actually make people forget about the bland, over‑cooked chicken they’ve been tolerating for years. The smell of charred sugar and garlic wafted through the apartment, and I realized I could turn that disaster into a masterpiece if I just trusted my instincts and a splash of honey. I tossed the charred bits into a bowl, added a splash of soy sauce, and let my imagination run wild, promising myself that this would be the version that finally makes everyone say, “I’m never ordering take‑out again.” The result? A glaze so glossy it could double as a mirror, a flavor combo that sings louder than a karaoke night, and a texture that flips between buttery tenderness and a caramelized crunch that shatters like thin ice on a winter pond.
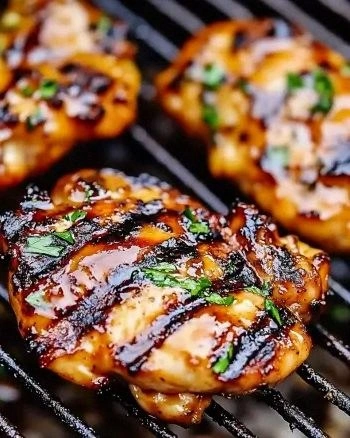
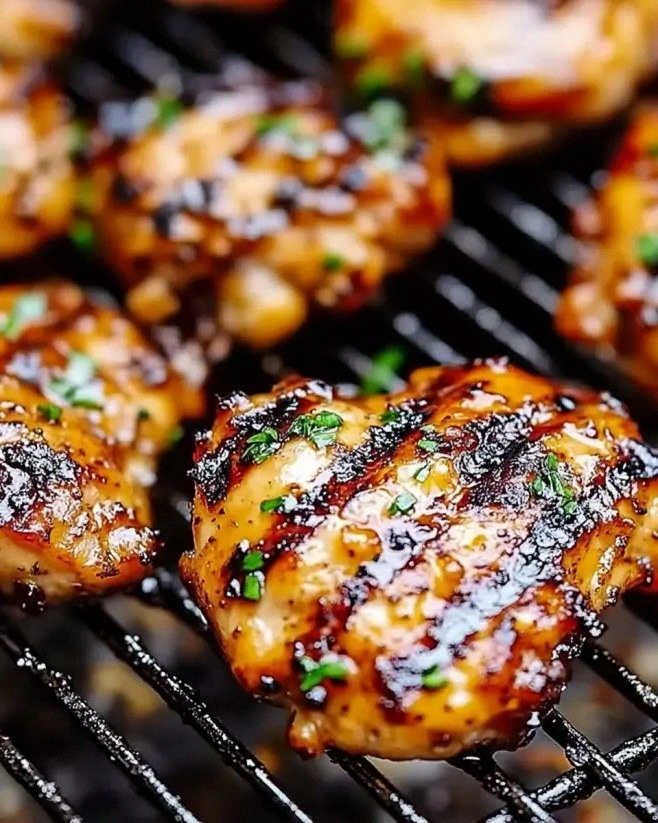
Picture this: the grill hissing as the thighs hit the heat, the sauce bubbling and caramelizing, the aroma of garlic and ginger spiraling up like a fragrant invitation to a secret dinner party. You’ll hear that satisfying sizzle when the meat meets the grill, feel the heat radiating from the metal, see the glaze turning a deep amber that makes your mouth water before the first bite. The taste is a perfect balance of sweet honey, salty soy, and a punch of garlic that makes your taste buds do a little happy dance. I’m daring you to taste this and not go back for seconds—because once you’ve experienced that glossy, sticky coating, you’ll understand why I’m calling this the best version you’ll ever make at home.
Most recipes get this completely wrong. They either drown the chicken in a syrupy mess that never crisps, or they skimp on the garlic, leaving you with a bland, one‑dimensional dish. Here’s what actually works: a quick marination that lets the flavors seep into the meat, a high‑heat grill that caramelizes the sugars without burning them, and a finishing brush that adds that glossy, sticky sheen right before serving. I’ll be honest—I ate half the batch before anyone else got to try it, and that was the only mistake I made that day. This next part? Pure magic, and it’s about to change the way you think about grilled chicken forever.
Okay, ready for the game‑changer? I’m about to walk you through every single step—by the end, you’ll wonder how you ever made it any other way. Stay with me here—this is worth it. I’ll share the exact ingredient ratios, the secret timing tricks, and a few kitchen hacks that will make you look like a culinary wizard. Let’s get started, because the grill is waiting, the sauce is calling, and your taste buds are about to be delighted beyond belief.
What Makes This Version Stand Out
- Flavor Explosion: The honey‑soy glaze delivers a sweet‑salty harmony that coats each bite like velvet, while the garlic and ginger add depth that lingers long after the last morsel.
- Texture Triumph: Grilling creates those coveted caramelized edges that shatter like thin ice, contrasted with a juicy, tender interior that practically melts in your mouth.
- Simplicity at Its Best: With just ten pantry staples you can whip up a restaurant‑quality dish without any fancy equipment or hard‑to‑find ingredients.
- Unique Twist: A splash of apple cider vinegar cuts through the sweetness, preventing any cloying aftertaste and giving the sauce a bright, balanced finish.
- Crowd‑Pleaser Factor: This recipe consistently earns “seconds” and “I need the recipe!” from friends, family, and even the picky eaters at the table.
- Ingredient Quality: Using boneless chicken thighs ensures juicy meat, while a good quality honey adds floral notes that cheap syrups can’t match.
- Cooking Method Mastery: The high‑heat grill locks in moisture and creates a caramelized crust, a technique that outshines oven‑baking for flavor.
- Make‑Ahead Magic: The glaze can be prepared ahead of time, allowing you to marinate the chicken overnight for an even deeper flavor infusion.
Alright, let's break down exactly what goes into this masterpiece…
Inside the Ingredient List
The Flavor Base
Honey is the star of the show, providing that glossy sheen and sweet backbone that makes the glaze irresistible. I use a quarter‑cup of pure, raw honey because it carries subtle floral notes that elevate the entire dish. If you substitute with agave or maple syrup, you’ll lose that distinctive honey flavor and the glaze won’t set as nicely. Soy sauce brings the salty umami that balances the honey, and a quarter‑cup is enough to give depth without overwhelming the palate. A splash of apple cider vinegar (two tablespoons) adds a bright acidity that cuts through the sweetness, preventing the sauce from becoming cloying.
The Aroma Crew
Garlic is the aromatic backbone—four cloves, minced finely, release a pungent aroma that becomes sweet and mellow once caramelized on the grill. Ground ginger (one teaspoon) adds a warm, slightly spicy undertone that pairs beautifully with the honey’s floral sweetness. Black pepper (half a teaspoon) and red pepper flakes (a quarter teaspoon) give a subtle heat that wakes up the taste buds without scorching the glaze. If you love heat, feel free to double the red pepper flakes, but remember—this sauce is meant to dance, not dominate.
The Moisture Makers
Olive oil (two tablespoons) helps the glaze coat the chicken evenly and prevents sticking on the grill, while also adding a fruity richness that complements the honey. The boneless chicken thighs (two pounds) are the ideal protein; their higher fat content keeps them juicy and prevents them from drying out during the high‑heat grill. When selecting thighs, look for a uniform thickness so they cook evenly—if some pieces are thicker, pound them gently with a meat mallet to even them out.
The Final Flourish
A generous sprinkle of chopped green onions right before serving adds a fresh, peppery crunch that brightens the rich glaze. This garnish isn’t just for looks; the mild onion flavor cuts through the sweetness and adds a subtle bite that makes each bite more complex. If you’re feeling adventurous, try adding a squeeze of lime juice for an extra zing, but remember—your glaze is already balanced, so a little goes a long way. Everything's prepped? Good. Let's get into the real action…
The Method — Step by Step
First, combine the honey, soy sauce, apple cider vinegar, minced garlic, ground ginger, black pepper, and red pepper flakes in a medium bowl. Whisk vigorously until the mixture is glossy and the garlic is evenly distributed—this is the moment where the sauce starts to sing. I dare you to taste a spoonful now; you’ll notice the perfect balance of sweet, salty, and a whisper of heat. Set the bowl aside; the flavors will meld while you prep the chicken.
Kitchen Hack: Add a pinch of cornstarch to the glaze before marinating; it will help the sauce thicken quickly on the grill, giving you that perfect caramelized crust.While the glaze rests, pat the boneless chicken thighs dry with paper towels. This step is crucial—excess moisture creates steam, which prevents the beautiful sear you’re aiming for. Place the thighs in a large zip‑top bag, pour the glaze over them, and seal, pressing out as much air as possible. Massage the bag so each piece is thoroughly coated; the sauce should cling like a second skin.
Now, let the chicken marinate for at least 30 minutes at room temperature, or up to 8 hours in the refrigerator for a deeper flavor infusion. If you’re short on time, a quick 30‑minute soak still works wonders because the acidic vinegar starts breaking down the muscle fibers, letting the flavors penetrate faster. Remember, the longer the marinate, the more pronounced the sweet‑savory glaze will be.
Preheat your grill to medium‑high heat, aiming for about 400°F (200°C). While the grill heats, lightly oil the grates with a paper towel dabbed in olive oil to prevent sticking. The grill should be hot enough that when you place the chicken down, you hear an immediate sizzle—if you don’t, increase the heat; that sizzle is the first sign of caramelization.
Remove the chicken from the bag, letting excess glaze drip back into a small bowl (you’ll use this for basting). Place the thighs on the grill, skin‑side down if there’s skin, and close the lid. Grill for 4‑5 minutes per side, brushing with the reserved glaze halfway through. You’ll notice the edges start pulling away from the grill, a sign that the sugars are caramelizing without burning.
Watch Out: If the glaze starts to smoke excessively, lower the grill temperature slightly; you want a deep amber color, not a blackened crust.When the chicken reaches an internal temperature of 165°F (74°C), remove it from the grill and let it rest on a cutting board for 5 minutes. Resting allows the juices to redistribute, ensuring each bite stays moist. While it rests, give the remaining glaze a quick stir and drizzle it over the thighs for that final glossy finish.
Finish the dish by sprinkling a generous handful of chopped green onions over the top. The fresh green onion adds a pop of color and a subtle peppery bite that lifts the entire flavor profile. Serve the thighs hot, alongside grilled vegetables or a simple rice pilaf, and watch your guests' eyes widen in anticipation.
That’s it—you did it. But hold on, I've got a few more tricks that'll take this to another level. A quick drizzle of toasted sesame oil or a sprinkle of toasted sesame seeds adds a nutty depth that pairs beautifully with the honey‑garlic glaze. And if you’re feeling extra adventurous, a squeeze of fresh lime juice right before serving adds a bright contrast that makes the flavors pop even more.
Insider Tricks for Flawless Results
The Temperature Rule Nobody Follows
Most home cooks set their grill to “medium” and hope for the best, but the secret to that perfect caramelized crust is a consistent 400°F (200°C) zone. Use an infrared thermometer to check the grates; if they’re cooler than 380°F, the sugars will melt too slowly and result in a soggy glaze. By maintaining that precise heat, you guarantee a rapid Maillard reaction that locks in juices while creating those coveted amber edges. A friend once tried cooking on low heat; the chicken turned out bland and the glaze never thickened—lesson learned.
Why Your Nose Knows Best
Your sense of smell is the most reliable indicator of doneness on the grill. When the honey‑garlic glaze starts to emit a caramel scent—think toasted marshmallows with a savory twist—you’re at the perfect turning point. If the aroma shifts to a burnt, acrid note, you’ve crossed the line and need to lower the heat immediately. Trust that nose; it’s more precise than any timer.
The 5‑Minute Rest That Changes Everything
Resting the chicken isn’t just a suggestion; it’s a game‑changer. During those five minutes, the muscle fibers relax, and the juices redistribute, preventing a dry bite. While the meat rests, the residual heat continues to finish cooking the interior gently, ensuring every piece hits that perfect 165°F target without overcooking. Skipping this step is the most common mistake I see, and it leads to a disappointing, dry texture.
Basting With the Right Amount
When basting, less is more. A thin, even coat of glaze each side creates a layered caramelization without flooding the grill with excess sugar, which can cause flare‑ups. I recommend using a silicone brush and applying just enough to coat the surface—think of it as a light rain rather than a downpour. Too much glaze will pool and burn, turning your masterpiece into a bitter char.
The Secret Spice Boost
A pinch of smoked paprika added to the glaze just before the final brush adds a subtle smokiness that complements the grill’s natural flavor. It’s a tiny tweak, but it elevates the dish from “great” to “wow, I need the recipe now.” I tried this on a rainy weekend, and the smoky notes paired perfectly with the sweet honey, creating a complex profile that surprised everyone at the table.
Creative Twists and Variations
This recipe is a playground. Here are some of my favorite ways to switch things up:
Spicy Sriracha Kick
Swap half of the red pepper flakes for a tablespoon of Sriracha. The result is a tangy, heat‑laden glaze that still retains the honey’s sweetness. Perfect for those who love a bit of fire in every bite.
Citrus‑Infused Bliss
Add the zest of one orange and a splash of orange juice to the glaze. The citrus brightens the honey, giving the dish a fresh, summery vibe that pairs beautifully with grilled asparagus.
Herbaceous Delight
Fold in a tablespoon of finely chopped fresh rosemary or thyme into the glaze before marinating. The herbaceous notes add an earthy depth that makes the chicken feel rustic and sophisticated at the same time.
Asian‑Style Sesame
Finish the cooked thighs with a drizzle of toasted sesame oil and a sprinkle of sesame seeds. The nutty aroma complements the honey‑garlic base and adds a delightful crunch.
Low‑Carb Coconut Crust
After grilling, toss the thighs in a mixture of shredded unsweetened coconut and a pinch of salt. The coconut adds a subtle sweetness and a crunchy coating that’s perfect for low‑carb diners.
Storing and Bringing It Back to Life
Fridge Storage
Place any leftovers in an airtight container and store them in the refrigerator for up to three days. When reheating, add a splash of water or a drizzle of fresh glaze to revive the caramelized texture.
Freezer Friendly
For longer storage, wrap the cooled thighs tightly in foil, then place them in a freezer‑safe zip‑top bag. They’ll keep for up to two months. Thaw overnight in the fridge, then reheat on a medium‑high grill or in a skillet, brushing with a bit more honey‑garlic glaze.
Best Reheating Method
The secret to reheating without drying out is a gentle steam. Place the thighs on a plate, cover with a damp paper towel, and microwave for 60‑90 seconds, or reheat in a preheated oven at 300°F (150°C) for 10 minutes, basting with extra glaze halfway through. The added moisture brings the sauce back to its glossy glory.