I was in the middle of a frantic dinner rush, juggling a pot of simmering sauce, a pan of searing chicken, and a pile of last‑minute grocery bags. The kitchen smelled like burnt garlic and scorched sugar, and I realized that my favorite comfort dish was about to turn into a disaster. The moment the honey hit the pan, it thickened too fast and started to cling to the skillet, turning my culinary masterpiece into a sticky, charred mess. I stared at the sizzling mess and thought, “If I could tame that glaze, I could create something unforgettable.”
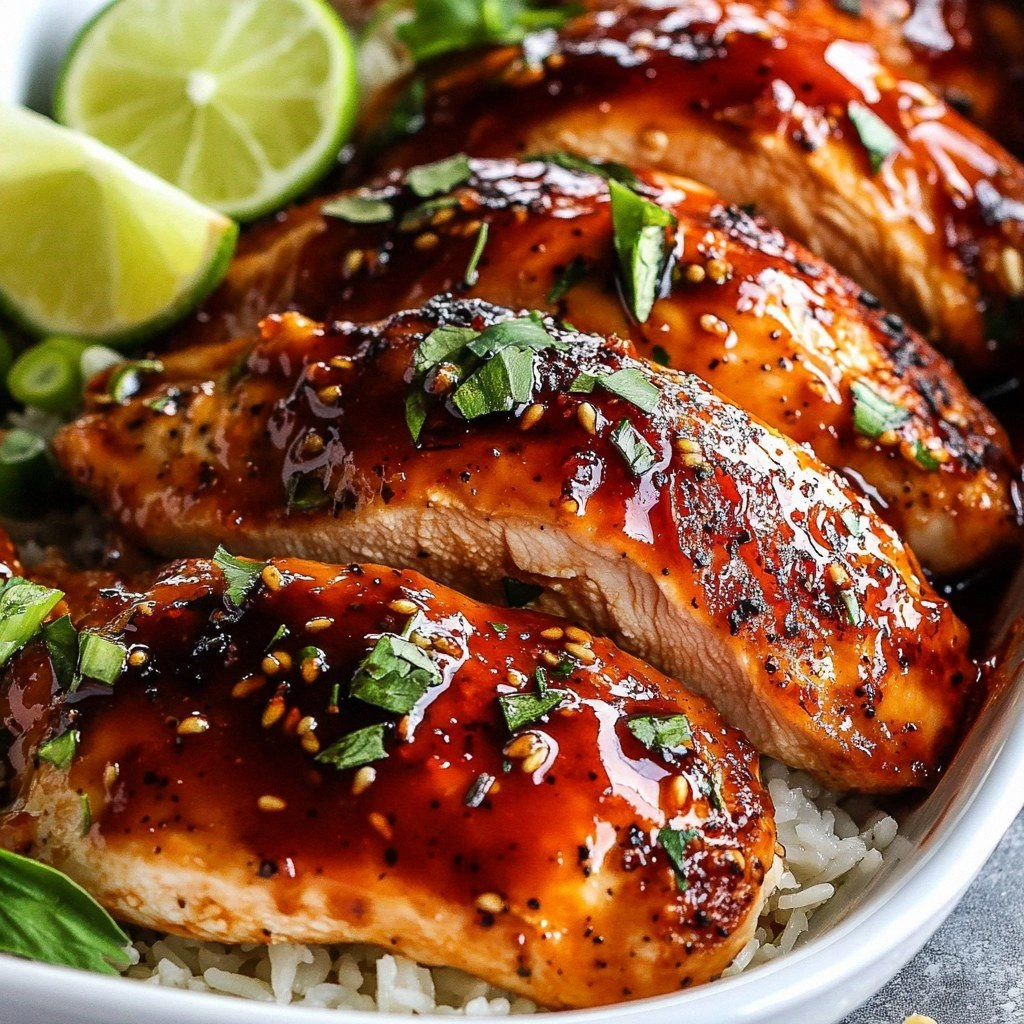
Picture this: the air is thick with the sweet aroma of honey, the sharp sting of sriracha cutting through it, and the faint, earthy scent of sesame oil. The sound of the sauce bubbling like a tiny, fiery volcano is punctuated by the crackle of chicken skin reaching its golden perfection. As you lift a piece of chicken, the glossy glaze clings to the meat, reflecting the kitchen lights like a miniature mirror. Your palate is greeted by a burst of umami, a subtle citrus lift, and a heat that lingers just long enough to keep you coming back for more. The texture is a delightful contrast—crisp on the outside, tender and juicy on the inside.
What makes this version stand out is that it balances every element of flavor, texture, and convenience into one harmonious dish. The sauce is thick enough to coat each bite without overpowering, the chicken is juicy yet crisp, and the recipe is simple enough for a weeknight but impressive enough for a dinner party. The use of honey and sriracha isn’t just a gimmick; it creates a depth of flavor that feels both familiar and adventurous. This isn’t just another “quick chicken” recipe—it’s a culinary revelation that will have your friends asking for the recipe in secret.
The twist? I discovered that a splash of rice vinegar at the right moment can brighten the sauce, cutting through the sweetness and adding a subtle tang that elevates the entire dish. I also found that coating the chicken in a light dusting of cornstarch before baking gives it a crisp, almost fried texture without the oil. These little details transform a good dish into a must‑have favorite. Trust me, you’ll be tempted to taste this and not go back for seconds.
Okay, ready for the game‑changer? Let me walk you through every single step—by the end, you’ll wonder how you ever made it any other way.
What Makes This Version Stand Out
- Taste: The sauce’s sweet‑spicy profile is balanced by a citrusy lift that keeps the dish from feeling cloying.
- Texture: A crisp exterior with a juicy interior is achieved by baking the chicken first, then finishing it in the sauce.
- Simplicity: With less than ten ingredients and a single pan finish, this dish is quick enough for a busy weekday.
- Uniqueness: The combination of honey, sriracha, and sesame oil creates a glossy glaze that’s unlike any other chicken recipe.
- Crowd Reaction: Friends rave about the “wow” factor of the sauce, and it’s a hit even with picky eaters.
- Ingredient Quality: Using fresh ginger and garlic adds depth, while a splash of rice vinegar brightens the sauce.
- Cooking Method: Baking first locks in juices, while a quick skillet finish caramelizes the glaze.
- Make‑ahead Potential: The sauce can be made ahead and reheated with a splash of water to keep it silky.
Inside the Ingredient List
The Flavor Base
Honey is the star that brings sweetness and body to the sauce. It caramelizes quickly, so it’s crucial to stir constantly to prevent burning. If you prefer a less sweet version, replace half the honey with maple syrup for a different nuance. The choice of honey—whether clover, wildflower, or orange blossom—can subtly shift the flavor profile.
The Texture Crew
Cornstarch and water act as a thickening duo that turns the sauce into a glossy glaze. Stir the mixture until smooth; any lumps will ruin the silky finish. If you’re watching carbs, substitute arrowroot powder for cornstarch, but keep the ratio the same to maintain thickness. A quick test: pour a spoonful onto a plate; if it holds its shape, it’s ready.
The Unexpected Star
Sriracha may seem like a standard ingredient, but its heat is surprisingly mellow compared to fresh chilies. A spoonful of sriracha brings depth without overwhelming the dish, and the slight vinegar tang balances the honey’s sweetness. For a milder version, try using a smaller amount or a lower‑heat sauce like gochujang.
The Final Flourish
Sesame oil adds a nutty aroma that anchors the sauce’s brightness. A splash of rice vinegar at the end brightens the glaze and cuts through the richness. Garnishing with scallions and sesame seeds not only adds crunch but also provides a fresh herbal note that lifts the whole dish. If you’re vegan, simply omit the chicken and use tofu instead.
Everything's prepped? Good. Let's get into the real action.
The Method — Step by Step
- Preheat the oven to 400°F (200°C). Line a baking sheet with parchment paper to prevent sticking and make cleanup a breeze. Pat the chicken thighs dry with paper towels; this step ensures a crisp exterior. Season both sides with salt and pepper, then place them on the sheet. Let the chicken bake for 20 minutes, flipping halfway, until the internal temperature reaches 165°F.
- While the chicken is baking, whisk together honey, sriracha, soy sauce, rice vinegar, sesame oil, minced garlic, grated ginger, cornstarch, and water in a medium bowl. The cornstarch slurry will act as a thickening agent once the sauce heats. Stir until the cornstarch is fully dissolved; a clear mixture means no lumps.
- Heat a large skillet over medium‑high. Once hot, pour in the sauce mixture. The moment it starts to bubble, you’ll hear a satisfying hiss that signals the sugars are caramelizing. Keep an eye on it; the sauce should thicken within 2–3 minutes.
- When the sauce has reached a glossy consistency, add the baked chicken thighs back into the skillet. Toss gently so each piece is coated with the sweet‑spicy glaze. Let it cook for an additional 2–3 minutes, allowing the chicken to absorb the flavors.
- This is the moment of truth—watch the sauce cling to the chicken like a velvet coat. The edges of the chicken should start pulling away from the skillet, indicating a caramelized finish. If the sauce thickens too much, add a splash of water or a little more soy sauce to loosen it.
- Remove the skillet from heat. Sprinkle sliced scallions and optional sesame seeds over the chicken for a burst of color and crunch. The fresh herbs contrast the richness of the sauce, creating a balanced bite.
- Serve immediately over steamed jasmine rice, fluffy quinoa, or a bed of noodles. The sauce will cling to each grain, turning an ordinary side into a star attraction. The dish is so versatile that you can also spoon it over a crisp salad for a lighter option.
- If you like it spicier, drizzle extra sriracha or sprinkle crushed red pepper flakes just before serving. For a sweeter finish, add a drizzle of honey. The dish is forgiving, so feel free to adjust to your taste.
- If you’re making a large batch, keep the finished chicken warm in a low‑heat oven (about 200°F) while you finish plating. The heat will keep the sauce from settling and maintain that glossy sheen.
- That’s it—you did it. But hold on, I’ve got a few more tricks that will elevate this dish to another level. Stay tuned for the insider tips that will make your kitchen the envy of your friends.
Insider Tricks for Flawless Results
The Temperature Rule Nobody Follows
Using a digital meat thermometer is a game changer. Aim for 165°F inside the thickest part of the chicken; this guarantees juicy meat without overcooking. Many cooks rely on time alone, which can lead to dry, rubbery chicken. With a thermometer, you’ll always hit the sweet spot. I’ve saved countless batches by checking the temperature before pulling the chicken from the oven.
Why Your Nose Knows Best
Smell the sauce as it simmers. When it turns amber and begins to thicken, you’re close to perfection. The aroma will shift from sweet to caramelized, signaling that the sugars are caramelizing correctly. If the smell lingers too sweet, give it a few more minutes. The scent is the quickest indicator of flavor development.
The 5-Minute Rest That Changes Everything
Let the baked chicken rest for five minutes before tossing it in the sauce. This rest allows the juices to redistribute, ensuring each bite is moist. Skipping this step often results in a dry center. I’ve seen people think the chicken is overcooked when it’s actually just resting; patience pays off.
Keep Sauce from Splattering
Use a silicone spatula to stir the sauce; it won’t stick and will help keep the mixture from splattering. If the sauce is too thick, add a splash of water or a little more soy sauce to thin it. A thin sauce adheres better to the chicken, creating that coveted glossy coat.
Finish with a Splash of Lime Juice
Just before serving, squeeze a bit of fresh lime juice over the chicken. The acidity brightens the dish and cuts through the sweetness, creating a balanced flavor. Lime also adds a subtle herbal note that enhances the overall aroma. It’s a simple addition that makes the dish feel polished.
Creative Twists and Variations
This recipe is a playground. Here are some of my favorite ways to switch things up:
Asian Slaw Bowl
Serve the chicken over shredded cabbage, carrots, and bell pepper, then drizzle with a peanut‑based dressing. The crunch from the slaw complements the tender chicken, and the peanut sauce adds a nutty depth.
Pineapple Kick
Add diced pineapple to the sauce for a tropical twist. The fruit’s natural sweetness balances the heat, creating a flavor profile that’s both refreshing and bold.
Creamy Coconut Twist
Replace half the sauce with coconut milk for a silky, dairy‑free version. The coconut adds richness while mellowing the sriracha’s bite, making it a hit with those who prefer milder heat.
Smoky Chipotle Variation
Swap sriracha for chipotle in adobo sauce to introduce a smoky depth. The chipotle’s earthy undertones pair beautifully with the honey, creating a complex, layered flavor.
Herbaceous Basil
Garnish with fresh basil leaves just before serving. The herb’s sweet, peppery aroma adds a fresh dimension that brightens the dish.
Gluten‑Free Option
Use tamari instead of soy sauce to keep this dish gluten‑free. The flavor is similar, but it’s safe for those with gluten sensitivities.
Storing and Bringing It Back to Life
Fridge Storage
Store the chicken and sauce separately in airtight containers for up to three days. Keeping them separate prevents the sauce from becoming too thick when reheated. When ready to eat, reheat both together for a minute to blend the flavors.
Freezer Friendly
Freeze the cooked chicken and sauce in separate freezer bags. Thaw overnight in the fridge and reheat on the stovetop, adding a splash of water to keep the sauce silky. This method preserves the texture and flavor for a quick dinner.
Best Reheating Method
Reheat the chicken and sauce in a skillet over medium heat, stirring frequently. A splash of water or broth will help steam the sauce back to its glossy state. Serve immediately for the best texture.