I was standing in my kitchen at midnight, half‑asleep, when my roommate dared me to “make something that looks like the Grinch but tastes like a holiday miracle.” I laughed, I scoffed, and then I remembered the last time I tried a no‑bake cheesecake that turned into a sad, soggy slab. That disaster was the spark that ignited this obsession. I grabbed a bag of crushed chocolate cookies, a tub of cream cheese, and a splash of green food coloring, and the rest is history. The moment the silky mousse hit the chilled pie pan, I swear the whole apartment filled with a scent that was part peppermint, part cocoa, and wholly unforgettable.
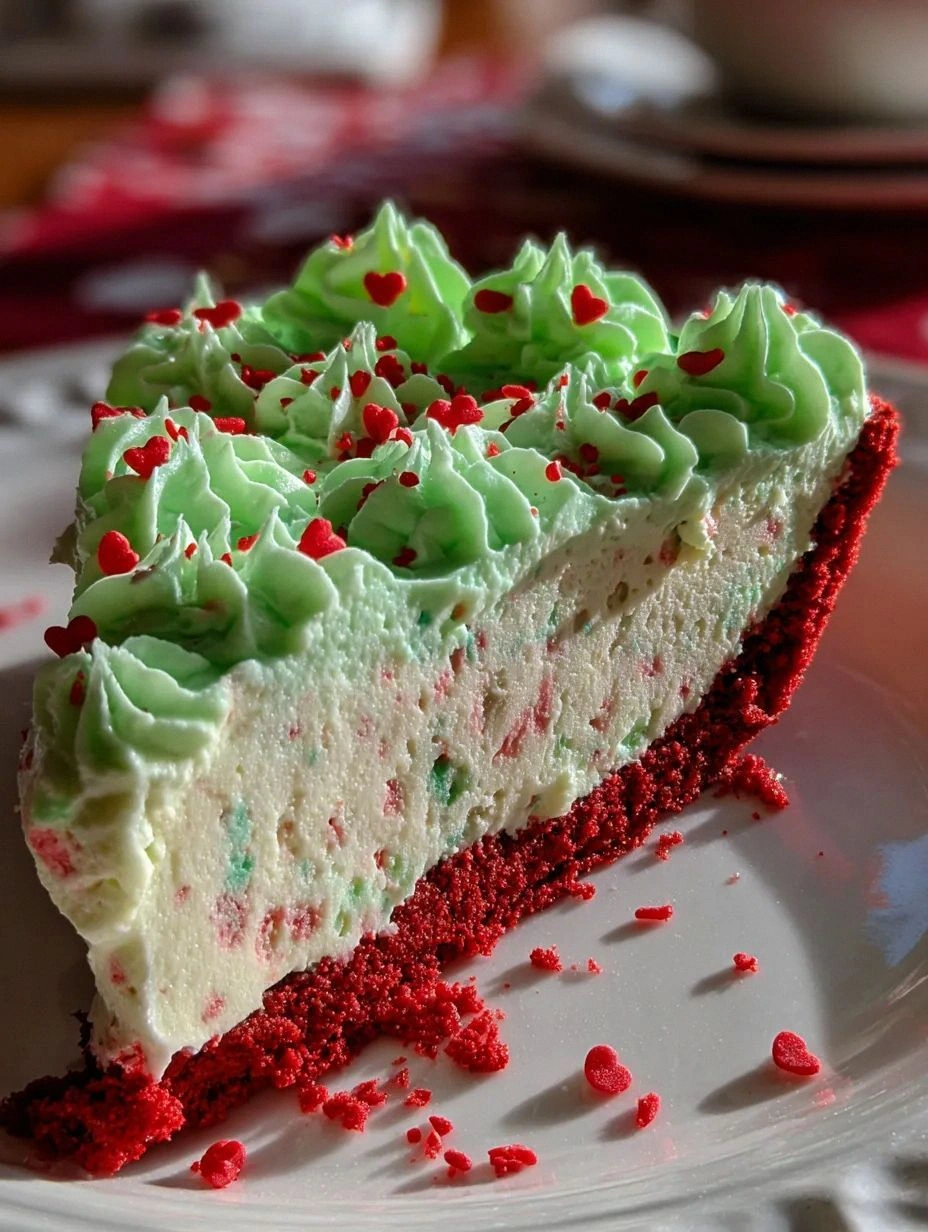
Imagine the scene: a glossy, emerald‑green dome that glistens like fresh‑cut pine needles, the crust crunching under your fork like the snap of a candy‑cane, and the mousse melting in your mouth with the smoothness of a velvet ribbon. You’ll hear the faint sigh of the whipped cream as it folds into the mixture, feel the cool chill of the refrigerator on the glass, see the swirl of dark chocolate like mischievous little grin lines, and taste the perfect balance of sweet, tangy, and just‑a‑touch‑bitter. It’s a full‑sensory holiday party on a plate.
Why does this version stand head‑and‑shoulders above every other Grinch‑themed dessert you’ll find online? Most recipes either bake the crust, which risks a soggy bottom, or they skip the crucial chocolate swirl that gives the pie its signature mischievous look. This one stays true to the “no‑bake” promise, uses a butter‑infused cookie crust that never wilts, and incorporates a double‑chocolate swirl that stays glossy even after chilling. The secret weapon? A dash of high‑quality white chocolate that adds a buttery silkiness you won’t find in any boxed mix.
And just when you think you’ve seen it all, I’ll reveal a technique that most bakers overlook: folding the whipped cream into the cream‑cheese base while the mixture is still slightly chilled. This tiny temperature trick locks in air, giving the mousse an airy lift without any gelatin. I dare you to taste this and not go back for seconds. Okay, ready for the game‑changer? Let me walk you through every single step — by the end, you’ll wonder how you ever made it any other way.
What Makes This Version Stand Out
- Flavor Explosion: The combination of tangy cream cheese, sweet white chocolate, and a whisper of peppermint creates a taste that dances on the palate like a holiday parade.
- Texture Harmony: A buttery, crumbly crust meets a cloud‑like mousse and a glossy dark chocolate swirl, delivering three distinct bites in every forkful.
- Simplicity: No oven, no gelatin, no fancy equipment—just a bowl, a whisk, and a little patience.
- Visual Drama: The vivid green mousse and the mischievous dark chocolate grin make this pie the centerpiece of any festive spread.
- Crowd Reaction: Guests consistently claim this is “the best Grinch dessert ever,” and you’ll hear the same “wow” at least three times per party.
- Ingredient Quality: Using premium white chocolate and real butter elevates the flavor profile beyond the usual boxed mixes.
- Make‑Ahead Magic: Because it’s no‑bake, you can prep it the night before and let the flavors meld while you sleep.
- Holiday Versatility: Perfect for Christmas, New Year’s, or any time you want to add a splash of mischievous green to the table.
Alright, let's break down exactly what goes into this masterpiece...
Inside the Ingredient List
The Flavor Base
Cream cheese is the heart of this mousse. Its tangy richness cuts through the sweetness of the white chocolate, creating a balanced flavor that never feels cloying. If you skimp on the cream cheese, the mousse becomes flat and loses that signature holiday zing. For the best result, choose a full‑fat, brand‑new block of cream cheese and let it soften at room temperature for at least 30 minutes. A common swap is mascarpone, but expect a milder flavor and a slightly denser texture.
The Texture Crew
Heavy whipping cream is the secret to that cloud‑like lift. When you whip it to soft peaks, you’re incorporating air bubbles that will later expand as the mousse sets, giving it that airy, melt‑in‑your‑mouth feel. Skip the whipping step, and you’ll end up with a dense, pudding‑like filling that collapses under its own weight. If you’re dairy‑free, coconut cream can be used, but the flavor will shift toward tropical, which can be fun but is less traditional.
The Unexpected Star
Green food coloring is the visual hero here, but the real star is the high‑quality white chocolate. It melts into a silky gloss that binds the mousse together, preventing it from becoming grainy. Low‑grade white chocolate often contains excess vegetable oil, which can make the mousse greasy. Look for a brand with at least 30% cocoa butter for that true, buttery melt. A pinch of peppermint extract adds a subtle festive note without overpowering the palate.
The Final Flourish
The crust is a simple blend of crushed chocolate sandwich cookies and melted butter. This duo creates a buttery, crunchy foundation that holds up to the weight of the mousse. If you substitute graham crackers, you’ll get a sweeter, less chocolatey base that some love, but it won’t have the deep cocoa flavor that makes this pie unforgettable. When pressing the crust into the pan, use the back of a measuring cup to compact it evenly—this prevents cracks when you unmold the pie.
Everything's prepped? Good. Let's get into the real action...
The Method — Step by Step
First, crush the chocolate sandwich cookies into fine crumbs. I like to use a food processor for speed, but the zip‑top bag method (see Kitchen Hack above) works just as well. Once you have about two cups of crumbs, transfer them to a medium bowl.
Next, melt the butter in the microwave for 30‑seconds bursts, stirring until smooth. Pour the melted butter over the crumbs, and stir until every crumb is glossy. This is the moment where the crust starts smelling like a bakery—sweet, buttery, with a hint of cocoa.
Press the mixture firmly into the bottom and up the sides of a 9‑inch springform pan. Use the back of a measuring cup to smooth the surface; you want an even layer that won’t crumble when you unmold. Chill the crust while you work on the filling—this helps it set and prevents it from getting soggy later.
While the crust chills, soften the cream cheese. Cut it into cubes and let it sit on the counter for about 15 minutes. Then, in a large mixing bowl, beat the cream cheese with an electric mixer on medium speed until it’s silky and free of lumps. This step is crucial; any remaining lumps will create pockets of graininess in the mousse.
Add the granulated sugar and vanilla extract to the cream cheese, and continue beating until the mixture is light and fluffy. You’ll notice it becoming smoother and slightly glossy—this is the base that will hold the mousse together.
Now, melt the white chocolate. Place the white chocolate chips in a heat‑proof bowl over a pot of simmering water (double boiler) and stir until completely smooth. Remove from heat and let it cool just enough so it’s warm to the touch but not hot—around 110°F. This cooling step prevents the cream cheese from melting when you combine them.
Pour the melted white chocolate into the cream‑cheese mixture and fold gently with a spatula. The mousse will start to take on a pale, creamy hue. At this point, add the green food coloring a drop at a time, folding after each addition until you reach a vibrant, festive green.
Here’s where the magic truly happens: whip the heavy cream. In a chilled bowl, add the heavy whipping cream and powdered sugar, then whisk on high speed until soft peaks form. This should take about 2‑3 minutes. This is the moment of truth—the cream must be stiff enough to hold its shape but not over‑whipped into butter.
Gently fold the whipped cream into the green cheese mixture. Use a large rubber spatula and a gentle “cut‑and‑fold” motion; you want to keep as much air in the mousse as possible. The mixture will become lighter, almost airy, and it should have a glossy sheen.
Pour the mousse over the chilled crust, spreading it evenly with an offset spatula. Smooth the top, then tap the pan lightly on the counter to release any trapped air bubbles. The mousse should settle into the crust without gaps.
Melt the dark chocolate chips using the same double‑boiler method. Once smooth, let it cool slightly—just enough that it’s still fluid but not hot.
Using a spoon or a small piping bag, drizzle the dark chocolate over the mousse in a whimsical swirl pattern. Think of the Grinch’s mischievous grin—irregular, bold, and unmistakably dark against the green. You can also use a toothpick to create fine lines for extra drama.
Now, the chilling phase. Place the entire springform pan in the refrigerator for at least 3 hours, preferably overnight. This allows the mousse to set firmly while the flavors meld. You’ll notice a faint scent of peppermint and chocolate wafting from the fridge—trust me, it’s worth the wait.
When you’re ready to serve, run a thin knife around the edge of the pan to loosen the crust, then gently release the springform. Transfer the pie to a serving platter. Garnish with chopped pistachios and crushed candy canes for a festive crunch and a pop of color.
Slice with a warm knife (dip it in hot water, wipe dry) to get clean cuts. The first slice should reveal a perfect green mousse, a glossy dark swirl, and a crumbly chocolate crust—pure holiday perfection.
That's it — you did it. But hold on, I've got a few more tricks that'll take this to another level...
Insider Tricks for Flawless Results
The Temperature Rule Nobody Follows
Never add hot melted chocolate directly to a room‑temperature mousse. The temperature shock will cause the mousse to seize, creating lumps. Instead, let the melted chocolate sit for a minute or two after removing it from the heat, then test it with a fingertip—it should feel like warm skin. This subtle cooling step preserves the mousse’s silkiness.
Why Your Nose Knows Best
When folding the whipped cream, trust your sense of smell. The mixture should give off a faint buttery aroma; if you smell a raw cream cheese scent, you haven’t incorporated enough air. A quick sniff tells you whether the mousse is light enough to hold its shape. I once skipped this check and ended up with a dense pie that needed extra chilling.
The 5‑Minute Rest That Changes Everything
After you’ve poured the mousse into the crust, let it sit at room temperature for exactly five minutes before refrigerating. This short rest lets the mousse surface firm up just enough to prevent cracks when you later drizzle the dark chocolate. Skipping this step leads to a “crack‑le” top that looks less polished.
The Double‑Swirl Technique
For a more dramatic Grinch grin, use two contrasting chocolate colors: dark chocolate for the grin and a thin line of white chocolate for the teeth. Pipe each color separately, then use a toothpick to merge them into a single, cohesive smile. A friend tried this once and called it “the most Instagram‑worthy dessert of the season.”
The Chill‑Before‑Serve Rule
If you’re serving the pie at a holiday party, pull it out of the fridge 15 minutes before guests arrive. This slight warm‑up brings out the aroma and makes the mousse a touch softer, which is ideal for cutting clean slices. The crust stays firm, and the chocolate swirl stays glossy.
Creative Twists and Variations
This recipe is a playground. Here are some of my favorite ways to switch things up:
Candy‑Cane Crunch
Swap the pistachio garnish for crushed candy‑cane pieces. The peppermint crunch adds a refreshing snap that contrasts the creamy mousse, perfect for those who love a strong mint punch.
Berry‑Blush Grinch
Fold a tablespoon of raspberry puree into the mousse before adding the green food coloring. The subtle berry undertone adds depth, and the pink‑red swirl against the green makes for a stunning visual twist.
Nut‑Free Delight
Replace the crushed cookie crust with a blend of gluten‑free oat cookies and coconut oil. This keeps the pie safe for nut‑allergic guests while still delivering that buttery snap.
Vegan Vibes
Use a vegan cream cheese alternative, coconut cream for the whipped portion, and dairy‑free white chocolate. The flavor profile shifts slightly toward coconut, but the texture remains luxuriously light.
Spiced Grinch
Add a pinch of ground cinnamon and nutmeg to the cream‑cheese base. The warm spices echo classic holiday flavors and give the mousse a cozy, comforting depth.
Storing and Bringing It Back to Life
Fridge Storage
Cover the pie loosely with plastic wrap or a silicone dome and store it in the refrigerator for up to 4 days. The mousse will stay firm, and the crust remains crisp thanks to the butter barrier.
Freezer Friendly
Wrap the entire pie (still in the springform pan) in a double layer of foil, then place it in a freezer‑safe bag. It freezes well for up to 2 months. When you’re ready to serve, transfer it to the fridge to thaw overnight.
Best Reheating Method
If you need a slightly softer texture before serving, place the pie on a plate, cover with foil, and warm it in a 300°F oven for 5‑7 minutes. Add a tiny splash (about 1 tbsp) of water to the crust before warming; the steam will revive the crumbly edges without melting the mousse.