It all started on a sweltering July afternoon when my air‑conditioner decided to take a vacation, the kitchen turned into a sauna, and I found myself staring at a bowl of over‑ripe peaches that were practically begging for redemption. I tossed a handful of raspberries in for good measure, because why not add a pop of color to the chaos? The result? A sticky, fragrant mess that clung to the counter like a sweet‑scented glue, and a sudden, desperate craving for something that could capture that summer madness in a bite. I dared myself to turn that mess into a dessert that could stand up to the heat, and after a few frantic experiments (and a few bites taken straight from the mixing bowl), I finally nailed a version that makes my friends swear they’ve never tasted anything like it.
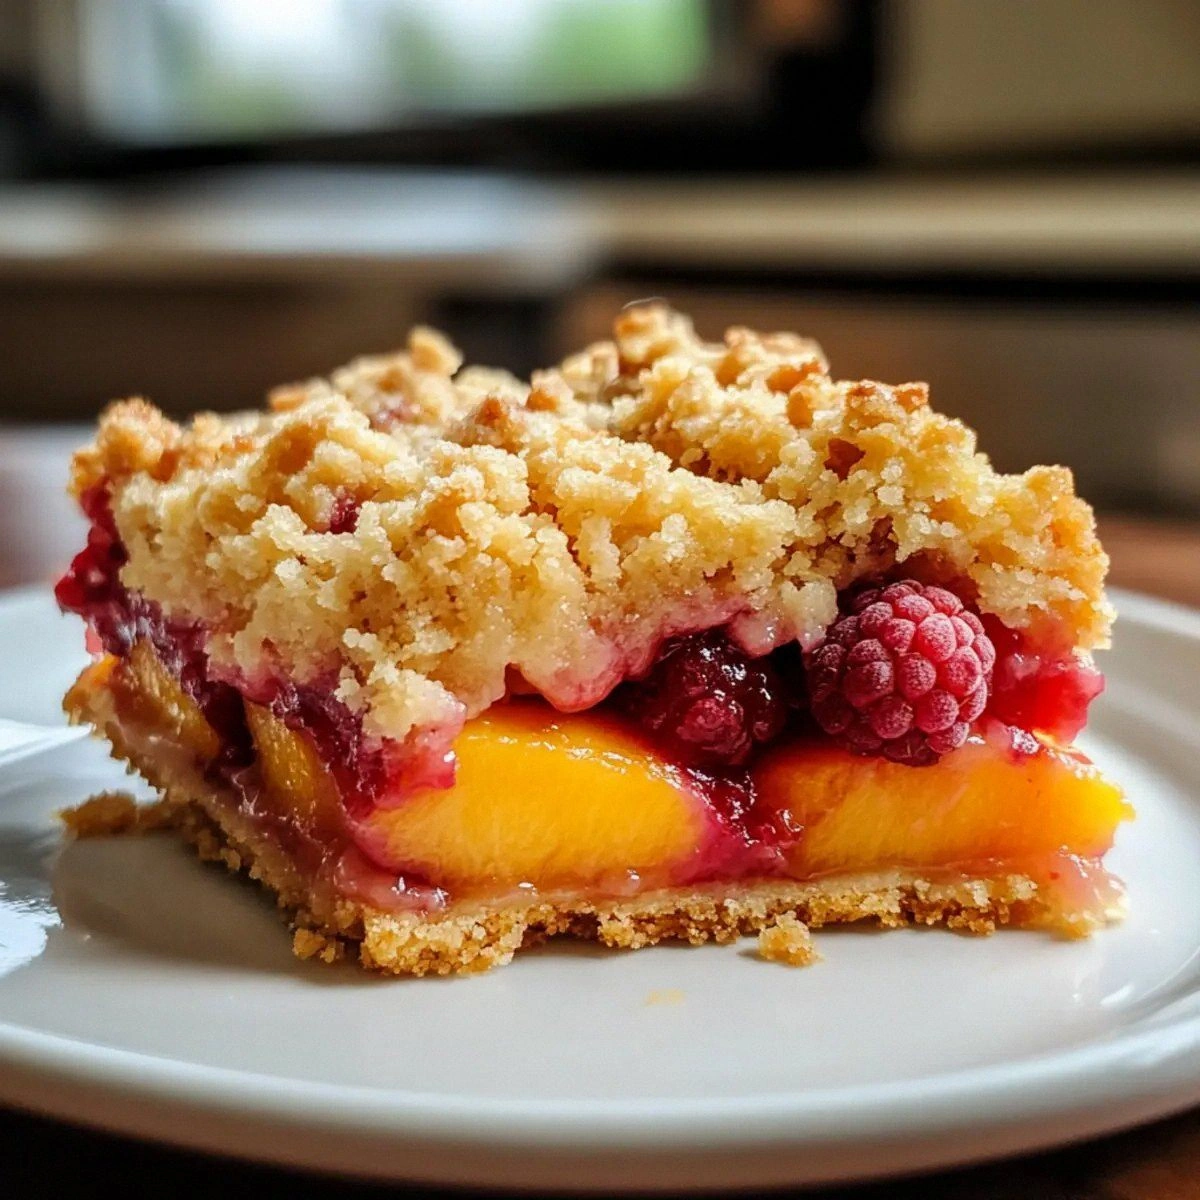
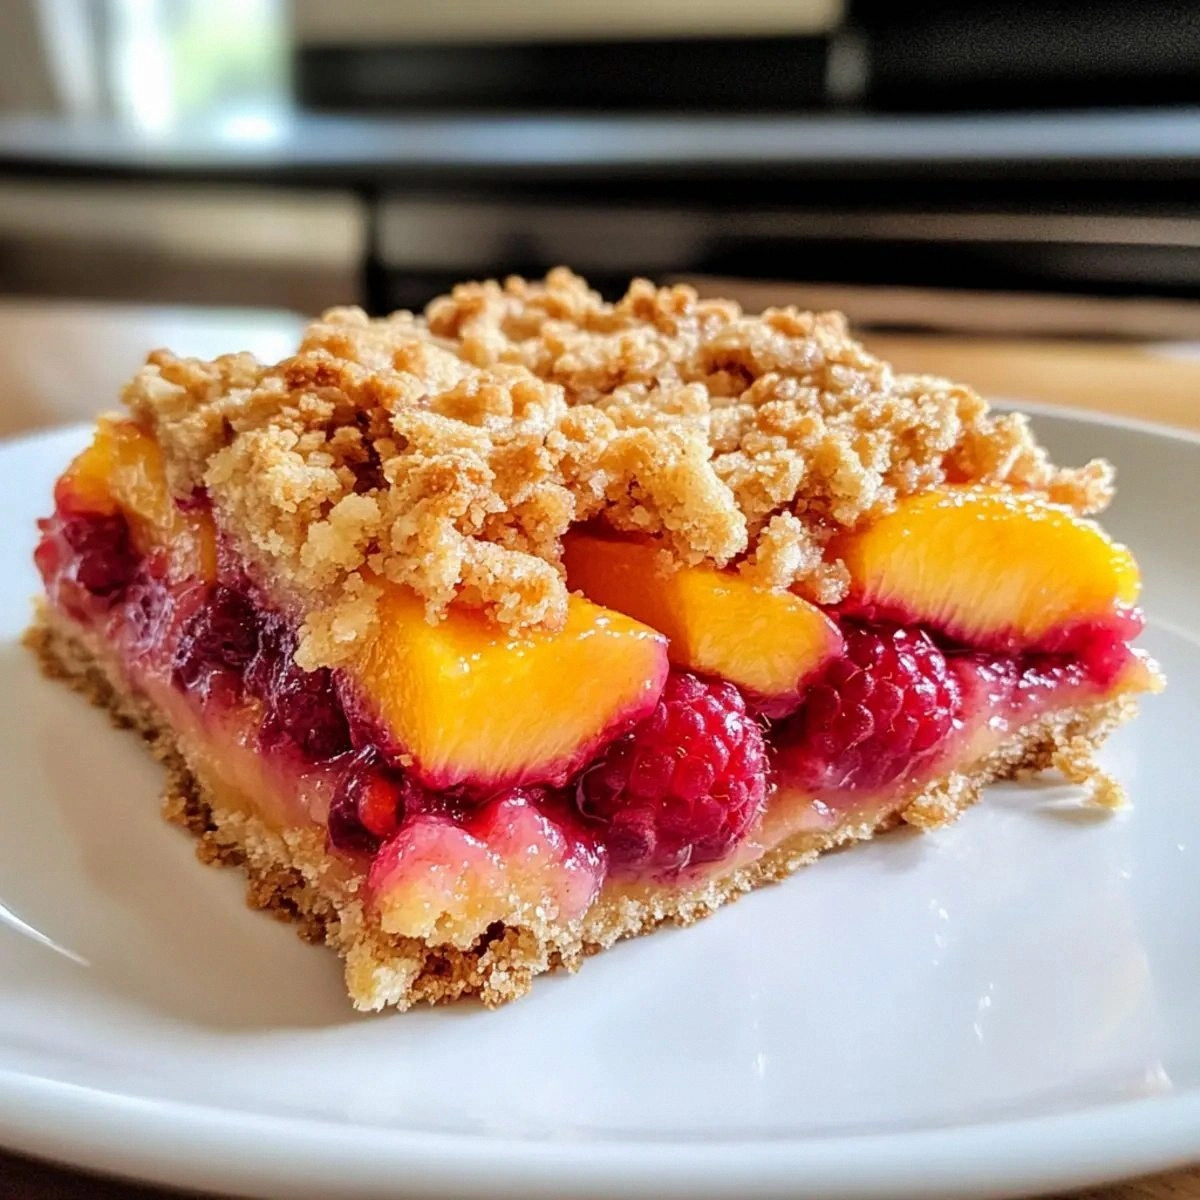
Picture this: the first time you pull the bars out of the oven, the whole kitchen is filled with a perfume that whispers of sun‑kissed orchards and a hint of toasted almond, while the top is a golden‑brown crumble that cracks under the fork like delicate glass. The fruit underneath is a molten, ruby‑red river of raspberries and juicy peach chunks, each bite delivering a burst of summer that feels like a cool breeze on a scorching day. You’ll hear the faint crackle of the crust as you slice, see the glossy sheen of the fruit glistening like a summer pond, and feel the buttery crumble melt on your tongue, leaving a lingering sweetness that makes you want to dive back in for seconds.
Most peach crumble recipes either drown the fruit in sugar or produce a soggy bottom that collapses under its own weight. I’ve been there, trust me – I’ve watched countless attempts turn into a mushy disappointment, and I’ve felt the sting of a recipe that promises “light and airy” but delivers a dense, gummy slab. This version, however, flips the script entirely: the secret lies in a balanced blend of rolled oats and almond slivers that give the crust a satisfying crunch while keeping the fruit perfectly cradled. The addition of dark brown sugar adds a caramel depth that you won’t find in the usual white‑sugar‑only versions, and a dash of salt amplifies every flavor like a maestro conducting an orchestra.
Okay, ready for the game‑changer? I’m about to walk you through every single step — from selecting the ripest peaches to mastering the perfect crumble texture — and by the end, you’ll wonder how you ever settled for any other peach dessert. I dare you to taste this and not go back for seconds. Let’s dive in.
What Makes This Version Stand Out
- Texture: The combination of rolled oats and sliced almonds creates a crust that’s crisp on the edges yet tender in the middle, delivering that satisfying crunch‑to‑soft contrast that makes every bite feel like a mini celebration.
- Flavor Balance: Dark brown sugar adds a deep caramel note, while the modest amount of granulated sugar lets the natural sweetness of the peaches shine without overwhelming the palate.
- Simplicity: Only nine ingredients, all pantry‑friendly, mean you can whip this up on a weeknight without a trip to the specialty store.
- Freshness Factor: Using fresh, ripe peaches and plump raspberries captures the essence of summer, making the bars taste like a sun‑drenched picnic in every forkful.
- Visual Appeal: The ruby‑red raspberry swirls against the golden peach base create a striking, Instagram‑ready look that’s as pretty as it is tasty.
- Make‑Ahead Magic: These bars hold up beautifully for a day or two, meaning you can bake them ahead for a weekend brunch or a spontaneous dessert for guests.
- Crowd‑Pleaser: The sweet‑and‑tart dance between peach and raspberry has a universal appeal, winning over both kids and adults alike.
- Ingredient Quality: The recipe leans on high‑quality butter and fresh fruit, proving that a few premium components can elevate a humble crumble into a show‑stopper.
Inside the Ingredient List
The Flavor Base
Peaches (3 cups): Fresh peaches are the heart of this bar, providing juicy sweetness and a subtle floral note. Choose fruit that yields slightly to pressure but isn’t mushy; that way they’ll soften without turning to puree. If you’re out of fresh peaches, frozen sliced peaches work in a pinch – just thaw and pat dry to avoid excess moisture.
Raspberries (1 cup): Raspberries bring a bright acidity that cuts through the richness of the butter and brown sugar. Their natural pectin helps thicken the filling, creating that glossy, jam‑like sheen. When using frozen raspberries, add them directly to the mixture; they’ll thaw as the bars bake, releasing just enough juice without making the crust soggy.
Granulated Sugar (1/4 cup): This light sprinkle of sugar sweetens the fruit without masking its natural flavors. It also aids in caramelization, giving the top a subtle golden hue. If you prefer a less sweet version, you can reduce this to 2 tablespoons and let the brown sugar do the heavy lifting.
The Texture Crew
All‑Purpose Flour (1 cup): Flour provides the structural backbone of the crumble, binding the butter and oats together. Using a high‑quality, unbleached flour ensures a tender crumb rather than a tough one. If you’re gluten‑intolerant, a 1‑to‑1 gluten‑free flour blend works just fine, though the texture will be slightly softer.
Rolled Oats (1 cup): Oats give the crust its characteristic chew and a rustic, nutty undertone. They also absorb some of the butter, preventing the base from becoming overly greasy. For a finer texture, pulse the oats briefly in a food processor – but don’t go too far, or you’ll lose that satisfying bite.
Sliced Almonds (1/2 cup): Almonds add a buttery crunch and a subtle, toasted flavor that elevates the whole bar. Toast them lightly in a dry skillet for 3‑4 minutes before folding them in; this brings out their natural oils and intensifies the nutty aroma. If you’re allergic, toasted pepitas make a great alternative.
The Unexpected Star
Dark Brown Sugar (3/4 cup): This ingredient is the secret weapon that transforms a basic crumble into a caramel‑kissed masterpiece. Its molasses content deepens the flavor, lending notes of toffee and a hint of bitterness that balances the fruit’s sweetness. Use a packed measure for accuracy; a loose scoop can throw off the crust’s texture.
Unsalted Butter (1/2 cup): Butter is the glue that holds the crumble together, and using unsalted allows you to control the salt level precisely. Cut the butter into small cubes and blend it quickly with the dry ingredients to achieve a coarse, pea‑sized crumb before baking. If you want a richer flavor, swap half the butter for clarified butter – the result is a slightly nutty, crispier crust.
The Final Flourish
Salt (1/4 teaspoons): A pinch of salt is the silent hero that amplifies every other flavor, turning the sweet into something more complex and satisfying. Even a tiny amount can make the difference between “nice” and “wow.” If you love a salty‑sweet combo, sprinkle a pinch of flaky sea salt on top just before baking.
Everything's prepped? Good. Let’s get into the real action…
The Method — Step by Step
Preheat your oven to 350°F (175°C) and line a 9×13‑inch baking pan with parchment paper, allowing the edges to overhang for easy removal later. While the oven warms, whisk together the all‑purpose flour, rolled oats, dark brown sugar, and salt in a large bowl. This dry mix is the foundation of your crumble, and the even distribution of sugar ensures every bite gets that caramel kiss.
Cut the unsalted butter into small cubes and toss them into the dry mixture. Using a pastry cutter or two forks, cut the butter into the flour‑oat blend until the mixture resembles coarse crumbs, with some pea‑size pieces of butter still visible. Pro tip: If the butter starts to melt from the heat of your hands, pop the bowl in the fridge for a couple of minutes – you want those little butter islands to stay solid.
Stir in the sliced almonds, allowing them to coat lightly with the butter crumbs. This is where the magic begins; the almonds will toast in the oven, releasing an aroma that’s practically a hug for your nostrils.
Kitchen Hack: Toss the almonds in a teaspoon of melted butter before folding them in – they’ll turn a richer golden color and add extra crunch.Press about two‑thirds of the crumble mixture firmly into the prepared pan, creating an even base layer. Use the back of a measuring cup or your hands (dipped in a little water to prevent sticking) to smooth it out. The base should be compact but not overly packed; you want it to hold together yet still give a little when you bite.
Now for the fruit: In a separate bowl, combine the sliced peaches, raspberries, granulated sugar, and a squeeze of fresh lemon juice (optional, but it brightens the flavor). Gently toss to coat the fruit evenly, being careful not to crush the raspberries.
Watch Out: Over‑mixing the fruit can release too much juice, making the crumble soggy. Treat the berries like delicate glass – a gentle fold is all you need.Spread the fruit mixture evenly over the crust, making sure the berries are distributed for a consistent color burst in every bite. If you notice any large pools of juice, sprinkle a tiny pinch of extra flour over the top – it will absorb excess moisture as the bars bake.
Take the remaining crumble mixture and crumble it over the fruit layer, aiming for a rustic, uneven look. This top layer will become the golden, crackly crown that defines the bar. Press it down lightly with your fingertips; you don’t want to compact it too much, or you’ll lose that airy crumb texture.
Slide the pan into the preheated oven and bake for 30‑35 minutes, or until the top is a deep amber and the fruit is bubbling around the edges. Around the 20‑minute mark, rotate the pan halfway to ensure even browning – this is the moment of truth where the aromas will fill your kitchen like a summer breeze.
Remove the pan from the oven and let it cool on a wire rack for at least 20 minutes. This resting period allows the filling to set, making it easier to cut clean squares. While you wait, the scent will continue to waft, tempting you to sneak a warm piece (I’ll be honest — I ate half the batch before anyone else got to try it).
That's it — you did it. But hold on, I've got a few more tricks that'll take this to another level…
Insider Tricks for Flawless Results
The Temperature Rule Nobody Follows
Never bake these bars straight from a cold fridge; let the pan sit at room temperature for 10 minutes before popping it in the oven. This prevents the crust from shocking and cracking, ensuring a uniform rise. I once tried baking a chilled pan and ended up with a crust that looked like a broken cookie – not pretty.
Why Your Nose Knows Best
When the edges start pulling away from the sides of the pan and you smell a toasty, caramel scent, the bars are done. Trust your senses more than the timer; ovens can vary by up to 25°F. A quick visual check plus that sweet aroma is the ultimate indicator.
The 5‑Minute Rest That Changes Everything
Allowing the bars to rest for five extra minutes after the initial 20‑minute cooling window lets the sugars settle and the crumb firm up. This tiny pause makes slicing cleaner and prevents the fruit from spilling out. My first batch was sliced too early and turned into a sloppy mess – lesson learned.
Butter Temperature Trick
Softened, not melted, butter is key. If you melt the butter, the crumble becomes dense and greasy. Keep the butter cool but pliable; a quick 10‑second zap in the microwave (10% power) does the trick without liquefying it.
Layering for Extra Crunch
For an added crunch factor, sprinkle a thin layer of toasted oat flakes on top just before baking. This creates a crackly crown that shatters like thin ice when you bite into it. I love the contrast between the soft fruit and that crisp top – it’s pure textural bliss.
Creative Twists and Variations
This recipe is a playground. Here are some of my favorite ways to switch things up:
Berry‑Burst Explosion
Swap the raspberries for a mix of blueberries and blackberries. The deeper hues create a richer visual contrast, and the tartness of blackberries adds a bold zing that pairs beautifully with the sweet peaches.
Nutty Coconut Crunch
Replace half of the sliced almonds with shredded coconut. Toast the coconut lightly for a tropical aroma; the result feels like a beach‑side dessert, perfect for summer parties.
Spiced Autumn Version
Introduce a pinch of ground cinnamon and a dash of nutmeg to the dry mix. This gives the bars a warm, comforting flavor that works beautifully in cooler months, turning the dish into a cozy treat.
Gluten‑Free Friendly
Use a 1‑to‑1 gluten‑free flour blend and certified gluten‑free rolled oats. The texture remains delightfully crumbly, and the almond flavor shines even brighter without wheat interference.
Vegan Adaptation
Swap the butter for a plant‑based margarine and use maple syrup instead of granulated sugar. The bars stay just as buttery, and the maple adds a subtle caramel depth that complements the fruit.
Mini Bar Delight
Press the batter into a muffin tin for individual servings. These bite‑size versions are perfect for potlucks or for a quick snack, and they bake a few minutes faster due to the smaller size.
Storing and Bringing It Back to Life
Fridge Storage
Allow the bars to cool completely, then cover the pan tightly with plastic wrap or transfer the bars to an airtight container. They’ll stay fresh in the refrigerator for up to four days, retaining their texture and flavor. If you notice any condensation, pat the tops gently with a paper towel before resealing.
Freezer Friendly
Wrap each bar individually in parchment paper, then place them in a freezer‑safe zip‑top bag. They freeze beautifully for up to two months. When you’re ready to enjoy one, let it thaw at room temperature for 20 minutes, then pop it in a 300°F oven for 5‑7 minutes to revive the crisp crust.
Best Reheating Method
To bring the bars back to life, preheat your oven to 300°F and place the bar on a parchment‑lined sheet. Add a tiny splash of water (about a teaspoon) to the edge of the bar – the steam will re‑hydrate the fruit without making it soggy. Heat for 5‑8 minutes, and you’ll have a warm, gooey center with a freshly crisped top.