I still remember the December evening when my kitchen looked like a crime scene. Crimson beet juice splattered across my white countertops, my favorite cream sweater now permanently tie-dyed, and the smell of roasted earthiness clinging to every surface like an overzealous perfume. I was attempting what I thought would be a simple winter salad for a dinner party, but I'd fallen into the trap that snares every home cook: thinking beets are just innocent root vegetables that'll behave themselves in the oven. What emerged from that chaotic experiment, however, changed my relationship with winter produce forever.
Picture this: it's 6 PM, snow is falling sideways outside your window, and you want something that tastes like sunshine trapped in January. Most winter salads taste like punishment — limp greens wearing sad shreds of carrot, drowning in dressing that's trying too hard to be interesting. Not this one. This winter beet salad is what happens when you treat beets like the divas they are: roasting them until they concentrate into candy-sweet jewels, pairing them with ingredients that make them sing instead of sink, and building layers of texture that keep every forkful exciting. I dare you to taste this and not go back for seconds — though I'll be honest, I ate half the batch before anyone else got to try it.
What makes this version different? We're not just roasting beets and calling it a day. We're creating a symphony where earthy meets bright, creamy meets crunchy, and warm meets cool in ways that'll make your winter palate do a happy dance. Most recipes get this completely wrong by either undercooking the beets (that awful squeak between your teeth) or overdressing them until they taste like purple vinegar bombs. Here's what actually works: slow-roasting until they're fork-tender but not mushy, letting them chill to intensify their sweetness, then introducing them to friends who bring out their best qualities.
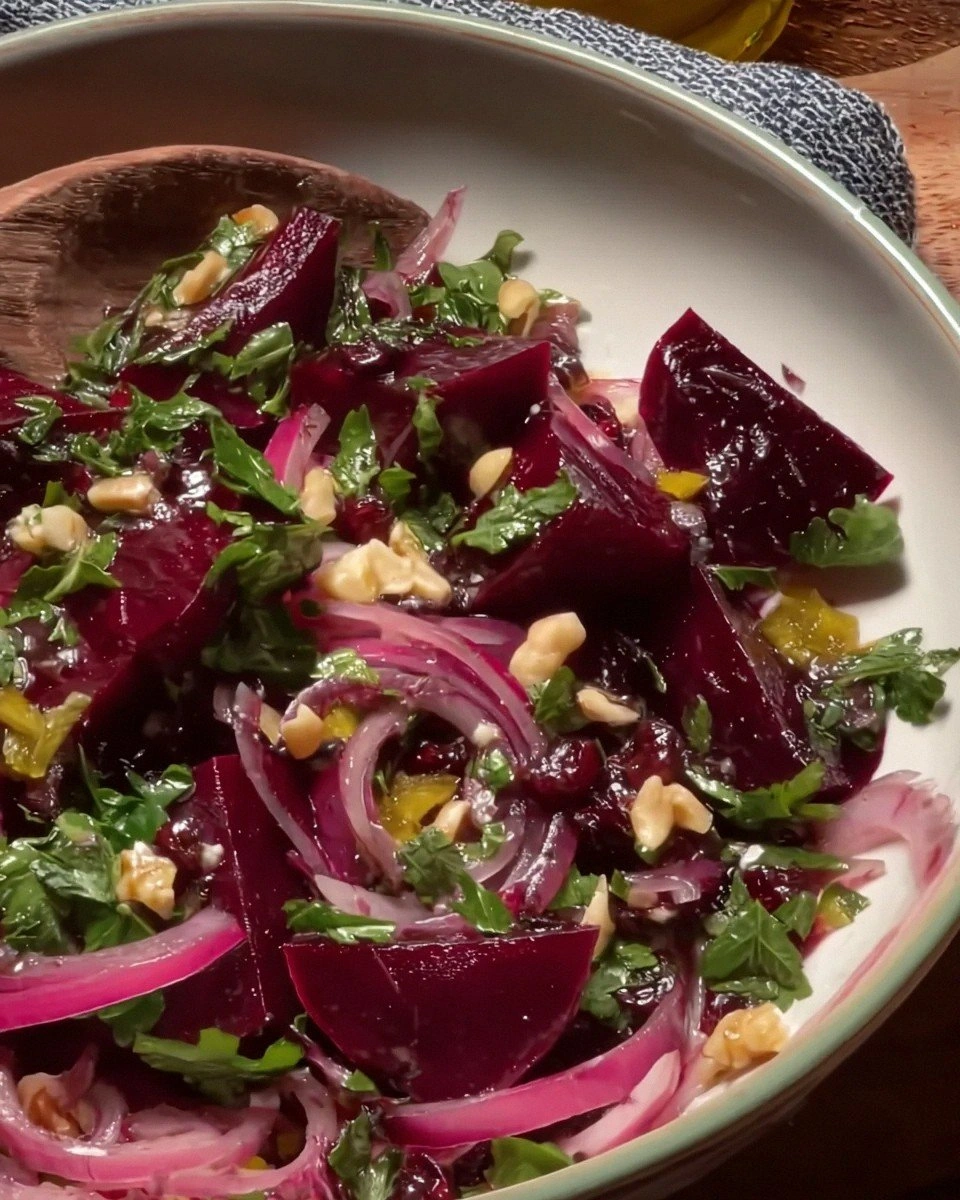
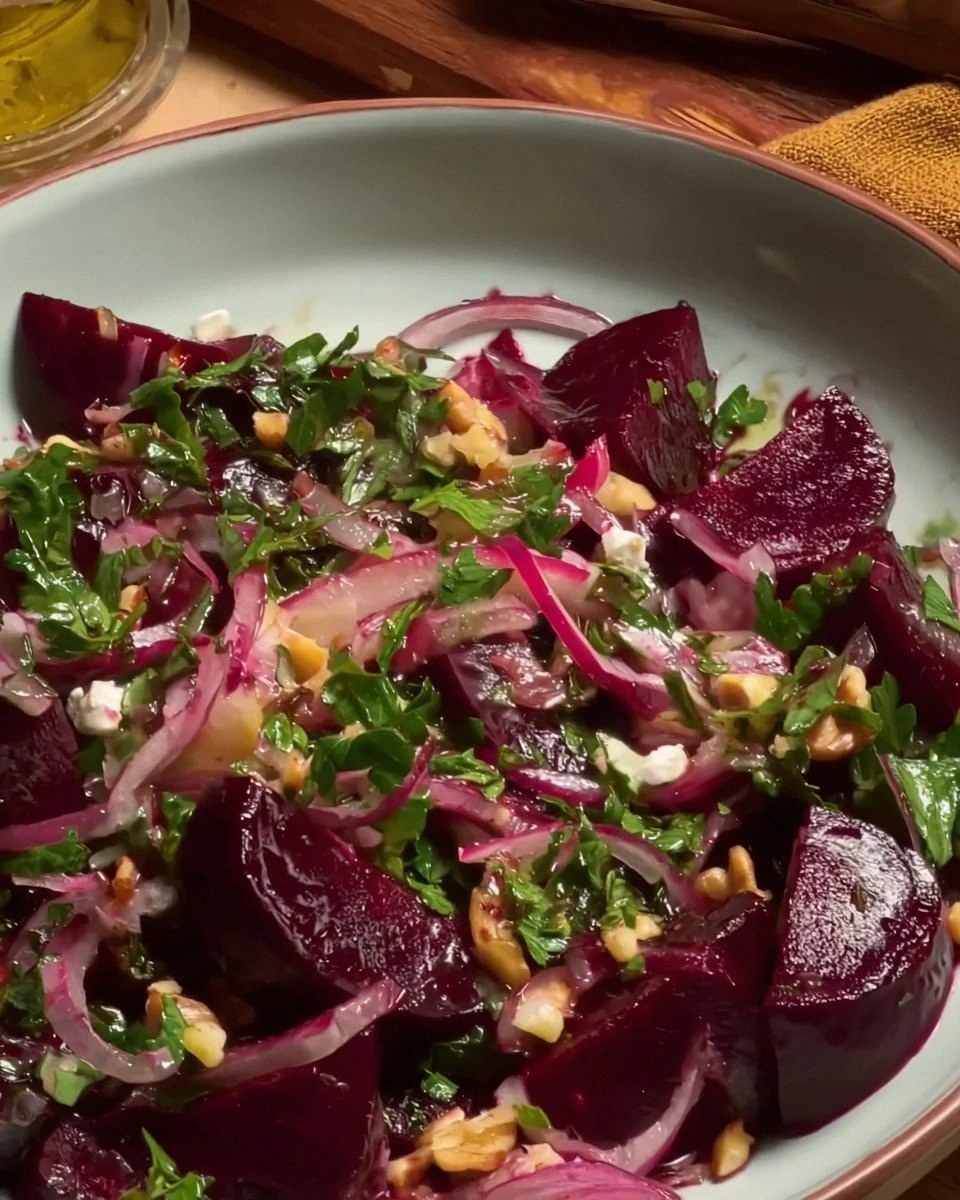
Stay with me here — this is worth it. We're talking about roasted golden and red beets nestled against peppery arugula, with segments of orange that burst like citrus grenades, creamy goat cheese that melts slightly against the warm beets, and a maple-balsamic glaze that coats everything like liquid velvet. The finishing touch? Candied walnuts that shatter like thin ice between your teeth, adding a buttery crunch that makes this salad feel like you're eating jewelry. Let me walk you through every single step — by the end, you'll wonder how you ever made it any other way.
What Makes This Version Stand Out
Okay, ready for the game-changer? This isn't your grandmother's beet salad — unless your grandmother was a culinary genius who understood that beets are basically nature's candy when treated right. Here's why this version will ruin all other beet salads for you:
- Dual Beet Strategy: Using both golden and red beets isn't just for Instagram likes — golden beets are sweeter and milder, while red beets bring that deep, earthy complexity. Together they create a flavor spectrum that single-beet salads can only dream about.
- Temperature Play: Serving this with warm roasted beets against cool arugula creates a temperature contrast that makes each bite feel alive. It's like a warm hug followed by a crisp high-five in your mouth.
- Texture Symphony: Creamy goat cheese, crunchy candied walnuts, juicy orange segments, and tender beets create a textural experience that keeps your palate engaged from first bite to last. No boring monotextures here.
- Make-Ahead Magic: Everything can be prepped ahead except the final assembly — roast your beets, candy your nuts, whisk your dressing. When guests arrive, you're just five minutes away from looking like a kitchen wizard.
- Balanced Sweetness: The maple-balsamic glaze hits that perfect middle ground between candy and vinegar, enhancing the beets' natural sweetness without making you feel like you're eating dessert.
- Nutrient Dense: This salad doesn't just taste good — it's packed with folate, vitamin C, iron, and antioxidants. You're basically eating a multivitamin that happens to taste incredible.
- Crowd Psychology: Even beet skeptics convert after trying this. The combination of flavors is so well-balanced that people who claim to hate beets find themselves asking for the recipe.
Alright, let's break down exactly what goes into this masterpiece...
Inside the Ingredient List
The Flavor Base
Let's start with the headliners: the beets themselves. You want firm, unblemished specimens that feel heavy for their size — these are the sugar bombs that'll roast into vegetable candy. Skip any with soft spots or wrinkled skin; they're past their prime and will roast up tasting like sweetened cardboard. The greens should be fresh and perky if still attached — a great indicator of freshness. Size matters here: medium beets (about the size of a tennis ball) roast most evenly, while those giant mutant ones stay tough in the center.
Arugula isn't just filler green — it's the peppery backbone that cuts through all that sweetness. Look for bright green leaves with no yellowing or slime. Baby arugula is milder and more tender, while mature arugula brings serious peppery heat. If you can only find the spicy stuff, mix it half and half with baby spinach to keep things balanced. And here's a confession: I'll be honest — I ate half the batch before anyone else got to try it, specifically picking out all the arugula that had touched the warm beets and wilted slightly.
The Texture Crew
Walnuts need the full treatment here — raw nuts won't cut it. Candying them in butter and brown sugar creates these shiny gems that crack between your teeth, revealing creamy nuttiness inside. Don't rush this process; low and slow is the key to avoiding burnt nuts that taste like bitter disappointment. Picture yourself pulling these out of the oven, the whole kitchen smelling like caramel and toasted nuts, and try not to eat them all before they hit the salad.
Goat cheese brings that tangy, creamy element that makes the whole salad feel decadent. Fresh chèvre is best — look for one that's creamy but not runny, with a clean dairy smell. Skip the pre-crumbled stuff; it contains anti-caking agents that prevent it from melting properly against the warm beets. Let it come to room temperature before serving so it can properly cozy up to the other ingredients.
The Unexpected Star
Orange segments might seem like an odd addition, but they provide these bright bursts of acidity that make the beets taste even sweeter by comparison. Plus, the vitamin C helps your body absorb the iron from the beets — it's like nutritional teamwork. Supreme the orange properly (cutting between the membranes) so you get clean segments that don't leak juice everywhere and turn your beautiful salad into a pink mess.
The Final Flourish
The maple-balsamic glaze is where the magic happens — reduce good balsamic vinegar with real maple syrup until it coats the back of a spoon like liquid velvet. This isn't the time for pancake syrup; get the real stuff that costs more than you'd like but tastes like liquid gold. The reduction concentrates the flavors into a glossy sauce that clings to every ingredient without drowning them.
Everything's prepped? Good. Let's get into the real action...
The Method — Step by Step
- Preheat and Prep: Crank your oven to 400°F and position racks in the upper and lower thirds. While it's heating, scrub those beets clean — I mean really scrub, getting into every crevice where dirt likes to hide. Trim off the greens (save them for another dish — sautéed beet greens with garlic are incredible), but leave about an inch of stem attached. This prevents the beets from bleeding out all their color and juices during roasting. Wrap each beet individually in foil with a drizzle of olive oil and a pinch of salt — think of it as a spa treatment that'll make them tender and concentrated.
- The Long Roast: Place your foil-wrapped beet packages on a baking sheet and slide them into the oven. Now, don't walk away from the oven here — set a timer for 45 minutes and find something productive to do. After 45 minutes, test the largest beet by piercing through the foil with a knife. It should slide in with almost no resistance, like going through warm butter. If you've ever struggled with this, you're not alone — and I've got the fix: if they're still firm, rewrap and give them another 15-20 minutes. The golden beets might finish sooner than the red ones, so check them individually.
- Cool Down Period: Once tender, let the beets cool in their foil jackets until you can handle them comfortably. This next part? Pure magic — the skins will slip off like silk stockings, revealing jewel-toned flesh underneath. Rub them with paper towels or use your fingers, but wear gloves unless you want pink hands for three days. That sizzle when it hits the pan? Absolute perfection — except there's no pan here, just the satisfying slip of skin meeting flesh.
- Candied Walnut Creation: While the beets roast, start the walnuts. Melt 2 tablespoons of butter in a heavy skillet over medium heat — not high, because burnt nuts are bitter nuts. Add your walnuts and toss to coat, then sprinkle in brown sugar and a pinch of salt. Stir constantly for about 5 minutes, watching them like a hawk. They'll go from golden to burnt faster than you can say "winter salad," so keep them moving. When they smell like caramel and look glossy, pour them onto parchment paper to cool. They'll harden into crunchy clusters that you'll have to resist eating like candy.
- Segment the Orange: Cut off both ends of your orange, then stand it on a cut end and slice away the peel and pith, following the curve of the fruit. Hold the peeled orange in your hand and carefully cut between the membranes to release perfect segments. Do this over a bowl to catch any juice — you can add it to your dressing for extra brightness. This technique, called supreming, gives you clean segments that won't weep all over your beautiful salad.
- The Glaze That Makes It: In a small saucepan, combine balsamic vinegar and maple syrup over medium heat. Bring it to a gentle simmer and let it reduce by about half — this takes 8-10 minutes. The key is patience; high heat will burn the sugars and give you a bitter, sticky mess. When it coats the back of a spoon and has the consistency of warm honey, you're there. Let it cool slightly; it'll thicken more as it cools.
- Assembly Time: Now for the fun part — bring everything together while the beets are still slightly warm. Toss the arugula with just a whisper of olive oil and a pinch of salt to help it stand up to the other ingredients. Slice the roasted beets into rounds or wedges — I like a mix of shapes for visual interest. Arrange them on a platter with the arugula, tucking orange segments between the beets like hidden treasures.
- Final Flourish: Crumble the goat cheese over the top, letting it fall where it may — rustic is better than perfect here. Scatter the candied walnuts like precious gems, then drizzle everything with your glossy maple-balsamic glaze. Start with less than you think you need; you can always add more, but you can't take it away. A final crack of black pepper ties everything together.
- Serve Immediately: This is the moment of truth — serve this salad while the beets still hold some warmth, the goat cheese is just starting to soften, and the arugula maintains its crisp bite. The contrast of temperatures and textures is what elevates this from good salad to life-changing experience. Watch faces light up as people take their first bite, that moment when they realize winter produce can taste this exciting.
That's it — you did it. But hold on, I've got a few more tricks that'll take this to another level...
Insider Tricks for Flawless Results
The Temperature Rule Nobody Follows
Here's the thing about roasted beets: they're best served slightly warm, not hot. When they're too hot, the goat cheese melts into a messy puddle and the arugula wilts into submission. But when they're just warm enough to soften the cheese slightly while keeping the greens perky? That's the sweet spot. Aim for beets that you can handle comfortably with your fingers — warm enough to release their aromatics but cool enough to maintain their structural integrity.
Why Your Nose Knows Best
Trust your sense of smell throughout this process. The walnuts are done when they smell like caramel corn, not when they look perfect. The glaze is reduced enough when your kitchen fills with sweet-tart balsamic perfume. Even the beets — they should smell earthy and slightly sweet when properly roasted, never like dirt or nothing at all. A friend tried skipping this step once — let's just say it didn't end well, and she served burnt nuts with under-reduced dressing to a table of disappointed dinner guests.
The 5-Minute Rest That Changes Everything
After you dress the salad, let it sit for exactly 5 minutes before serving. This brief rest allows the glaze to slightly soften the arugula, the flavors to meld, and the cheese to reach optimal creaminess. Too long and everything becomes soggy, too short and the flavors taste separate. Set a timer — this is one of those details that separates good cooks from great ones.
The Cutting Board Secret
Use a wooden cutting board when segmenting your oranges — the slight absorbency prevents the segments from sliding around like they're on an ice rink. Plus, wood won't react with the citrus like metal can, keeping those segments pristine and beautiful. And here's a confession: I actually prefer cutting beets on wood too, because the stains become part of your board's story rather than permanent reminders on plastic.
The Ratio Revelation
The perfect bite contains all the elements in specific proportions: 40% beet for earthy sweetness, 30% arugula for peppery bite, 15% orange for bright acidity, 10% goat cheese for creamy tang, and 5% walnut for crunch. When you build your salad, keep this ratio in mind — it's why some bites taste transcendent while others fall flat.
Creative Twists and Variations
This recipe is a playground. Here are some of my favorite ways to switch things up:
The Mediterranean Makeover
Swap the goat cheese for crumbled feta and add some Kalamata olives for briny punch. Replace the maple-balsamic glaze with a lemon-oregano vinaigrette, and throw in some cucumber ribbons for extra crunch. This version tastes like you're dining on a Greek island, even when snow is piling up outside your window.
The Winter Harvest Bowl
Turn this into a hearty grain bowl by adding farro or wild rice underneath everything. The nutty grains soak up all the glorious juices, transforming this side dish into a satisfying main course. Add some roasted butternut squash cubes for extra winter comfort — they roast alongside the beets for zero extra work.
The Fancy Holiday Version
Replace the walnuts with candied pecans and add some fresh pomegranate arils for jewel-like bursts of tartness. Use blood oranges instead of regular ones for dramatic color, and swap the goat cheese for creamy burrata that you tear apart tableside. This is hands down the best version you'll ever make when you want to impress the in-laws.
The Protein-Packed Power Salad
Add sliced grilled chicken or pan-seared salmon on top, and you've got a complete meal that'll power you through the afternoon slump. The protein plays beautifully with all the existing flavors, and the extra sustenance means this salad works as dinner, not just a side dish.
The Spicy Southwest Twist
Add some roasted poblano strips, swap the goat cheese for queso fresco, and spike your glaze with a touch of chipotle. The smoky heat plays gorgeously against the sweet beets, and a handful of crushed tortilla chips on top adds unexpected crunch. If you've ever struggled with boring salads, this variation will wake up your taste buds permanently.
The Vegan Victory
Replace the goat cheese with a tangy cashew cream and use maple-syrup-candied pumpkin seeds instead of walnuts. The result is entirely plant-based but still feels indulgent and creamy. Even my most devoted cheese-loving friends request this version regularly.
Storing and Bringing It Back to Life
Fridge Storage
If you somehow have leftovers (I dare you to taste this and not go back for seconds), store the components separately for best results. Roasted beets keep beautifully in an airtight container for up to 5 days, becoming even sweeter as they sit. The candied walnuts stay crisp for 2 weeks in a sealed jar at room temperature — though good luck keeping them around that long. The glaze will keep for a month in the fridge; just bring it to room temperature before using, as it thickens considerably when cold.
Assembled salad is best eaten within 2 hours, but if you must store it, pack the dressed greens separately from the other components. The arugula will wilt and the cheese will get sad if stored dressed. I actually prefer making individual containers with beets, oranges, and walnuts together, then adding fresh arugula and cheese just before serving.
Freezer Friendly
Here's where things get interesting: roasted beets freeze brilliantly for up to 3 months. Let them cool completely, then freeze in a single layer on a baking sheet before transferring to freezer bags. Thaw overnight in the fridge or give them a quick zap in the microwave. The texture changes slightly — they become a bit softer — but the flavor remains incredible. I always roast extra beets now and freeze them for instant winter salads.
The candied walnuts also freeze well, though they lose some of their snap. To bring them back to life, spread them on a baking sheet and warm them in a 300°F oven for 5 minutes. They'll return to their former glory, ready to make your salad sing again.
Best Reheating Method
If your roasted beets have been refrigerated, bring them to room temperature or give them a gentle warm-up before serving. I like to toss them in a dry skillet over medium heat for 2-3 minutes — just enough to take the chill off and intensify their sweetness. Add a tiny splash of water before reheating — it steams back to perfection and prevents them from drying out.
For the complete salad experience, warm the beets slightly, then assemble everything else at room temperature. The contrast of warm beets against cool greens recreates that just-made magic, even if everything was prepped days ago.