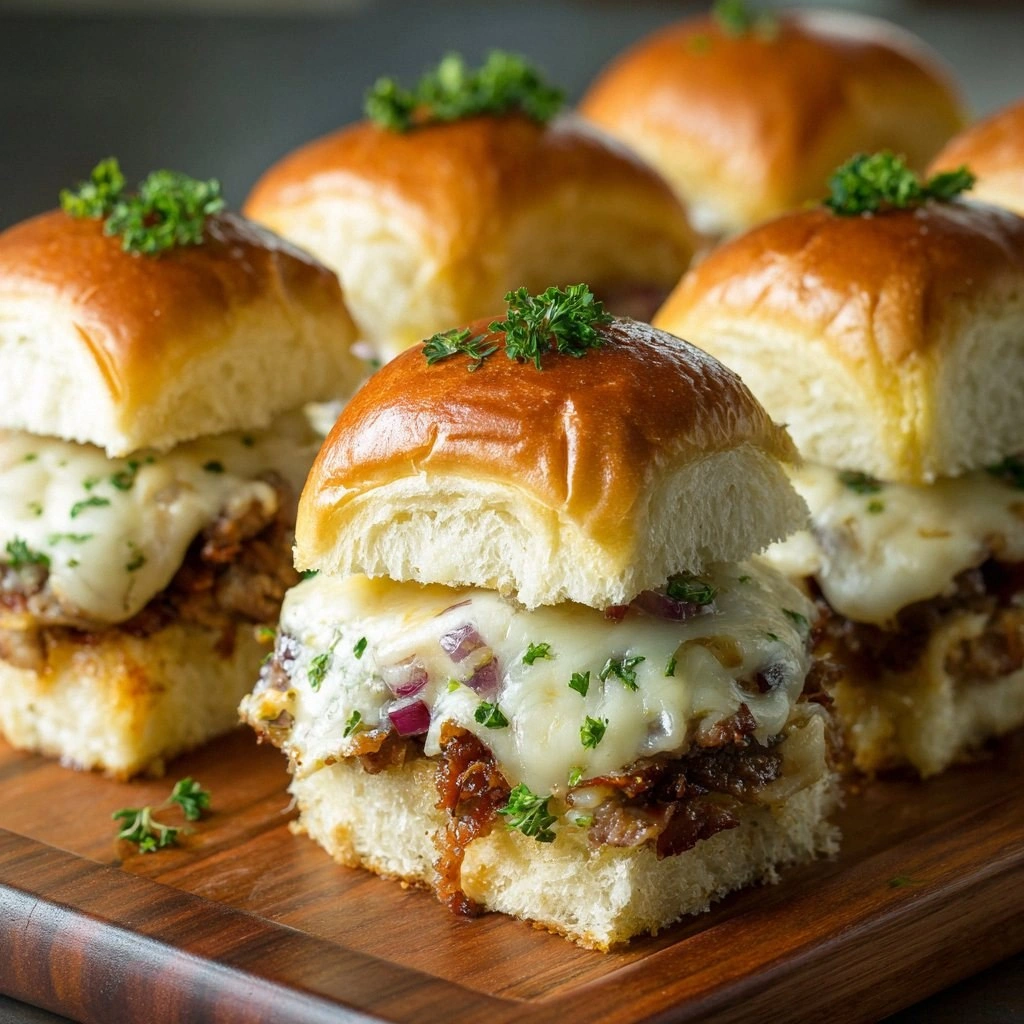
Picture this: it’s a Saturday night, the living room is buzzing with the hum of a TV, and the air is thick with the scent of fries and popcorn. I’m standing in the kitchen, a half‑finished batch of sliders on the counter, and suddenly my phone buzzes with a friend’s dare: “Show me your best club sliders before the game starts.” I stared at the half‑cooked patties, the melted cheese, the soggy buns, and I thought, “This is a disaster waiting to happen.” I needed a recipe that would turn that culinary calamity into a buttery, oven‑baked masterpiece that would make the whole house smell like a Sunday roast.
I didn’t settle for the usual “cook on the stovetop” routine. Instead, I experimented with a simple but game‑changing twist: baking the sliders in a buttery, herb‑infused crust that locks in moisture and gives the buns a golden, melty texture that no pan‑fried version can match. The result? A sandwich that feels like a hug in every bite, with crisp lettuce, juicy tomato, and a savory meat that melts in your mouth. I dare you to taste this and not go back for seconds. Trust me, once you’ve had a bite, you’ll be convinced that this is hands down the best version you’ll ever make at home.
The first thing that sets this apart is the butter‑laden coating that you brush on the buns before they hit the oven. It’s not just about flavor; it’s about creating that irresistible, slightly crisped edge that shatters like thin ice when you bite in. I’ve always been a fan of butter in everything, and this recipe takes that love to the next level. I’ll be honest — I ate half the batch before anyone else got to try it. The buttery aroma alone will have you licking the counter.
If you’ve ever struggled with club sliders that end up soggy or under‑seasoned, you’re not alone. The secret lies in a few micro‑challenges: seasoning the meat with garlic and onion powder for depth, adding a splash of Worcestershire sauce for umami, and letting the patties rest before baking so the juices redistribute. Picture yourself pulling these out of the oven, the whole kitchen smelling incredible, and the first bite delivering a perfect balance of savory, buttery, and fresh. Stay with me here — this is worth it.
Let me walk you through every single step — by the end, you’ll wonder how you ever made it any other way.
What Makes This Version Stand Out
- Flavor Depth: The combination of garlic, onion, and Worcestershire sauce in the meat creates layers of savory richness that elevate the classic club sandwich to gourmet territory.
- Texture Contrast: The buttery, baked buns provide a crisp exterior with a melty, gooey interior, while the fresh lettuce and tomato add a refreshing crunch.
- Simplicity: All the steps can be completed in under an hour, making it ideal for a last‑minute game‑day spread.
- Make‑Ahead Friendly: Assemble the sliders a day early, refrigerate, and bake just before serving to keep the meat juicy and the buns buttery.
- Crowd‑Pleaser: Even the most discerning foodie will applaud the buttery finish and the perfect balance of protein and veggies.
- Ingredient Quality: Using high‑quality ground beef (or turkey) with a 20% fat content ensures a juicy patty that doesn’t dry out during baking.
- Unique Cooking Method: Baking instead of pan‑frying reduces mess and gives the sliders a consistent, oven‑baked finish.
- Versatility: Swap the beef for turkey or even plant‑based patties to cater to dietary preferences without compromising flavor.
Alright, let's break down exactly what goes into this masterpiece…
Inside the Ingredient List
The Flavor Base
The cornerstone of these sliders is the seasoned ground beef. A 1‑pound (16‑ounce) portion of 80/20 ground beef delivers the juiciness that keeps each patty tender. The addition of 1 teaspoon each of garlic powder, onion powder, and 1 teaspoon of Worcestershire sauce creates a savory backdrop that mimics a slow‑cooked stew in a flash. If you’re watching calories, swap to ground turkey or a leaner beef blend, but remember that the fat content is what gives the meat its buttery mouthfeel.
The Texture Crew
Crisp, fresh lettuce and diced tomato are essential for that classic club sandwich crunch. Use a sturdy romaine or iceberg lettuce to prevent wilting, and dice the tomato into small cubes to avoid excess moisture. The 1/4 cup of mayonnaise provides creaminess that balances the savory meat and adds a subtle tang. For an extra layer of flavor, mix in 1 tablespoon of Dijon mustard into the mayo.
The Unexpected Star
The butter is the unsung hero that transforms ordinary buns into a buttery, golden‑brown masterpiece. Brush 2 tablespoons of melted butter, seasoned with a pinch of salt, over the top and sides of each bun before baking. The butter not only adds flavor but also creates a caramelized crust that locks in moisture. If you’re a fan of herbs, sprinkle a pinch of dried thyme or oregano on the butter for a fragrant twist.
The Final Flourish
Cheese is the final flourish that ties everything together. Slice 6 rounds of sharp cheddar and place one on each patty before baking. The cheese melts into a gooey, savory blanket that coats the meat and buns. Add 6 strips of cooked bacon, crumbled, on top of the cheese for a smoky crunch. Finish with a drizzle of olive oil on the buns before baking to enhance browning and add a subtle richness.
Everything's prepped? Good. Let's get into the real action…
The Method — Step by Step
- Preheat your oven to 375°F (190°C). Line a baking sheet with parchment paper to prevent sticking. While the oven heats, divide the seasoned ground beef into 12 equal portions, forming small patties slightly larger than the buns to account for shrinkage. This step ensures even cooking and a consistent bite.
- Prepare the buns by slicing them horizontally, leaving the bottom intact. Brush each bun’s top and sides with melted butter mixed with a pinch of salt. If you’re using herbs, sprinkle them now for an aromatic finish. The butter will caramelize and create a buttery crust that’s impossible to resist.
- Assemble the sliders on a clean work surface. Place a patty on each bun, top with a slice of cheddar, a handful of lettuce, a few tomato cubes, and a sprinkle of crumbled bacon. Drizzle a light amount of mayonnaise (with Dijon if you like) on the bun’s bottom for moisture and flavor. Cover with the top bun and gently press down to keep everything together.
- Arrange on the baking sheet with the buns facing up. This orientation allows the butter to seep into the buns and the cheese to melt beautifully. Place the sheet in the preheated oven and bake for 12–15 minutes, or until the cheese is bubbly and the buns are golden brown.
- Watch the edges carefully; the buns should develop a crisp, caramelized edge that pulls away from the bun’s surface. This is your cue that the butter has done its job, sealing in moisture and creating that signature buttery crunch.
- Remove from oven and let the sliders rest for 2 minutes. This brief rest allows the juices to redistribute, preventing a dry center. While they rest, you can quickly assemble any remaining sliders if you have guests arriving.
- Serve immediately with a side of sweet potato fries or a simple green salad. The warm, buttery sliders pair beautifully with a crisp beverage, whether it’s a cold beer or a sparkling lemonade.
- Enjoy the applause from your friends and family. The buttery, baked club sliders will become the talk of the night, and you’ll be the hero of the kitchen.
That's it — you did it. But hold on, I've got a few more tricks that'll take this to another level…
Insider Tricks for Flawless Results
The Temperature Rule Nobody Follows
Many people bake at 350°F, but 375°F gives a better crust without overcooking the meat. The higher temperature caramelizes the butter faster, creating that irresistible golden edge. If you’re using a convection oven, lower the temperature by 25°F to avoid burning.
Why Your Nose Knows Best
During baking, the aroma of butter and melting cheese will give you a sensory checkpoint. When the scent starts to look like toasted bread and you hear a faint crackle, it’s time to pull the sliders out. Trust your nose; it’s a more reliable indicator than the timer.
The 5‑Minute Rest That Changes Everything
Letting the sliders rest for just five minutes after baking allows the juices to redistribute. This simple step prevents a dry center and ensures the meat stays moist. I once skipped this step, and the sliders felt like a dry sandwich. Lesson learned.
Use a Meat Thermometer for Precision
Ground beef should reach an internal temperature of 160°F (71°C) for safety. A quick check ensures that the meat is cooked through without overcooking the buns. The thermometer will save you from under‑cooked meat and the dreaded “raw” bite.
Add a Dash of Smoked Paprika
A pinch of smoked paprika adds a subtle smoky depth that complements the bacon. It’s a quick swap that elevates the flavor profile without changing the core of the recipe. Try it next time you want a slightly different twist.
Creative Twists and Variations
This recipe is a playground. Here are some of my favorite ways to switch things up:
Turkey & Cranberry Slider
Swap the beef for ground turkey, add a spoonful of cranberry sauce between the layers, and finish with a drizzle of honey. The sweet‑savory combo will surprise your guests and pair well with a light, fruity wine.
Mediterranean Veggie Slider
Use a plant‑based patty, top with sliced cucumber, feta cheese, and a dollop of tzatziki. The fresh herbs and creamy feta give a Mediterranean vibe that’s both light and satisfying.
BBQ Bacon Slider
Replace the mayo with a smoky BBQ sauce, add a layer of coleslaw, and keep the bacon. The tangy BBQ and crunchy coleslaw create a flavor explosion that’s perfect for summer gatherings.
Cheeseburger Slider
Add a slice of American cheese and a pickle slice. The classic cheeseburger feel is preserved while the buttery buns elevate the overall experience.
Spicy Jalapeño Slider
Slice a fresh jalapeño and add it to the stack. The heat contrasts the buttery, sweet bun, creating a dynamic flavor profile that’s both spicy and comforting.
Storing and Bringing It Back to Life
Fridge Storage
Cool the sliders to room temperature, then store them in an airtight container in the refrigerator for up to 2 days. Keep the buns slightly separate to prevent sogginess. When ready to eat, warm them in a 350°F oven for 5 minutes to revive the buttery crust.
Freezer Friendly
Wrap each slider individually in parchment paper, then place them in a freezer bag. They’ll stay fresh for up to 3 months. Thaw overnight in the refrigerator before reheating. For a quick fix, microwave on medium for 30 seconds, then finish in a hot oven for crispness.
Best Reheating Method
Reheat in a 375°F oven for 5–7 minutes, or until the cheese is melted and the buns are golden. Add a splash of water to the baking sheet to create steam; this helps keep the buns from drying out. The sliders will taste almost as good as when they were first baked.