Picture this: I’m standing in a kitchen that smells like burnt toast and old coffee, staring at a bag of beef tips that have been sitting in the freezer for what feels like a decade. The only thing that could turn this culinary catastrophe into a triumph is a recipe that promises tenderness, flavor, and a single pot that doesn’t require constant checking. I dare you to taste this and not go back for seconds. That’s the kind of confidence I bring to every dish, and this one is hands down the best version you’ll ever make at home. Let me walk you through every single step — by the end, you’ll wonder how you ever made it any other way.
I’ve spent more nights staring at my stove than I care to admit, trying to coax the same melt‑in‑your-mouth tenderness from cheap cuts of meat. The moment I first tasted a slow‑cooked beef tip that was practically falling apart, I knew I had stumbled on something special. That first bite felt like velvet against a backdrop of savory broth, the kind of texture that makes you pause, close your eyes, and savor the moment. I’ve tried countless “no‑peek” recipes, but most of them left me with dry, chewy pieces that begged for a second bite. This recipe, however, flips that narrative on its head.
What makes this version stand out isn’t just the technique; it’s the subtle interplay of ingredients that work in harmony. Think of the beef tips as the stars, the broth as the stage, and the aromatics as the spotlight that brings everything to life. The secret lies in the balance of umami from Worcestershire and soy sauce, the gentle sweetness of brown sugar, and the slight acidity from red wine. It’s a flavor orchestra where every note is heard without drowning the others. And the best part? You won’t have to lift a finger after the initial sear because the slow cooker does the heavy lifting.
Now, I’ll give you a sneak peek at a technique that will make your kitchen smell like a five‑star restaurant. The trick involves a quick, high‑heat sear that locks in juices and creates a caramelized crust that adds depth. I’ll walk you through that process with the precision of a seasoned chef, so you can replicate it every time. Trust me, the difference between “good” and “great” comes down to that moment of searing. Keep your eyes on this part, because it’s the foundation of the entire dish.
What Makes This Version Stand Out
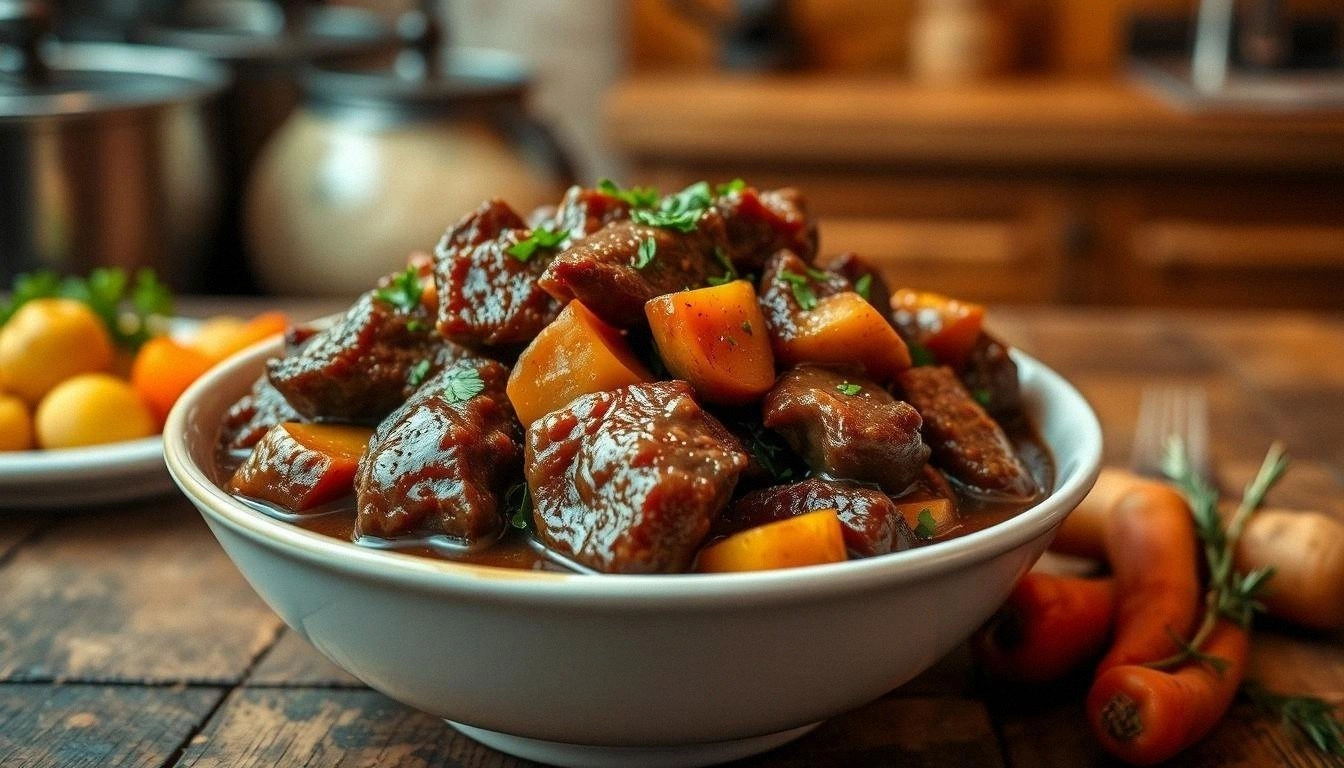
- Flavor: The combination of Worcestershire, soy sauce, and red wine creates a complex umami base that elevates the beef to gourmet status.
- Tenderness: Slow‑cooking at low heat breaks down collagen without drying out the meat, resulting in tips that practically melt.
- Convenience: Once you sear the beef and add the rest of the ingredients, the slow cooker does all the work, so you can focus on other tasks.
- Texture: The cornstarch slurry thickens the sauce to a silky glaze that clings to every tip.
- Ingredient Quality: Fresh aromatics and a high‑quality beef broth make a noticeable difference in overall taste.
- Make‑Ahead Potential: The dish can be prepared a day in advance and reheated without losing flavor.
- Crowd‑Pleaser: The rich, comforting taste is ideal for family dinners and impressing guests alike.
- Versatility: Pair it with mashed potatoes, rice, or crusty bread to suit any meal plan.
Alright, let's break down exactly what goes into this masterpiece. We’ll dissect the ingredient list into four distinct groups, each with its own role in the symphony of flavors. Understanding the purpose of each component not only helps you make the dish but also gives you the confidence to tweak it later. And don’t worry if you’re missing a pantry staple; I’ll suggest swaps that keep the integrity of the dish intact.
The Flavor Base
Beef broth and red wine form the aromatic foundation that carries the meat’s savory depth. The broth should be low‑sodium to allow you to control the salt level, while the wine adds a subtle acidity that brightens the dish. If you’re a fan of a richer, sweeter profile, consider substituting the red wine with a splash of balsamic vinegar; the result will be a slightly caramelized undertone. The broth’s quality directly affects the final flavor, so choose a brand or homemade stock that you would serve on its own. Skipping this step would leave the beef tips feeling flat and unremarkable.
The Texture Crew
Cornstarch slurry and flour are the unsung heroes that transform a watery stew into a glossy, clingy sauce. The slurry, made by mixing cornstarch with cold water, ensures that the thickening agent doesn’t clump when added to hot liquid. Flour, on the other hand, is used during the searing stage to help develop a caramelized crust. If you’re avoiding gluten, replace the flour with a gluten‑free blend or simply omit it; the dish will still be delicious, though the crust may be slightly lighter. Neglecting the thickening step will result in a soupy consistency that doesn’t coat the beef.
The Unexpected Star
Brown sugar and Worcestershire sauce may sound like an odd pairing, but together they create a sweet‑savory balance that enhances the meat’s natural flavors. Brown sugar caramelizes during the searing process, giving the sauce a subtle caramel note that lingers on the palate. Worcestershire adds depth through its fermented, umami‑rich profile. If you’re watching sodium, opt for a low‑sodium Worcestershire or reduce the quantity by half; the dish will still retain its complexity. Removing either ingredient will diminish the sauce’s richness and make the beef tips feel under‑seasoned.
The Final Flourish
Fresh parsley and a squeeze of lemon juice finish the dish with a burst of brightness that cuts through the richness. The parsley adds a herbaceous aroma and a pop of color, while lemon juice lifts the overall flavor profile. If you’re allergic to citrus, replace lemon with a splash of apple cider vinegar; it provides a similar acidic lift. Skipping the garnish might make the dish look bland, but the core flavors will still dominate. The final flourish is optional, but it’s the finishing touch that turns a good meal into a memorable one.
Everything's prepped? Good. Let's get into the real action. I’ll walk you through each step, so you can follow along without any guesswork. The process is simple, but the results are extraordinary.
The Method — Step by Step
- Prep the Beef: Pat the beef tips dry with paper towels to ensure a good sear. Season generously with salt and pepper. The dryness is key; it helps form that caramelized crust that locks in juices. I’ve seen the difference in texture between a seared and a steamed tip—trust me, you’ll taste it.
- Heat the Oil: In a large skillet, heat the olive oil over medium‑high heat until it shimmers. Add the beef in batches, leaving space so each tip gets a chance to brown. Don’t crowd the pan; overcrowding releases moisture and prevents searing. Flip once to brown all sides, then transfer to the slow cooker.
- Sauté the Aromatics: In the same skillet, reduce heat to medium, add a splash of oil if needed, and toss in the diced onion and minced garlic. Cook until the onion becomes translucent, about 3 minutes, stirring frequently. The aroma that rises will set the mood for the rest of the dish. I swear, that scent alone can calm a chaotic kitchen.
- Add the Veggies: Stir in the sliced carrots and celery, letting them mingle with the onions for a minute. They’ll soften slightly and absorb the savory base. If you prefer a chunkier texture, add them earlier; if you want a smoother sauce, add them later.
- Combine Liquids: Pour in the beef broth, red wine, Worcestershire, soy sauce, and tomato paste. Stir until the paste dissolves completely, forming a cohesive mixture. The mixture should look glossy and slightly thickened; this is the sauce’s foundation.
- Layer in the Beef: Return the seared beef tips to the skillet, ensuring they’re submerged in the liquid. Add the bay leaf and dried thyme, then transfer everything to the slow cooker. The slow cooker’s gentle heat will break down the collagen without over‑cooking the meat.
- Cook: Set the slow cooker to low for 6–7 hours or high for 3–4 hours. The ideal temperature is around 185°F, which allows the beef to become fall‑apart tender. The sauce will thicken as the broth reduces, creating a rich glaze.
- Thicken the Sauce: Once the cooking time is up, remove the bay leaf. In a small bowl, whisk together cornstarch and cold water to create a slurry. Stir the slurry into the slow cooker, then let it cook for an additional 10 minutes on high. The sauce should coat the beef tips like velvet, not drip off.
- Finish: Taste the sauce and adjust seasoning with salt or pepper if needed. Stir in chopped parsley for a burst of color and freshness. If you like a little zing, squeeze a lemon wedge over the top before serving. Plate the beef tips over mashed potatoes or rice, drizzle with sauce, and enjoy.
That's it — you did it. But hold on, I've got a few more tricks that'll take this to another level. Each of these insider tips is based on real kitchen experiments and will help you avoid common pitfalls.
Insider Tricks for Flawless Results
The Temperature Rule Nobody Follows
Many people think any low heat will do, but the ideal range is 185°F. If the temperature dips below 170°F, the beef tips will take longer to break down, resulting in a chewier texture. Conversely, going above 200°F can dry the meat out. Use a thermometer to monitor the slow cooker’s internal temperature if possible.
Why Your Nose Knows Best
The aroma that rises during the searing phase is a reliable indicator of progress. A sweet, caramelized scent means the sugars are reacting, while a sharp, metallic smell suggests you’re over‑cooking. Trust your nose; it’s the ultimate flavor sensor. I’ve lost a few dishes to a burnt aroma, but that’s a lesson learned the hard way.
The 5-Minute Rest That Changes Everything
After you remove the beef from the slow cooker, let it rest for five minutes before slicing. This allows the juices to redistribute, ensuring each bite is succulent. A friend once tried cutting straight away and got a dry, uneven texture. The rest step is simple but crucial.
The Right Amount of Salt
Start with a modest amount of salt during searing, then taste before adding more. The broth and sauces are already salty, so over‑salting will make the dish cloying. A pinch of salt after the sauce thickens balances the flavors without overpowering them.
The Secret of a Thick, Glazing Sauce
The cornstarch slurry should be added at the very end, after the slow cooker has finished. Adding it too early can cause the sauce to become gummy. Whisk the slurry vigorously to avoid lumps, and stir constantly during the final 10 minutes of cooking. The result is a silky coating that clings to the beef tips.
Creative Twists and Variations
This recipe is a playground. Here are some of my favorite ways to switch things up:
Spicy Thai Twist
Add a tablespoon of Thai red curry paste during the aromatics step and finish with a splash of coconut milk. The result is a creamy, fiery sauce that pairs beautifully with jasmine rice.
Herb‑Infused Mediterranean
Replace the thyme with oregano and add chopped sun‑dried tomatoes. Garnish with fresh basil for a Mediterranean flair that’s both bright and savory.
Sweet & Smoky BBQ
Swap the Worcestershire sauce for a smoky BBQ sauce and add a pinch of smoked paprika. The beef tips will develop a sweet, smoky glaze that’s perfect over corn on the cob.
Low‑Carb Version
Omit the flour used for searing and replace the cornstarch with xanthan gum. Serve over cauliflower rice to keep the dish keto‑friendly.
Vegan Adaptation
Use seitan or tofu cubes in place of beef tips. Keep the same sauce for a hearty plant‑based meal that satisfies even the most carnivorous palates.
Breakfast Kick‑Starter
Serve the beef tips over a bed of sautéed spinach and a fried egg for a protein‑rich breakfast that will keep you fueled all day.
Storing and Bringing It Back to Life
Fridge Storage
Cool the beef tips completely, then transfer them to an airtight container. Store in the refrigerator for up to 4 days. When reheating, add a splash of beef broth to keep the sauce moist.
Freezer Friendly
Divide the dish into portions and freeze in freezer‑safe containers. The beef will keep for up to 3 months. Thaw overnight in the fridge before reheating.
Best Reheating Method
Reheat on low heat in a saucepan, stirring occasionally. Add a tiny splash of water or broth to revive the sauce’s silkiness. This method prevents the meat from drying out and preserves the flavor.