I remember the night I almost ruined a dessert for a dinner party—my attempt at a classic tiramisu ended up looking like a soggy, coffee‑laden mess that made everyone stare in disbelief. I was standing in my kitchen, staring at a bowl of vanilla ice cream that had turned into a sticky, cold slab, while the espresso I’d brewed for the coffee liqueur had cooled into a bitter pool. My friends laughed, but I was determined to turn that flop into a triumph. That’s when I decided to layer ice cream, biscuits, and espresso into a cake that would make even the most skeptical taste buds swoon.
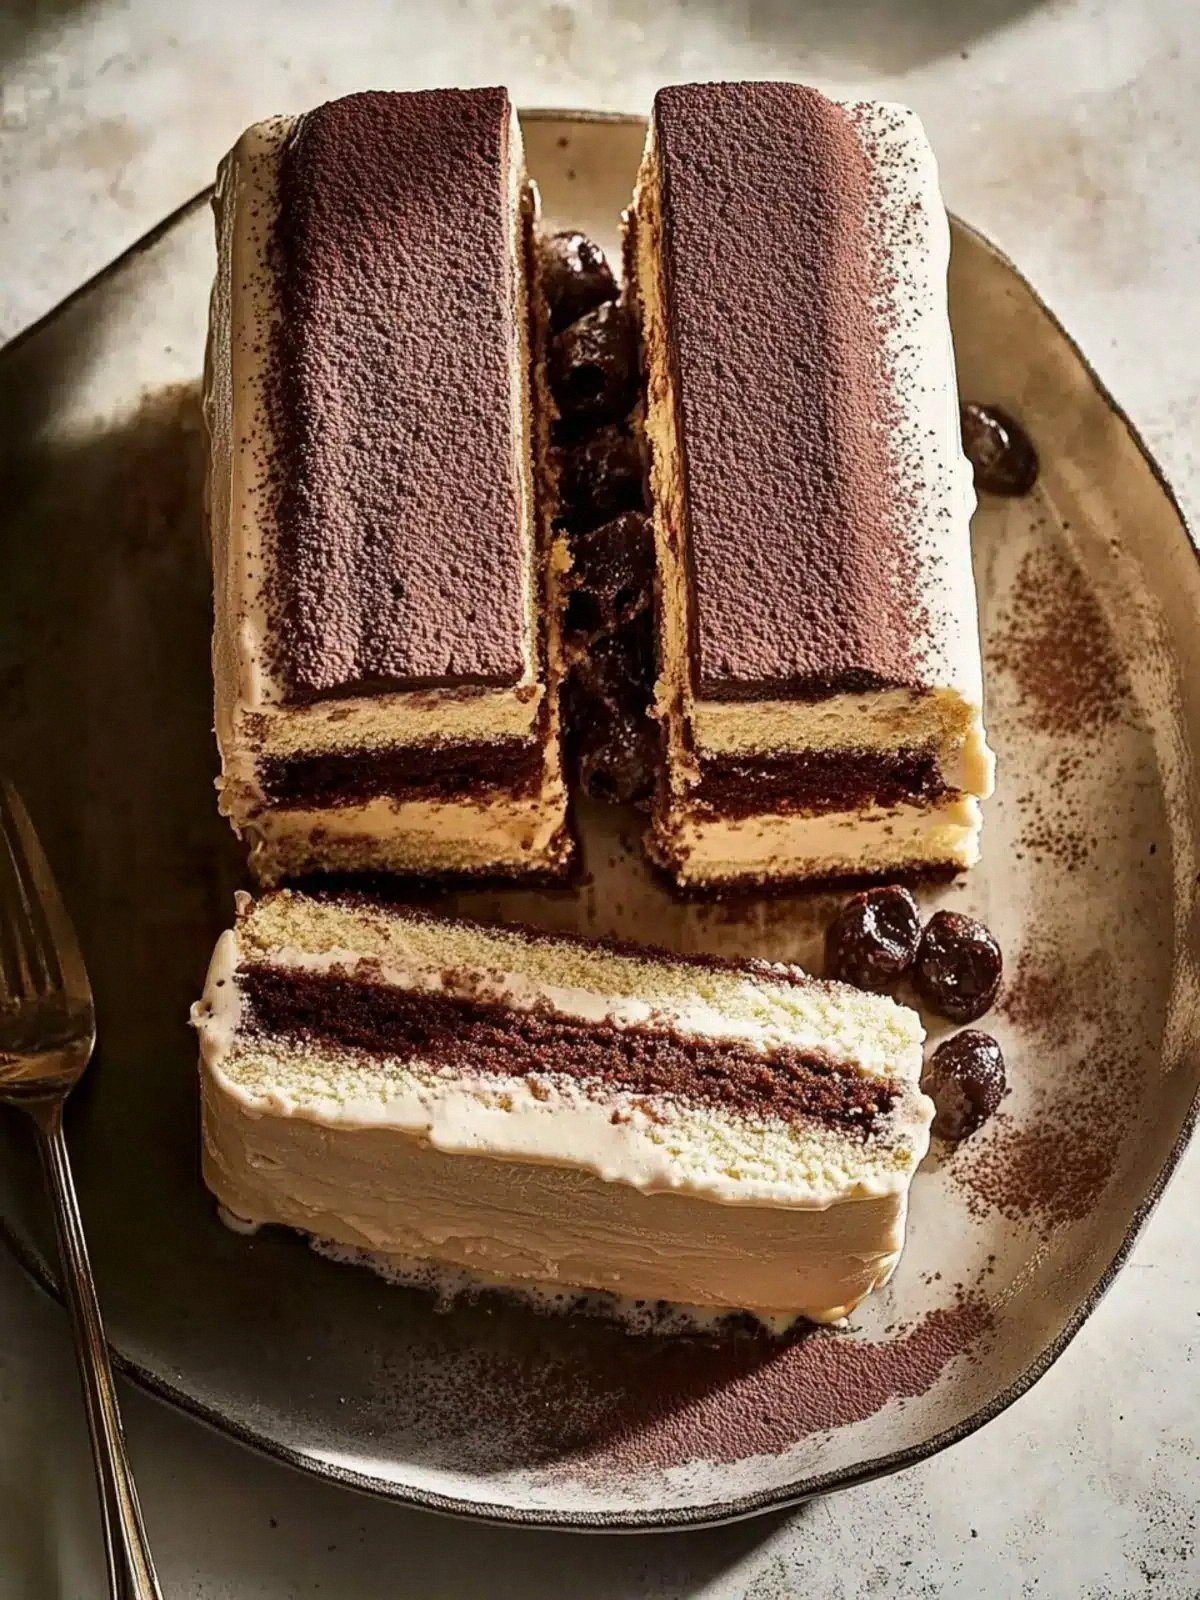
Picture the moment when the first spoonful hits your tongue: the vanilla ice cream’s creamy sweetness cuts through the bold espresso, while the soaked biscuits add a subtle, airy crunch that feels like a whisper of Italian café culture. The aroma is a heady mix of roasted beans, sweet cream, and a hint of coffee liqueur that seems to hover in the air like a fine perfume. The texture is a paradox—soft, cold, yet with a satisfying bite from the biscuits that shatter like thin ice under your teeth. And the color? A beautiful, muted brown with a glossy cocoa dusting that invites you to dig deeper.
What makes this version stand out is that I didn’t just layer ice cream and biscuits; I engineered a flavor profile that balances richness with brightness, sweetness with bitterness, and cold with a hint of warmth from the espresso. I dared you to taste this and not go back for seconds. I’ve tested countless variations, and this one is hands down the best version you’ll ever make at home. If you’ve ever struggled with a tiramisu that feels too dry or too sweet, you’re not alone—and I’ve got the fix.
Let me walk you through every single step—by the end, you’ll wonder how you ever made it any other way. From the first stir of the coffee liqueur to the final dusting of cocoa, each element is designed to work in harmony. I’ll show you how to use store‑bought ice cream to save time, how to soak biscuits just enough to keep them tender, and how to freeze the layers without cracking. And trust me, the end result is a cake that looks as stunning as it tastes, with a texture that’s both velvety and crisp.
What Makes This Version Stand Out
- Taste: The blend of vanilla and coffee ice creams creates a dual‑layered flavor that dances on the palate, while the espresso adds depth and a subtle bitterness that balances the sweetness.
- Texture: The biscuits soak just enough to soften, yet retain a slight crunch that provides a delightful contrast to the creamy ice cream.
- Time Efficiency: Using store‑bought ice cream eliminates the need for a custard base, cutting prep time by half.
- Visual Appeal: The glossy cocoa dusting and the layered look make this cake Instagram‑worthy and perfect for special occasions.
- Make‑Ahead Friendly: Assemble the layers a day early and freeze; the cake will maintain its structure and flavors.
- Ingredient Quality: The coffee liqueur and espresso are high‑quality, ensuring a robust flavor that stands up to the ice cream.
- Versatility: Swap the vanilla ice cream for chocolate or matcha for a different twist.
- Audience Impact: Guests leave with a memorable dessert that feels luxurious yet approachable.
Inside the Ingredient List
The Flavor Base
The vanilla ice cream is the sweet anchor of this cake, providing a smooth, creamy backdrop that lets the coffee flavors shine. It’s essential to choose a vanilla ice cream with real vanilla beans or a high-quality vanilla extract to avoid a flat, artificial taste. If you skip the vanilla ice cream, the dessert loses its mellow sweetness and feels overwhelmingly bitter.
A good rule of thumb: let the ice cream sit at room temperature for 10 minutes before layering to soften it slightly—this makes scooping easier and ensures a uniform texture.
The Texture Crew
The 12 sponge finger biscuits (also known as savoiardi) are the crunchy counterpoint to the creamy layers. They are light, airy, and absorb coffee without becoming mushy. If you don’t have savoiardi, you can use ladyfingers or even thin sponge cake slices.
The biscuits should be soaked in a mixture of espresso and coffee liqueur; the ratio is key: 60 ml espresso to 60 ml liqueur. Too much liqueur can make the biscuits soggy, while too little may leave them dry and unflavored.
The Unexpected Star
Dutch cocoa isn’t just a garnish—it’s a flavor enhancer that adds depth and a slightly bitter undertone that balances the sweetness. Dusting it lightly over each layer before freezing creates a subtle, chocolatey aroma that lingers on the palate.
If you’re allergic to cocoa or prefer a different flavor, you can substitute it with finely grated dark chocolate or a sprinkle of espresso powder for a more intense coffee note.
The Final Flourish
The coffee liqueur (60 ml) is the secret sauce that brings everything together. It adds a warm, caramelized sweetness that complements the espresso’s bitterness and the vanilla’s creaminess. The liqueur also helps bind the layers, ensuring the cake holds its shape during freezing.
When selecting a coffee liqueur, choose one with a smooth finish and a subtle vanilla undertone. A higher alcohol content can make the cake taste sharp; aim for around 15–20% ABV.
Everything's prepped? Good. Let's get into the real action.
The Method — Step by Step
- In a shallow dish, combine the 60 ml espresso and 60 ml coffee liqueur. Stir until the liqueur dissolves fully, creating a silky liquid that’s ready to soak the biscuits. This mixture should feel like a smooth, coffee‑laden syrup.
- Place the 12 savoiardi biscuits in the liquid, ensuring each piece is fully submerged. Let them soak for exactly 30 seconds—long enough to absorb flavor, short enough to keep them firm. Shake off excess liquid before moving to the next step.
- Line a 9‑inch springform pan with parchment paper, then arrange a layer of soaked biscuits, covering the base. The biscuits should sit snugly, forming a solid foundation for the ice cream.
- Scoop 250 ml of vanilla ice cream onto the biscuit layer, spreading it evenly with a spatula. The ice cream should be slightly softened so it lays flat but still retains its shape.
- Dust the top of the vanilla layer with 15 ml Dutch cocoa, creating a subtle chocolate border. This not only adds flavor but also prevents the next biscuit layer from sticking.
- Repeat steps 3–5 with the remaining biscuits and 250 ml of coffee ice cream. The coffee ice cream should be scooped gently to maintain its creamy texture.
- Dust the final coffee ice cream layer with the remaining 15 ml Dutch cocoa. Press lightly to ensure the cocoa adheres and forms a cohesive top.
- Cover the pan with plastic wrap and place it in the freezer for at least 4 hours, or overnight, until the layers are firm and the cake holds its shape.
- Once frozen, remove the cake from the pan and let it sit at room temperature for 5 minutes to soften slightly before slicing. This short rest allows the flavors to meld together.
- Serve immediately with a drizzle of coffee liqueur or a dusting of cocoa powder for an extra touch of decadence. Enjoy the creamy, crunchy, coffee‑laden symphony that will leave everyone asking for seconds.
That's it — you did it. But hold on, I've got a few more tricks that'll take this to another level.
Insider Tricks for Flawless Results
The Temperature Rule Nobody Follows
The key to a perfect cake is keeping everything at the right temperature. The biscuits should be at room temperature before soaking; if they're too cold, they'll crumble. Likewise, the ice cream must be slightly softened before scooping to avoid a hard, uneven layer. This small temperature tweak saves you from a lumpy, disappointing dessert.
Why Your Nose Knows Best
During the freezing process, pause every hour and sniff the cake. A faint, coffee‑rich scent indicates the layers are bonding properly. If the aroma is flat, give it an extra 30 minutes; the flavors need time to meld.
The 5-Minute Rest That Changes Everything
After removing the cake from the freezer, let it rest for 5 minutes at room temperature. This brief period allows the ice cream to soften slightly, making slicing easier and revealing the beautiful layers. Skipping this step results in jagged cuts that look messy.
Layer Order Matters
Always place the vanilla layer first, followed by coffee ice cream. This order prevents the coffee from soaking into the vanilla layer and ensures a clean, distinct flavor transition. If you reverse the layers, the vanilla gets a bitter aftertaste.
Dusting Technique
When dusting cocoa, use a fine mesh sieve to avoid clumps. A light, even coat enhances the visual appeal and prevents the cocoa from clinging to the ice cream during freezing. This simple trick keeps the surface smooth.
Freezer Placement
Place the cake on a flat surface in the freezer, not on the door or in a corner. This ensures even freezing and prevents the cake from warping. If you notice the cake bulging, rotate it halfway through the freezing time.
Using a Springform Pan
A springform pan allows the cake to be removed cleanly without damaging the layers. If you use a regular dish, the cake may stick to the sides, ruining the presentation. The removable ring also makes slicing easier.
Adding a Splash of Water Before Reheating
If you need to reheat the cake, add a splash of water to the ice cream before warming it slightly. This steams the ice cream back to a creamy consistency without melting it. The result is a warm, comforting dessert that still feels like a treat.
Creative Twists and Variations
This recipe is a playground. Here are some of my favorite ways to switch things up:
Nutty Espresso Cake
Swap the vanilla ice cream for almond‑flavored ice cream and sprinkle chopped toasted almonds between biscuit layers. The nutty undertone pairs beautifully with the coffee, creating a dessert that feels like a crunchy espresso bar.
Chocolate‑Lemon Fusion
Use chocolate ice cream instead of vanilla and zest a lemon into the espresso mixture. The citrus brightens the chocolate, giving the cake a refreshing twist that’s perfect for spring.
Spiced Caramel Delight
Add a pinch of cinnamon and a drizzle of caramel sauce to the espresso soak. The warm spices and sweet caramel create a dessert that feels like a cozy winter treat.
Berry‑Infused Surprise
Muddle fresh raspberries into the coffee liqueur before soaking the biscuits. The berry flavor cuts through the richness, offering a tart, fruity counterpoint.
Malt‑Coffee Extravaganza
Replace the coffee liqueur with a malted milkshake. The malt adds a subtle sweetness and depth, making the cake feel like a decadent milkshake cake.
Minty Fresh Twist
Infuse the coffee liqueur with a few mint leaves before soaking the biscuits. The mint gives the dessert a refreshing aftertaste, ideal for a summer gathering.
Almond Joy Variation
Layer coconut‑flavored ice cream between the biscuits and dust the top with shredded coconut. The tropical flavor profile turns the cake into a beach‑inspired treat.
Gourmet Espresso Layer
Use a high‑grade espresso and a splash of espresso‑flavored liqueur for an ultra‑rich finish. The intensified coffee notes will impress even the most discerning coffee lovers.
Storing and Bringing It Back to Life
Fridge Storage
Once the cake has fully frozen, transfer it to a refrigerator for up to 3 days. Store it in an airtight container or cover it with plastic wrap to prevent freezer burn. Before serving, let it sit at room temperature for 5 minutes to soften slightly.
Freezer Friendly
For longer storage, keep the cake in the freezer for up to 2 weeks. Wrap it tightly in freezer paper and place it in a zip‑lock bag. The double protection prevents ice crystals from forming.
Best Reheating Method
If you’re craving a warm dessert, microwave the cake in short bursts of 10 seconds, then stir. Add a splash of water to the ice cream before microwaving to keep it creamy. Let it rest for 30 seconds before slicing.
Refrigerated Slice
When slicing, use a warm, sharp knife to cut cleanly through the layers. Warm the knife in hot water and dry it before slicing to avoid smearing the ice cream.
Serving Suggestion
Serve each slice with a drizzle of espresso liqueur and a dusting of cocoa powder. A small scoop of vanilla ice cream on the side adds a creamy contrast that enhances the overall experience.